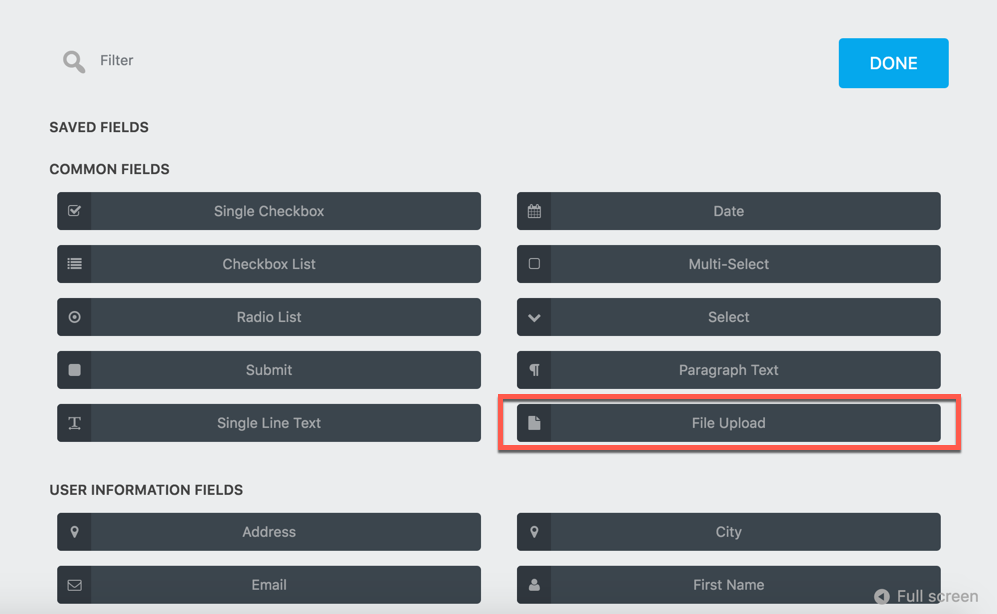
A File Uploads field can be added to the form by clicking on the Add Field Button on the bottom right, then choosing the File Upload field from the list.
Configuring your File Upload field
Click on the File Upload field to open its settings window.
General Settings
Label
The name of the field as displayed to your users.
Required Field
If enabled, this field must be completed before the form can be submitted.
Save to Server
Enabled by default, this option will save an uploaded file to your server when the form is submitted.
Rename Uploaded File
If you want the file to retain the name your user gave it, leave this blank. If you prefer your own naming convention, you can enter it here using the merge tag button.
There is a {file:extension} merge tag, but that doesn’t have to be added to the end of the setting as it will be added automatically.
The {file:name} and {file:extension} merge tags are only used the field settings and can’t be used in actions or other places. You can also create directories using / in the name.
The old style “shortcodes” are still supported for renaming and can be mixed with merge tags. These shortcodes can be found in the expandable section immediately below:
%filename% – The file’s original filename, with any special characters removed. %formtitle% – The title of the current form, with any special characters removed. %username% – The WordPress username for the user, if they are logged in. %userid% – The WordPress ID (int) for the user, if they are logged in. %displayname% – The WordPress displayname for the user, if they are logged in. %lastname% – The WordPress lastname for the user, if they are logged in. %firstname% – The WordPress firstname for the user, if they are logged in. %date% – Today’s date in yyyy-mm-dd format. %month% – Today’s month in mm format. %day% – Today’s day in dd format. %year% – Today’s year in yyyy format.
Save to Media Library
If this setting is enabled, the File Upload will be saved to the server’s Media Library.
You can retrieve data about the attachment created in the media library using the following merge tags:
{field:my_field_key:attachment_id} – the ID of the attachment {field:my_field_key:attachment_url} – the URL of the attachment {field:my_field_key:attachment_embed} – an HTML image of the attachment
Restrictions Settings
File Limit
Use this option to adjust the number of files that be uploaded from this File Upload field.
Maximum File Size
Set the maximum size of the file that can be uploaded here. This setting defaults to MB. Your server also likely has a maximum file size limit, so if you set something here and users still cannot upload files of that size, contact your host to have the server file size limit increased.
Minimum File Size
Set the minimum size of the file that can be uploaded here. This setting defaults to MB
Allowed File Types
This setting creates a allowlist of the types of files that can be uploaded by file extension (i.e. .pdf, .jpg, .png, .xls, etc). With data entered into this setting, users will be able to upload files of that type only.
Display Settings
Description
Any text entered here will appear between the label and the field.
Select File Button Text
By default, the text that appears on the File Uploads button when viewing the form will read “Select Files”. That can be changed to whatever you like here.
To see these features, you will need to enable Developer Mode in Ninja Forms’ settings.
Display Settings
Custom Class Names
Container: Text entered here applies a custom HTML class to this field’s wrapper
Element: Text entered here applies a custom HTML class to this field’s element
Help Text
Entering text here will display an informational icon next to the field label. When a user hovers over it, a small window will appear containing this text.
Advanced Settings
Label Position
Changes the orientation of the field label relative to the field element (above, below, left, right, hidden)
Administration Settings
Field Key
A unique programmatic key that can be used to identify and target your field for custom development. One is generated for each field automatically, and this is what you see pre-populated in the setting. It can be changed, though doing so will not update it in anything you’ve already written.
This can be accomplished in two ways, the first method via merge tag, which will then create a link to the file(s) uploaded in the received email.
Sending a download link with the email
From the Emails and Actions tab, edit the email action by clicking on the action’s gear symbol. From here, click the merge tag button located in the Email Message line, shown below. 2. Add in the File Uploads merge tag to the Email Message body by simply clicking on it. Should your list show many merge tags, and you have trouble locating the correct tag, take advantage of the merge tag search bar and type File Uploads to locate the appropriate tag.
File Upload merge tag modifiers (:plain, :link, :embed, :url, :filename) do not populate when Save to Server is disabled in File Upload field. Ensure that Save to Server is enabled, should you wish to use these.
Attaching the file(s) to the email
The second method will attach the file(s) itself to the email itself.
From the Emails and Actions tab, edit the email action by clicking on the action’s gear symbol.
From the pull out drawer, scroll down to the Advanced tab and click to drop down.
Then activate (click) the Attach File Uploads toggle.
Saving uploaded files to Dropbox, Google Drive, or Amazon S3
This process requires 2 steps: 1) adjusting plugin settings and 2) adjusting form settings
1. Set up your plugin settings to send uploaded files to an external service
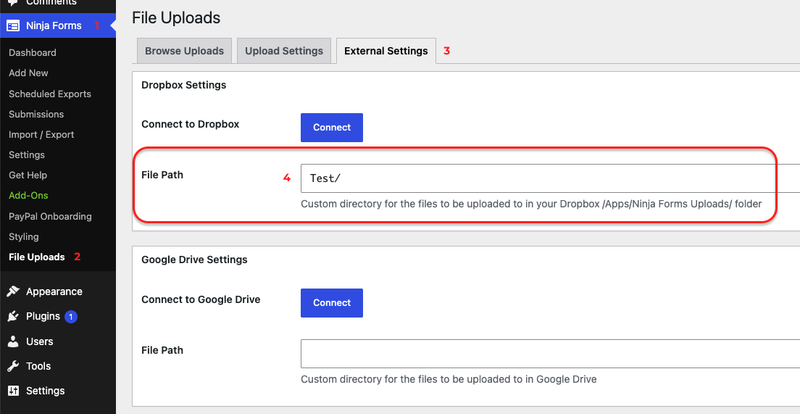
To connect Ninja Forms to Dropbox, go to Ninja Forms › File Uploads › External Settings tab and click on the Connect button
Dropbox will create a default directory of Apps/Ninja Forms Uploads within your Dropbox account. While this cannot be changed, you can use the File Path setting here to define a custom directory within that file path for this upload field.
Choosing where uploaded files are saved
Use the File Path setting to choose the folder your uploaded files are saved to in Dropbox. This is a global setting, so it applies to all forms that send uploads to that service.
Go to Ninja Forms › File Uploads.
Click the External Settings tab.
Find the settings box for your service (Dropbox).
In the File Path field, enter the name of the folder you want files saved to, followed by a forward slash. For example: Test/
Click Save.
Good to know: Files are always saved inside /Apps/Ninja Forms Uploads/ . Your File Path creates a folder inside that one. For example, Test/ saves files to Apps/Ninja Forms Uploads/Test/.
Open the IAM console within your Amazon S3 account
In the navigation pane, choose Users. Then choose your IAM user name.
Choose the Security Credentials tab and then choose Create Access Key.
If your bucket is set as private you will need to add this code snippet to an mu-plugin file, eg. wp-content/mu-plugins/ninja-forms.php (the mu-plugin directory might need to be created if it doesn’t exist):
<?php
add_filter( 'ninja_forms_uploads_s3_acl', function () {
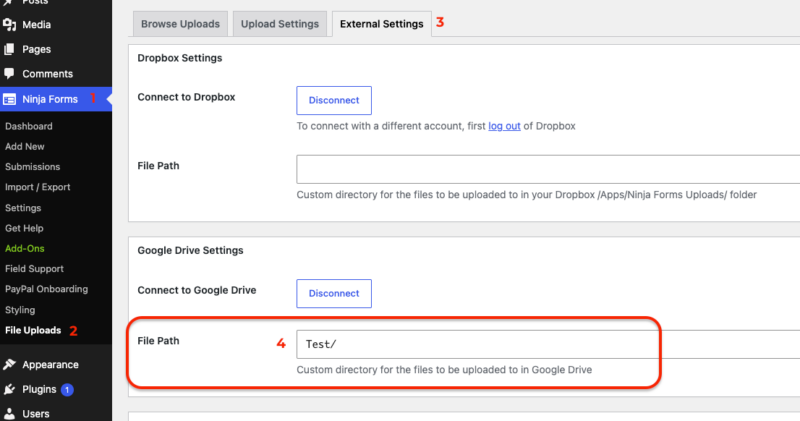
To connect Ninja Forms to Google Drive, go to Ninja Forms › File Uploads › External Settings tab and click on the Connect button in the ‘Google Drive Settings’ box.
Name the folder you want your file uploads to be stored in using the File Path setting. Whatever you type here will be the name of the folder in Drive. If you leave this setting blank, files will go straight to your general My Drive area and will not be placed in a folder.
Choosing where uploaded files are saved
Use the File Path setting to choose the folder your uploaded files are saved to in Google Drive. This is a global setting, so it applies to all forms that send uploads to that service.
Go to Ninja Forms › File Uploads.
Click the External Settings tab.
Find the settings box for your service (Google Drive).
In the File Path field, enter the name of the folder you want files saved to, followed by a forward slash. For example: Test/
Click Save.
Good to know:
Your File Path is the folder name in Drive. If you leave it blank, files are saved to the main My Drive area, not in a folder. For subfolders, to save into a folder within a folder, separate the names with a slash. For example: Clients/Resumes/
2. Set up your form to send uploaded files to an external service
Now that you have your plugin configured to send to either Dropbox or Amazon S3 (step 1), you need to add and configure an External File Upload action on the form itself. Open your form and navigate to the Emails & Actions tab, then click the blue circle/+ in the bottom right corner to add a new action.
Under the External File Upload Action, you can choose the service you would like the files from your form to save to.
Access these settings in your WordPress dashboard under Ninja Forms > File Uploads.
Browser Uploads
This tab allows you to view or delete all uploaded files that have been saved to your server. You can sort by form or by date.
Upload Settings
Max File Size (in MB) – The Max File Upload size allowed per form.
File upload error message – The Error Message that the user receives when the Max File Size is met.
Custom Directory – Is used to create dynamic directories.
If you migrate from another server and the File Uploads path is pointing to the older server location, you can deactivate then reactivate your File Uploads and Ninja Forms plugins to reset the file path.
Advanced Functionality
Please note that modifying your add-on with custom code is outside the scope of support that we are able to provide. However, this section provides solutions to highly specific use cases of File Uploads that may come in handy if you find yourself needing them!
Are there any performance hits that your website will take when uploading large files?
The upload still passes through web server first. That means hosting’s PHP limits (upload_max_filesize, post_max_size), server timeouts, and internet upload speed all still matter. If those are set high enough and internet connection is stable, you shouldn’t run into issues.
Recommended Settings for Large Files:
upload_max_filesize = 512M
post_max_size = 512M
max_execution_time = 300
memory_limit = 512M
Sending a direct link to the public URL of a file uploaded to External Services
To enable a direct link to the public URL for the uploaded file on Dropbox, Google Drive, or Amazon S3, turn on ‘Use Public URL’ setting in Ninja Forms > File Uploads > External Settings
Allowing file types in File Uploads that are not normally allowed by WordPress
For security purposes, File Uploads only allows the upload of file types that WordPress allows. However, this list of file types can be amended with the 'ninja_forms_upload_mime_types_whitelist' filter.
Add to functions.php
add_filter( 'ninja_forms_upload_mime_types_whitelist', 'my_ninja_forms_upload_mime_types_whitelist' );functionmy_ninja_forms_upload_mime_types_whitelist( $types ) {//Add extensions in the following format below: $types['extension'] = 'mime type';$types['abc'] ='application/octet-stream';$types['xyz'] ='application/octet-stream';return$types;}
If this happens, please ask your hosting company to enable the PHP multibyte (mbstring) extension on your account and this will clear up this issue for you.
Our plugins do not use the multibyte extension at all; however, the libraries we use to connect to Google, Amazon, and Dropbox have a backup solution for servers without the extension. WordPress also has its own backup solution. These two conflict and that conflict produces the error. By using the standard PHP extension on your site that requires it, you will avoid this conflict completely and use the most up-to-date functionality.