The Zoho CRM add-on needs to be installed and activated to see the features mentioned in this documentation.
Introduction to Features
The Zoho CRM extension for Ninja Forms enables you to send your form submission data directly into your Zoho CRM account. Supported modules are:
- Contacts
- Leads
- Accounts
- Potentials
- Notes
- Tasks
In addition to this impressive list of modules, your contacts will automatically be linked with the Account, Potential, Task, and Note. If you create a Lead, it will be linked to the Note and Task.
Custom Fields you create in Zoho are also available for use.
Connecting Ninja Forms to Zoho
Zoho’s new API v2 uses the Open Authorization protocol. In this method, you will first create in Zoho a “connected app,” the details of which you enter into your WordPress dashboard settings. Secondly, in WordPress, you’ll click a link we provide that requests access to your Zoho account from WordPress. The final step is for you to approve this access while you are logged into Zoho.
In Ninja Forms, you will need to enter the three values, Client ID, Client Secret, and Authorization Code into the text boxes on the Ninja Forms Zoho CRM Settings section and save the options.
The complete instructions from Zoho on how to generate your Open Auth credentials can be found at this link:
https://www.zoho.com/crm/help/api/v2/#oauth-request
What follows here is a quick start tutorial.
- Visit https://accounts.zoho.com/developerconsole
- Click “Add Client”
- Select “Self Client”
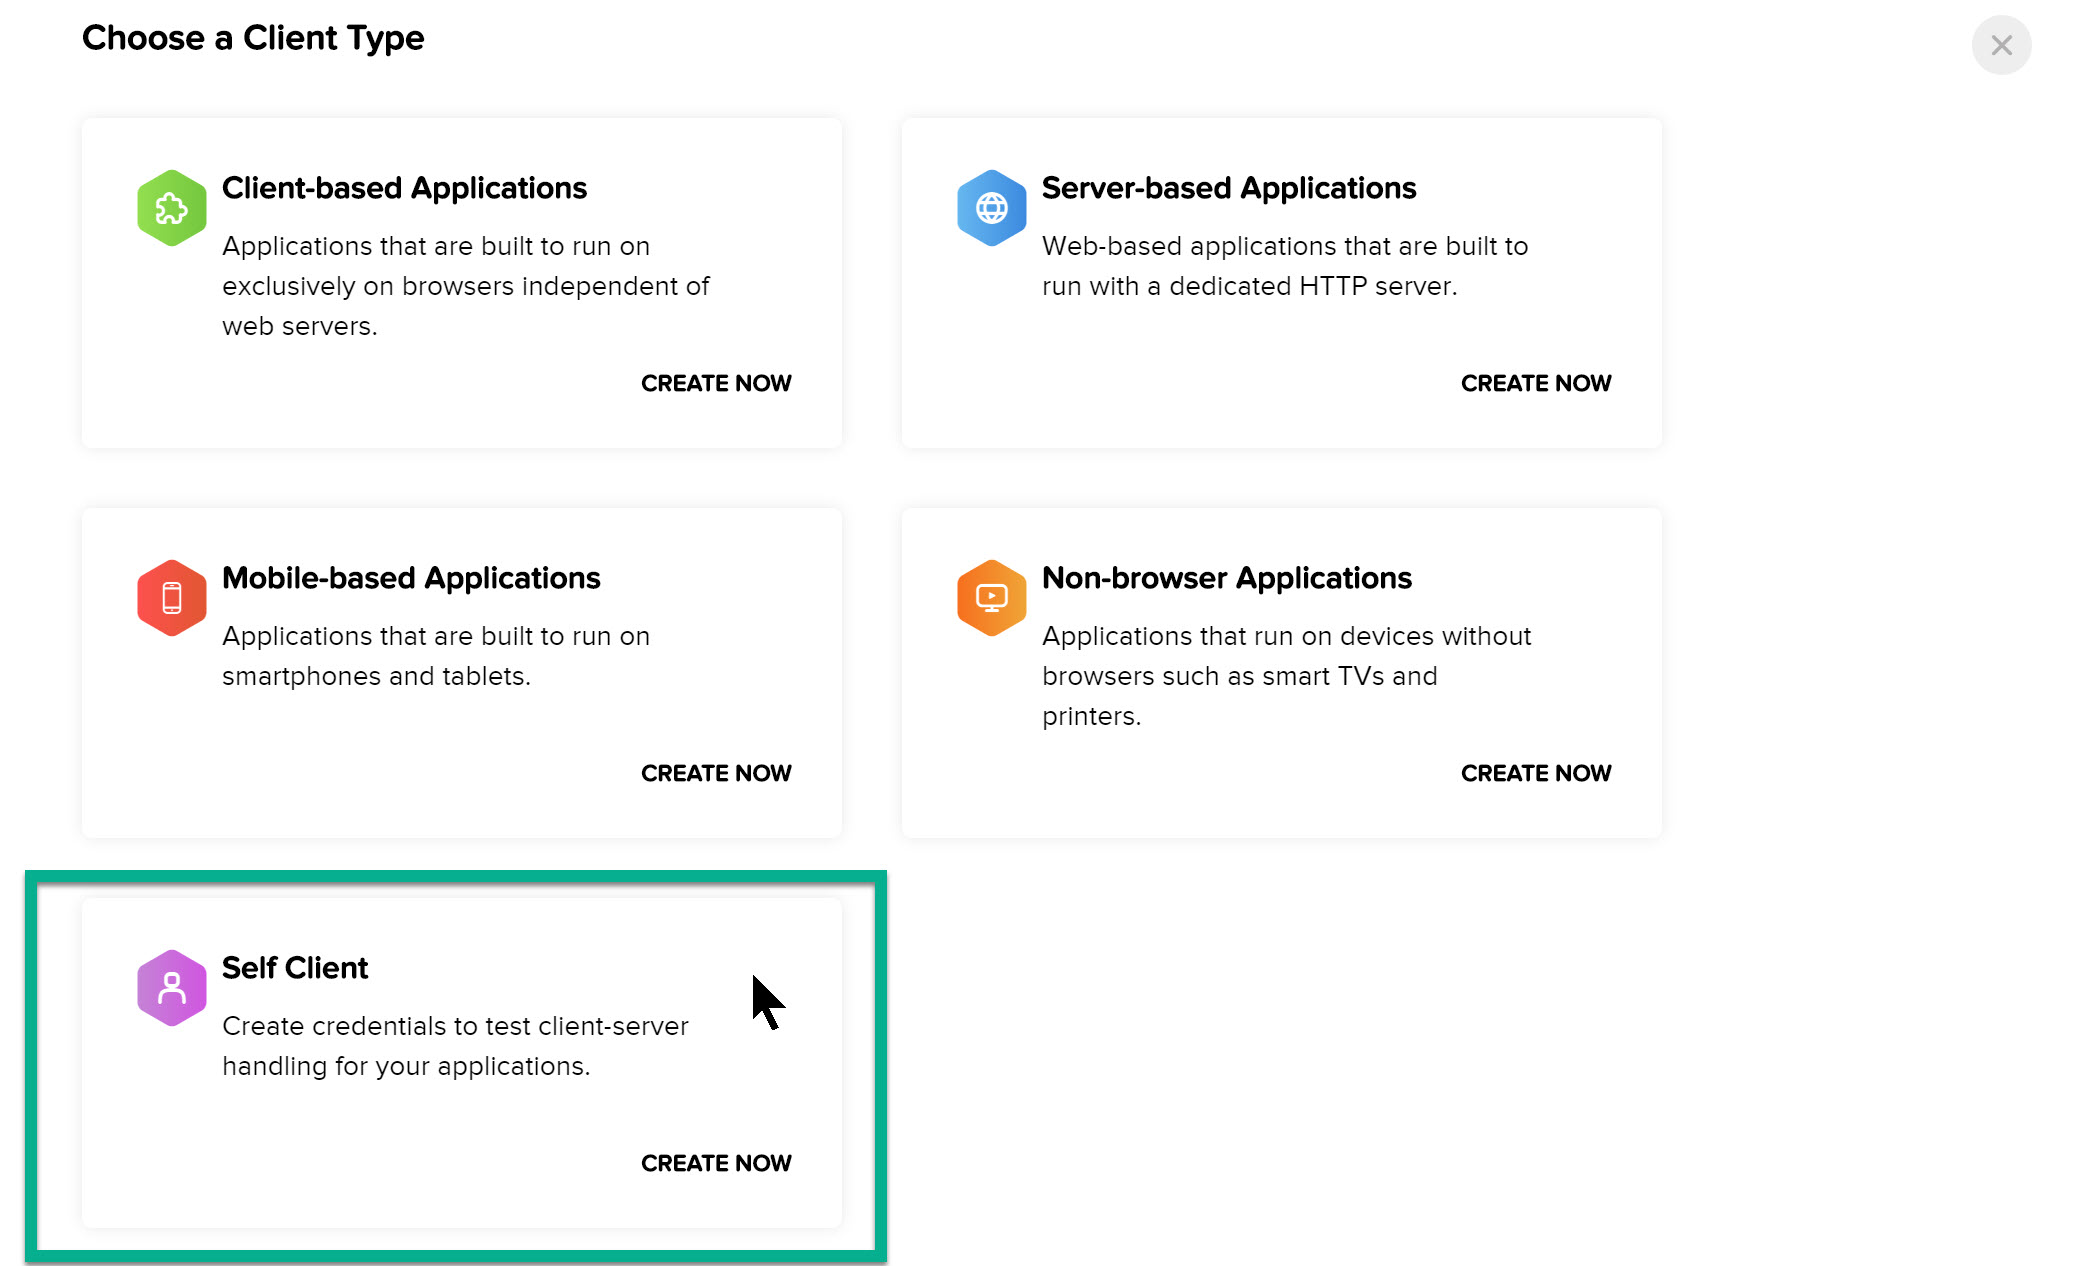
4. You will be presented with a Client ID and Client Secret; copy and paste these values into the Zoho CRM section of the Ninja Forms Settings page.

5. Back in the Zoho Developer Console for the Self Client settings, click the “Generate Code” tab.
6. Set the “Scope” to ZohoCRM.modules.all
7. Set the “Scope Description” to Ninja Forms

8. Click “Create”
9. In the window that appears, copy the generated code.

10. Paste this code in the Authorization Code text box in the Zoho CRM section of the Ninja Forms Settings page.

11. Click Save Options
12. Click to test your Zoho connection; you should now be fully connected
European Union, Australian, China, and Indian Customers
You will need to add the following endpoints to the Advanced Commands field:
- European Union: eu_endpoint
- Australia: au_endpoint
- China: cn_endpoint
- India: in_endpoint
If you are getting an authorization error, please add one of the endpoints listed above to the Advanced Commands field, save your options, and test again. See the Advanced Commands section for more information.
Note: Only the regions listed above are currently supported. Support for additional regions may be added in future updates.
Mapping Form Fields to Zoho
Field mapping is the process of connecting specific fields on your Ninja Form to the CRM field where you’d like the submitted field data to go. It is best for you to have your Ninja Form already built prior to starting this step. Of course, as you add or modify fields on your form, you always have the opportunity to modify your field maps.
To map fields, go to the Emails & Actions section of your form design, click the “+” to add a new action, and select the “Add to Zoho CRM” action. You will then see the Add to Zoho Field Mapper, as shown in the image.

To make it easier to read, click the “Full Screen” link in the bottom right corner of your screen.
For each field to map:
- In the “Zoho Field Map” box, click the “+ ADD NEW” button to add a new field map. Use the “Form Field” drop down icon to bring up a list of all the available fields on your form and click to select the form field you wish to use. If you want to set a specific value instead of one entered by the site visitor, type in the value you wish to use in this field (see “Setting Constant Values” for more detail).
- Click in the “Zoho Field” text box to bring up a list of all the Zoho fields available for receiving the form data. Click on the field you wish the form data to be sent to. If you are mapping to a custom field, select the ‘-module- Custom ->’ option for this box and move on to the Custom Field box.
- The “Custom Field” box is used when you want to map to a custom field. Type in the API name of the custom field as you have it created in Zoho. To help you get the exact field name, refer to the Advanced Commands section on displaying field names.
- The “Custom Field” box is also used for adding custom validation on the given field. Validation functions are enclosed in curly braces and are placed in the custom field box, after the Custom Field name. Here is a list of the custom validations:
[su_accordion]
[su_spoiler style=”fancy” title=”multipicklist” open=”yes”]
{multipicklist}
Structures multi-select field for Zoho multi-picklist
If you are adding validation to a custom field, simply add the command at the end of the custom field name. For example, if you have a custom field name of My_Industry and you want to use a pick list, your field would look like this:
My_Industry{multipicklist}
[/su_spoiler]
[su_spoiler style=”fancy” title=”replace_underscores”]
If your Custom Field’s name contains spaces, it will be necessary to replace those with underscores (_).
Ex: My Custom Field => My_Custom_Field
You would then place the following validator at the end to replace the underscores with spaces for Zoho CRM’s side:
{replace_underscores}
[/su_spoiler]
[su_spoiler style=”fancy” title=”remove_nonnumeric”]{remove_nonnumeric}
Ensures value comes in as a number
[/su_spoiler]
[su_spoiler style=”fancy” title=”force_boolean”]
{force_boolean}
converts value to true/false
[/su_spoiler]
[su_spoiler style=”fancy” title=”convert_date_interval”]
{convert_date_interval}
Converts value to a date interval from submission date
[/su_spoiler]
[su_spoiler style=”fancy” title=”format_date”]
{format_date}
Formats value to a Zoho date format
[/su_spoiler]
[/su_accordion]
Setting Constant Values
Some values you wish to send to your CRM will always be the same, as opposed to information that the site visitor types into the form. Perhaps the most used example of this would be the Contact Owner – the person in your sales organization who is assigned to the newly created entry.
In this situation, you don’t need to create or select a field from your form, you can simply type in the value you want to send into the Form Field box and then map it to the CRM field where you want that value to go. 
Zoho Triggers
With Zoho’s new API, workflows are automatically triggered, so you don’t need to turn these triggers on. This documentation is kept here for those who have yet to migrate to their new API.
If you need to trigger workflow rules, or require approval, you can turn these on by mapping the value true to the Trigger Workflow or Requires Approval field map values as shown in the following image:
About Field Types
When mapping your Ninja Forms’ fields to your CRM account, ensure that your form field is the same type of field that you have in the CRM. For instance, if your CRM requires a number, you want to ensure that your form field only allows numbers, otherwise it will reject your form submission and the form information won’t make it into your CRM account.
To check your field types in Zoho, go to Setup / Modules / {select your module} as shown in the following screenshots
Setup Modules
 Select your Module to View
Field Type Rules
The Data Type dictates what type of data can be sent to any given field in your CRM. When designing your form, ensure that the field you are sending matches the data type you need. Here are some types that require special care:
Lookup
Lookup fields have an entry in some other module that must match. For example, if you map to Campaign Source, ensure that the value you enter matches exactly a Campaign Source that you have created.
Date
Dates should be in the format d/m/Y (ex: 01/01/1970). For Task Due Date and Potential Closing Date, you have a great feature – the date interval. Since it may be difficult to set a specific date when you don’t know when a site visitor will submit the form, you can enter an interval ( ex: 2 days , 3 weeks ) and the extension will automatically calculate the future date based on when the form is submitted.
Pick List
A picklist is a specific list of allowed options created inside your CRM. Ensure that any option or options that you choose match exactly an option in the picklist. Avoid the use of special characters, like “&” ‘-” “/” wherever possible as Zoho may not recognize the transfer properly.
Boolean
Zoho requires ‘true’ or ‘false’ for boolean fields. A Ninja Forms checkbox will automatically be converted to the correct values. If you are creating a different field to send data to a boolean, ensure that the answers are either ‘true’ or ‘false.’
Optional Modules
In addition to creating your Lead or Contact and Account, you have the ability to attach various other modules to your newly created person.
About Potentials
The Potentials module has the following fields available:
-
- Name
- Type
- Lead Source – match a Pick List value
- Campaign Source – match a created Campaign
- Amount – numbers only; may use “,” for thousands separator and “.” for decimal point
- Closing Date (see “Field Type Rules – Date”)
- Next Step
- Stage – match Pick List value
- Probability
- Expected Revenue – numbers only; may use “,” for thousands separator and “.” for decimal point
- Description
About Notes
The Note module has two fields available:
- Note Title
- Note Content
About Tasks
The Tasks module has the following fields available:
- Task Subject
- Task Due Date (see “Field Type Rules”)
- Task Description
- Task Status(must match a state in your account, e.g., “Not Started”)
- Task Priority (one of the following integer values: 1 , 2 , 3 )
About Quotes and Sales Orders
Quotes and Sales Orders will automatically link to a newly created Account, Contact, and Potential (called ‘Deal’ in these modules). If you wish to manually assign the Quote or Sales Order to an existing value, you will manually create a field map to the Account Name, Contact Name, or Deal Name and add the ID for the desired record. Quotes and Sales Orders required Products to be added. By default, your form can add up to three products on a form.
Advanced Commands
The advanced commands textbox gives you an easy way to change the extension’s functionality without needing any programming experience. You can add as many of these commands as you want by putting a comma in between them as shown here:

After adding the commands you want, click “Save Options” and then REFRESH your browser page for your changes to take effect.
Here is a list of the current available Advanced Commands available:
[su_accordion]
[su_spoiler style=”fancy” title=”support” open=”yes”][su_label type=”black”]support[/su_label]
Display advanced communication diagnostics that we at Ninja Forms can use to troubleshoot any support requests you have.
[/su_spoiler]
[su_spoiler style=”fancy” title=”keep_html_tags”][su_label type=”black”]keep_html_tags[/su_label]
In Ninja Forms 3, text area boxes may have html tags that are removed with code. If you do not wish to remove html tags before sending, add this command.
[/su_spoiler]
[su_spoiler style=”fancy” title=”eu_endpoint”][su_label type=”black”]eu_endpoint[/su_label]
If your Zoho account is on the EU server ( zoho.eu, instead of zoho.com), use this command to connect to the correct location. If you don’t know what server you’re on if you log into zoho.eu and not zoho.com, then you may be on the EU server.
[/su_spoiler]
[su_spoiler style=”fancy” title=”au_endpoint”][su_label type=”black”]au_endpoint[/su_label]
[/su_spoiler]
[su_spoiler style=”fancy” title=”cn_endpoint”][su_label type=”black”]cn_endpoint[/su_label]
[/su_spoiler]
[su_spoiler style=”fancy” title=”in_endpoint”][su_label type=”black”]in_endpoint[/su_label]
[/su_spoiler]
[su_spoiler style=”fancy” title=”Products_{# of products}”][su_label type=”black”]Products_{# of products}[/su_label]
If you need to add more than the default three products to your Quote or Sales Order, use this command, replacing {# of products} with the number you wish to add.
[/su_spoiler]
[su_spoiler style=”fancy” title=”display_fields_module”][su_label type=”black”]display_fields_module[/su_label]
To view the fields of a given module, add this command, replacing the module with the name of a module. Note that most modules in Zoho are specified as English plurals (Leads, Accounts, Contacts, etc). You can specify multiple modules by separating them with a dash (Leads-Accounts).
This command will pull in the current values every time you view the settings page, so when you have the field names you need, delete this command to speed up the view on your settings page.
[/su_spoiler]
[su_spoiler style=”fancy” title=”unescape_backslash”][su_label type=”black”]unescape_backslash[/su_label]Removes backslashes, enabling new line in merge tags[/su_spoiler]
[/su_accordion]
Helpful Hints
Setting Fixed Values
In certain cases, you may want to send a fixed value into your CRM. For example, you may have a field for lead source and you want it always to say “Web Form Submission”. To do this, add a row to your Field Map action and, instead of selecting a form field, simply type in the value you want sent, and then map the value to the CRM field you wish.
Setting a “Lead Owner”
With the Zoho CRM add-on, to assign a Lead Owner, first, we will need to retrieve the ID of your user.
Within Zoho CRM, please navigate to Settings > Users.
On this page, click on the desired User. In the URL, the number at the very end is the ID that you will need to copy:

Within your Ninja Form, you can then use this number and map it to “Lead Owner”:

Requesting Help
Should you need help and submit a support ticket, do the following to help us find an answer faster for you:
- Type in the word “support” in the Advanced Commands box
- Save your settings
- Refresh the page
- Take a screen shot including Communication Status, Advanced Commands, and Status
This information can get us working on a solution for you faster.
