Are you on an inexpensive hosting plan? If so, running short on website storage is expected. Especially if you are accepting uploaded files on your site, storage can run out even faster.
That’s why Dropbox is a perfect solution. They offer a fantastic service for storing and sharing uploaded files. Using them as a secondary service is a perfect remedy for limited storage or accessibility of uploaded files.
Getting files moved over to Dropbox from WordPress is the only catch. Lucky for you, the File Uploads add-on from Ninja Forms comes with a built-in Dropbox integration.
If you’re tired of manually transferring files or sick of trying to arrange/maintain a custom integration, this article is for you. Below we’ll run through how to set up an automated system that will upload a file to Dropbox from WordPress!
Upload files to Dropbox from WordPress
- First, add the File Upload field to your WordPress Form
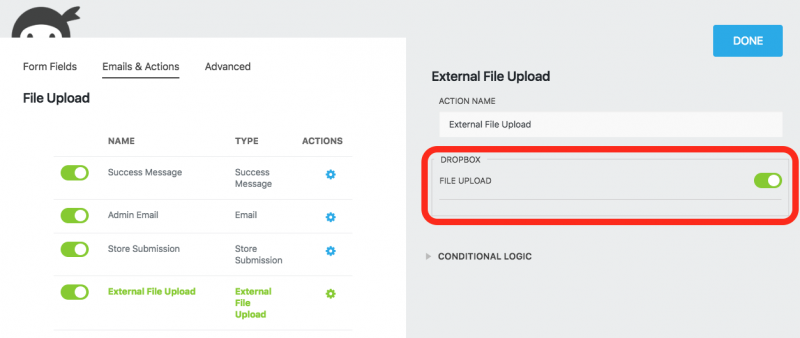
- Next, click on the Emails & Actions tab. Add the External File Upload action to your form.
- Open up the External File Upload action and toggle on the Dropbox setting.

You did it! Easy, right?
🔥 Hot Tip 🔥
If the uploaded files are showing up on your server, disable the Save to Server toggle found in the File Uploads fields.
Sending files to Dropbox has never been so easy 👩🏼💻
You did it! Now that you know how to upload files to Dropbox with WordPress. Stop red-lining your server storage and manually transferring files. Instead, spend your time and energy on your business, not managing piles of files.
Want to give only specific users access to upload files and not others? Pair File Uploads with Conditional Logic to show or hide the upload field dynamically on your WordPress form.
Not a fan of Dropbox? Don’t worry; you can connect to Google Drive and Amazon s3 too. Besides sending uploaded files to external storage devices, you can attach uploads to notifications, create custom file directories, set min and max file sizes as well as restrict the type of files users can upload.
Get the File Uploads add-on for Ninja Forms. It comes with the Basic Membership or can be purchased separately ( unlike our competition) with a one, five, or twenty-site license. As one of the most popular add-ons Ninja Forms offers, you won’t regret it.


Ash says:
Hi there,
I’m wanting to know if dropbox integration makes upload speeds faster for my clients?
Many thanks,
Ash
Jayne Leuterman says:
Now that I have my Ninja Form capturing files with File Upload, how do I capture these files to say add to a blog post?
Shaylee Hansen says:
Hi Jayne,
First, make sure “Dev Mode” ( Ninja Forms > Settings > Advanced ) has been enabled. Then, navigate back to your form and open the Create Post action, click the Advanced drop-down and look for Featured Image and select File Upload. For additional assistance please do reach out to our customer support team here, where we’d be happy to assist with your specific issues: https://ninjaforms.com/contact/
Rajeev Arora says:
Is it possible to change the Dropbox File Path for different forms? For example can Form A save attachments in FilePathA and FormB save attachments in FilePathB? Is there maybe a hook I can look at to make this happen?
Alternatively, can I add the form name and date to the filename when it is uploaded?
Shaylee Hansen says:
Hi Rajeev,
Please reach out to our customer support team, where we can answer your questions, https://ninjaforms.com/contact/