Webhooks are a way to send simple POST or GET data containing form information when a form is submitted. This is done within the Ninja Forms actions system and requires creating a new action to get started. For more information about what webhooks are and how they work, check out the wiki article here.
Add a Webhooks Action to your form
To add the action to any form, from the Emails & Actions tab click Add New Action and then the Webhooks action from inside the Actions Window that opens.

Configure Your Webhooks Action

- Remote URL – The URL to which you will be submitting data.
- Remote Method
- GET – Sends a request with your data as query string arguments in a URL to your chosen “Remote URL.”
- POST – Submits data to be processed to your chosen “Remote URL”
- See the W3 Schools article here for differences between GET and POST
- ARGS
- Key – The “name” your chosen URL will use to understand the field data you’re sending
- Field – The field containing the data you wish to send to your “Remote URL”
- Advanced
- Encode ARGS as a JSON string
- Run in Debug Mode – Data will submit to your endpoint in a verbose manner. Useful for troubleshooting as errors from the API may be shown after form submission.
Example Usage
Add Key/Field Pairs
To add a new key/field pair, click “Add New”

Once your key value pairs are configured, your form is good to go! Using the default Contact Form included in Ninja Forms, I have completed the key/value pairs for examples below. Let’s assume the form data we are working with is as follows from the contact form:
- Name – “Ninja Zach”
- Email – “ninja@ninjaforms.com”
- Message – “Hey man, I really love the team’s new Webhooks extension! Way to go!”
Map Your Key/Value Pairs
Set a Static Key Value
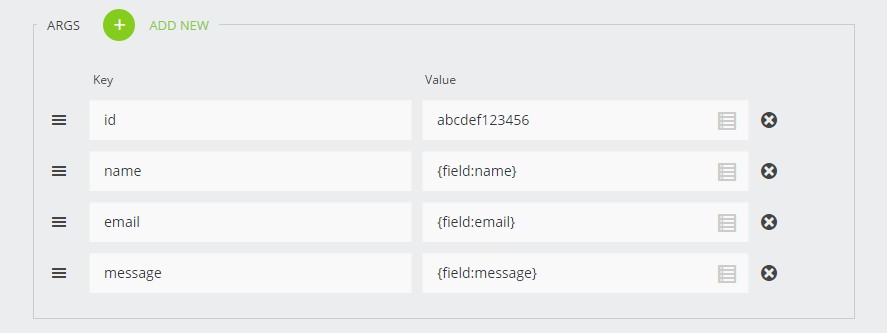
To connect to my imaginary API, I need to also provide an API key (mine is abcdef123456). My service expects the my API key to be called “id”, so that is the key name I will assign. All we need to do is use “id” as the key, and copy our API key into the “field” box.

Map Field Data to a Key Value
My sample API expects a name, an email address, and a message. For my API, they are called “name”, “email”, and “message” respectively. Map field values by using the list “merge tag” icon on the far right of fields in the “Field” list

Once your field values are mapped, your pairs will look like this: