Add a File Upload Field to Your Form (Complete Guide)

Need to accept file uploads on your WordPress website? Whether you want to accept resumes, collect user-generated content, or receive quotes from your clients, the WordPress file upload plugin makes it super simple to add a file upload field to your form.
In this ultimate guide, we will show you everything you want to know about accepting files in WordPress. So without a further do, let’s take a look at how to allow users to upload their files using the File Uploads add-on with our contact form builder.
Table of content
- Accept files in WordPress with the file upload plugin
- How to create a file upload form with the File Uploads plugin
- File Uploads restrictions (file size, file type, and the number of uploaded files)
- Send uploaded files to cloud-based storage solutions
- Renaming files and creating directories
- Attach an uploaded file to an email notification
- Preventing security issues with file uploads
Accept files in WordPress with the file upload plugin
The file uploads plugin is the easiest solution to accept files in your WordPress forms. There are a lot of options out there in the WordPress world but none that give you as easy control as our File Uploads add-on. It’s no wonder why it has been our top add-on for many years.
File Uploads add-on from Ninja Forms allows users to upload their files including pictures, documents, videos, or music files. It also gives visitors the ability to upload files that are not supported by WordPress.
The way how our file upload plugin works is that once you install it, 2 new features are added to your WordPress website.
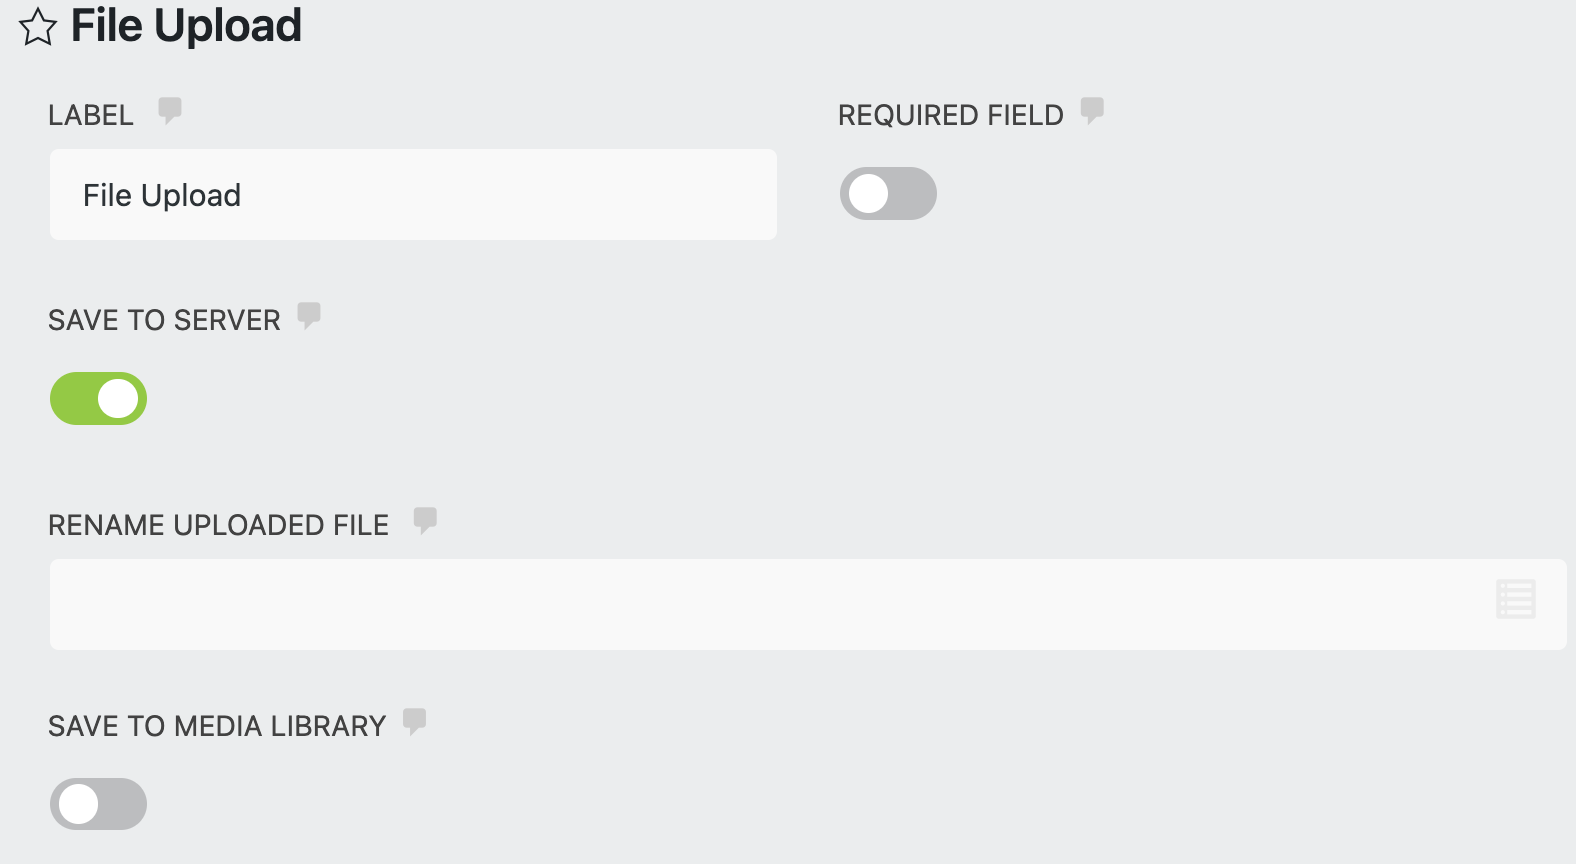
- A File Upload field. This is the field that allows users to upload files to your WordPress form. This field has multiple settings shown below.

- File Uploads settings under Ninja Forms in your WordPress dashboard to configure the add-on. Once you open the File Uploads setting, you will see three tabs: Browser Uploads, Upload Settings, and External Settings.


Browser Uploads
If you are storing files on your server, the Browse Uploads will contain all uploaded files.
Upload Settings
Under the Upload Settings, you can set the maximum file size (this can be done within the form builder). You can also change the wording of your File Upload error message, or access the various shortcodes to create dynamic folders/directories.
External Settings
The External Settings lets you connect to cloud-based storage services including Amazon S3, Google Drive, and Dropbox. Now let’s take a look at how to create a file upload form with Ninja Forms!
How to create a file upload form with our File Uploads plugin
To create a file upload form in WordPress, you’ll only need two things:
- Free Ninja Forms core plugin (download here)
- File Uploads add-on (included in all memberships/can be purchased individually)
Step 1. Install and activate Ninja Forms
First, install the Ninja Forms free core plugin by navigating to your WordPress Admin Menu, clicking Plugins > Add New. Locate the Search Plugins field, type “Ninja Forms,” then click the Install Now button and Activate.
Otherwise, you can upload the plugin by navigating to Plugins > Add New > Upload Plugin > Choose File.
Step 2. Install and activate the File Uploads add-on
Once you have access to the Ninja Forms File Uploads, you can download it from your Ninja Forms account, and upload it to Plugins. For a complete overview, see our installation guide for step-by-step instructions. If you successfully follow the installation instructions, you should see the File Upload field located under Common fields. 
Once you see it drag and drop the File Upload field to your form. Publish your form and then refresh your page. Do not skip refreshing. Failing to do so will prevent the upload button from appearing in the email action, so make sure you do it.
That’s it. You’ve just learned how to add a file upload field to your form and you are ready to start configuring the settings for your uploaded files.
File Uploads restrictions
The File Uploads add-on gives you complete control over the files being uploaded to your WordPress form. You can control the file type uploaded to your forms, the maximum and minimum file size, and even adjust the number of files you want to accept from your visitors. All can be found under the Restriction settings of the File Uploads field.

File Limit
This setting allows you to set a limit on the number of files uploaded to your form. Enter 1 if you only want to allow 1 file. If you want to accept multiple files from the same file upload field, just enter a high number that does not create a limit for the users.
Allowed file types
If you leave this field blank, your visitors can upload any supported files in WordPress to your file upload form. If you wish to allow additional files not supported by WordPress, visit our guide How to Allow Additional File Types in Ninja Forms.
Maximum file size & Minimum file size
Want to restrict the maximum file size of a resume to 2MB or set a minimum size for a logo? This is the place. You can also provide extra information to a user who tries to upload large files using our tooltip/help text. Navigate to Display Settings > Help Text and insert a little note such as Max 2 MB. Now your File Upload field will include an information icon that once users hover over it, will see a little note.
Disable storing uploaded files in your server
Additionally, you can disable storing files to your server or to your Media Library with a simple toggle on/off button. So, if you don’t want to store your files on your server, you can instead upload files to Dropbox, Google Drive, and Amazon S3. To do so, disable Save To Server and enable your External File Upload toggle found in your form action.
Send uploaded files to cloud-based storage solutions
We all have been there — overflowing WordPress Media Library, storage almost-full-warnings. This is a situation we all find pretty annoying. But instead of cleaning up your WordPress Media Library and losing important files, the File Uploads add-on gives you an option to send files directly to external storage services including Google Drive, Dropbox, and Amazon S3.
How to send files to external sites
Connecting Ninja Forms to an external storage site is super easy with the File Uploads add-on. Navigate to Ninja Forms > File Uploads > External settings and connect to the storage service of your choice. If you need more help connecting, check one of our tutorials on how to upload a file to Dropbox from WordPress or upload files to Google Drive!

Kindly note, that the links to uploaded files to external services are accessible by default to logged-in users of the site. If you would like to make these links publicly viewable, you can navigate within your site to Ninja Forms > File Uploads > External Settings and enable the checkbox for “Use Public URL”.
Sometimes, you might experience timeout issues when sending large files over to your cloud-based storage solution. Navigate to Emails & Actions > add a new action External File Upload > Advanced tab > toggle on the Background upload. This will help you avoid timeout issues and bypass your server upload settings and size limitations.

We would like to point out for users who use our Save Progress add-on that files are only transferred once the Submit button is clicked. The save and continue function won’t save the data of file uploads fields.
If you are using File Uploads with our CRM integrations, please consider the file does not get sent. However, you can send the file URL for where the file is located using the merge tag for the File Uploads field.
Renaming files and creating directories
Want to organize your file uploads, add different folders to different forms, and save these files into separate folders? Within the File Uploads field of your form, you can do that quickly!
If you want to create dynamic WordPress directories for your files, you can do so with the use of shortcodes and merge tags. Navigate to Ninja Forms > File Uploads > Upload Settings > Custom Directory.
Alternatively, you can do this can be done directly within your File Upload field by using the “Rename Uploaded File” settings. Here you can rename the uploaded file and dynamically create a folder the files should be saved in, by using / in the name, with the help of the merge tag icon. You can see additional Renaming Conventions in the following article.

On the other hand, if you don’t want to rename the file and prefer to retain the same file name that the user gave it, leave the “Rename Uploaded File” field blank. If users upload an image with the same file name, the file name will be modified by appending a sequentially numbered suffix — filename, filename – 1, filename – 2, etc.
For changing the custom directory for the files uploaded in your cloud-based storage service, you can navigate to Ninja Forms > File Uploads > External Settings and make the desired changes. That’s it!
Attach an uploaded file to an email notification
Ninja Forms lets you attach an uploaded file to email notification with a single click of the button. To attach an uploaded file to an email, click the Email & Actions tab. From there look for your Email action. If you don’t see an Admin Email or Email action added you can add one by clicking the plus sign at the bottom right and then clicking on Email.
Once you find the email action, open the Advanced drop-down of that action. From there, you should be able to see the setting for the Attach File Uploads. (Enable the Developer Mode if the Advanced section is not visible.)
Toggle the switch to green to attach the upload for that field and publish your form.

If you don’t see the File Upload button, publish your form and then refresh your page. You can also embed the uploaded file within the email message or insert the uploaded files within the generated PDF using the File Uploads merge tags.
They are a great feature as they auto-update and allow the dynamic data to be pulled from different sources. Afterward, the data is populated in the location merge tag is placed.
List of File Uploads merge tags:
:plain – Same as URL merge tag, but without a clickable anchor.
:embed – Use this merge tag within Email Actions if you are embedding the image, you can’t embed the video file.
:link – Use this merge tag to have a clickable link within the Email Action.
:url – When a File Upload merge tag ends with :url, the output will be formatted as the full URL.
:filename – If you want to list the uploaded files without having them be clickable.
:pdf_embed – If you are embedding a file within the PDF Form Submissions add-on, use this merge tag.
:name and :extension – You can use these merge tags in the field settings but not in the actions or other places.
For example, if you would like to insert the uploaded file within an email message, you can use the File Uploads merge tag by clicking the Merge Tag icon. ![]()
This will pull the data from your form to an email message and the file will be inserted.

Preventing security issues with file uploads
File upload vulnerabilities are some of the most common security issues that WordPress sites face. Why? There are two things to consider.
Site takeover risks
If a hacker can upload a file to your web server, they can take over your site completely. If your file upload form implementation is completely open for anyone to use, does not restrict file types, and stores uploaded files within your WordPress site, those files are publicly accessible.
As such, it is very important to consider security when creating a file upload form. Luckily, the Ninja Forms File Uploads add-on provides you with file restriction capabilities so that you can make good security decisions.
Personally identifiable information risks
If the files that your users are uploading contain any sort of personally identifiable information (PII), such as names, email addresses, or other sensitive information, consider having these uploaded to a secured location.
Anything uploaded to your WordPress uploads directory is publicly accessible. If your customers trust you with their PII, make sure you’re uploading to a private, secured location such as a secured Amazon S3 bucket.
Since we’re talking about security, let’s look at WordPress security and file upload vulnerabilities and how to keep your site safe as well as your forms.
How to prevent file upload vulnerabilities
1. Keep your website updated.
Every time someone reports a security vulnerability, the core WordPress team immediately works on fixing the issue. If you are not using the latest version of WordPress and plugins, hackers can look for sites running the older version and as a result, you can easily become a victim of an attack.
For this reason, make sure you update your plugins, theme, and core itself regularly. WordPress even allows you to enable automatic updates for their major releases, plugins, and themes so you can keep your site and files protected.

2. Change the location of uploaded files.
WordPress stores by default all the uploaded files in the wp-content/uploads folder on your server. The security of files you upload depends on the security of your server, but as long as you are using a good security service, this risk can be minimized.
You might decide you don’t want to save uploaded files to your server. With our File Uploads add-on, you can simply disable the Save To Server option in your File Upload field. This setting will prevent saving your uploaded files to your server, and to your media library.

We also offer the ability for secure uploading directly to Dropbox, Google Drive, or Amazon S3. Take a look at our super easy step-by-step tutorials on How to Upload a File to Dropbox from WordPress and Want to Upload Files to Google Drive from WordPress!
3. Allow only specific file extensions to upload
Due to security reasons, WordPress only allows for certain types of files you can upload through your site’s admin. The most accurate list of file types WordPress allows includes the following:
Images: .jpg, .jpeg, .png, .gif
Documents: pdf, .doc, .docx, .ppt, .pptx, .pps, .ppsx, .odt, .xls, .xlsx
Audio: .mp3, .m4a (might not work in all browsers), .ogg, .wav
However, sometimes you might find yourself in a need to expand the list with an additional file format. If that is the case, our File Uploads add-on gives you the ability to allow additional file types to be uploaded by your WordPress site.
4. Install WordPress security plugins.
Security plugins serve as an extra security layer for your website. In fact, you can choose from a wide choice of security solutions including Shield, Wordfence, MalCare, Sucuri, and many others. Learn more ways how to protect uploaded files to WordPress by reading How to Protect Uploaded Files in WordPress Forms.
You’ve just mastered our File Upload plugin!
Congratulations! You’ve reached the end of our article. To sum up, we’ve walked you through the File Uploads add-on settings and you learned how to add a file upload field to your form. If you would like to dig deeper into our File Uploads add-on, we recommend you take a look at the articles below so you can get the most informed decision about how to use our file upload plugin on your WordPress forms:
- How to Make a File Upload Form in WordPress
- How to Create Custom Directories For File Uploads
- How to Protect Uploaded Files in WordPress Forms
- How to Allow Additional File Types in Ninja Forms
- How to Upload Files from Phone Camera to WordPress Form
- Want to Upload Files to Google Drive from WordPress?
- How to Upload a File to Dropbox from WordPress
- How to Upload a File to Amazon S3 from WordPress
- How to Create a Job Application with WordPress
Our File Uploads add-on is a powerful WordPress file upload plugin you can’t go wrong with. Why not give it a try and see for yourself why this add-on is the most popular among Ninja Forms users? Unlike our competitors, you can buy our file upload plugin individually, or it comes included in all our membership plans. With a 14-day money-back guarantee, you have nothing to lose!
Try Ninja Forms Today
Always free, with premium features available through our memberships.
I used the File Upload addon for NinjaForms in my WordPress website. How can i get back the temp filename after choose a file in my form so i can show the user the uploaded file as a preview image, before submit the form? Is there any trigger to use in jquery or with ajax?
Hello Martin,
Please reach out to our customer support team, where we’d be happy to assist with your question: https://ninjaforms.com/contact/.
I used the File Upload addon for NinjaForms in my WordPress website.
But the form make error.
Can you help me?
Thank you
jquery.fileupload.js?ver=3.3.14:91 Uncaught TypeError: $.widget is not a function
at jquery.fileupload.js?ver=3.3.14:91:5
at jquery.fileupload.js?ver=3.3.14:25:5
at jquery.fileupload.js?ver=3.3.14:27:3
(anonimo) @ jquery.fileupload.js?ver=3.3.14:91
(anonimo) @ jquery.fileupload.js?ver=3.3.14:25
(anonimo) @ jquery.fileupload.js?ver=3.3.14:27
jquery.fileupload-process.js?ver=3.3.14:29 Uncaught TypeError: Cannot read properties of undefined (reading ‘fileupload’)
at jquery.fileupload-process.js?ver=3.3.14:29:31
at jquery.fileupload-process.js?ver=3.3.14:24:5
at jquery.fileupload-process.js?ver=3.3.14:26:3
(anonimo) @ jquery.fileupload-process.js?ver=3.3.14:29
(anonimo) @ jquery.fileupload-process.js?ver=3.3.14:24
(anonimo) @ jquery.fileupload-process.js?ver=3.3.14:26
jquery.fileupload-validate.js?ver=3.3.14:30 Uncaught TypeError: Cannot read properties of undefined (reading ‘fileupload’)
at jquery.fileupload-validate.js?ver=3.3.14:30:13
at jquery.fileupload-validate.js?ver=3.3.14:24:5
at jquery.fileupload-validate.js?ver=3.3.14:26:3
(anonimo) @ jquery.fileupload-validate.js?ver=3.3.14:30
(anonimo) @ jquery.fileupload-validate.js?ver=3.3.14:24
(anonimo) @ jquery.fileupload-validate.js?ver=3.3.14:26
vcgricerca.js?ver=1.0.6:322 Uncaught ReferenceError: siteContext is not defined
at vcgricerca.js?ver=1.0.6:322:5
(anonimo) @ vcgricerca.js?ver=1.0.6:322
fieldFile.js?ver=3.3.14:198 Uncaught TypeError: $file.fileupload is not a function
at n.initFileUpload (fieldFile.js?ver=3.3.14:198:10)
at p (backbone.min.js?ver=1.4.1:2:3736)
at f (backbone.min.js?ver=1.4.1:2:3533)
at a (backbone.min.js?ver=1.4.1:2:692)
at e.trigger (backbone.min.js?ver=1.4.1:2:3423)
at n.onRender (fieldItem.js:98:1)
at Object._triggerMethod (front-end-deps.js?ver=3.6.14:20:7917)
at n.triggerMethod (front-end-deps.js?ver=3.6.14:20:20921)
at n.render (front-end-deps.js?ver=3.6.14:20:22635)
at Jn (underscore.min.js?ver=1.13.4:2:7441)
Hello Radames,
Please reach out to our customer support team so that we can further assist you: https://ninjaforms.com/contact with the File Uploads add-on error.
dear Shaylee
I request support 2 times in 3 days.
Can someone help me?
Thank you