The Ninja Forms ActiveCampaign add-on needs to be installed and activated to see the features mentioned in this this documentation.
Installation
After you have downloaded the Ninja Forms for ActiveCampaign plugin, install the plugin via WordPress’s plugin installer. Once installed, be sure to activate the plugin.
Authenticating with ActiveCampaign
In order to successfully use the Ninja Forms for ActiveCampaign plugin, you need to authenticate with ActiveCampaign using your ActiveCampaign url and API Key.
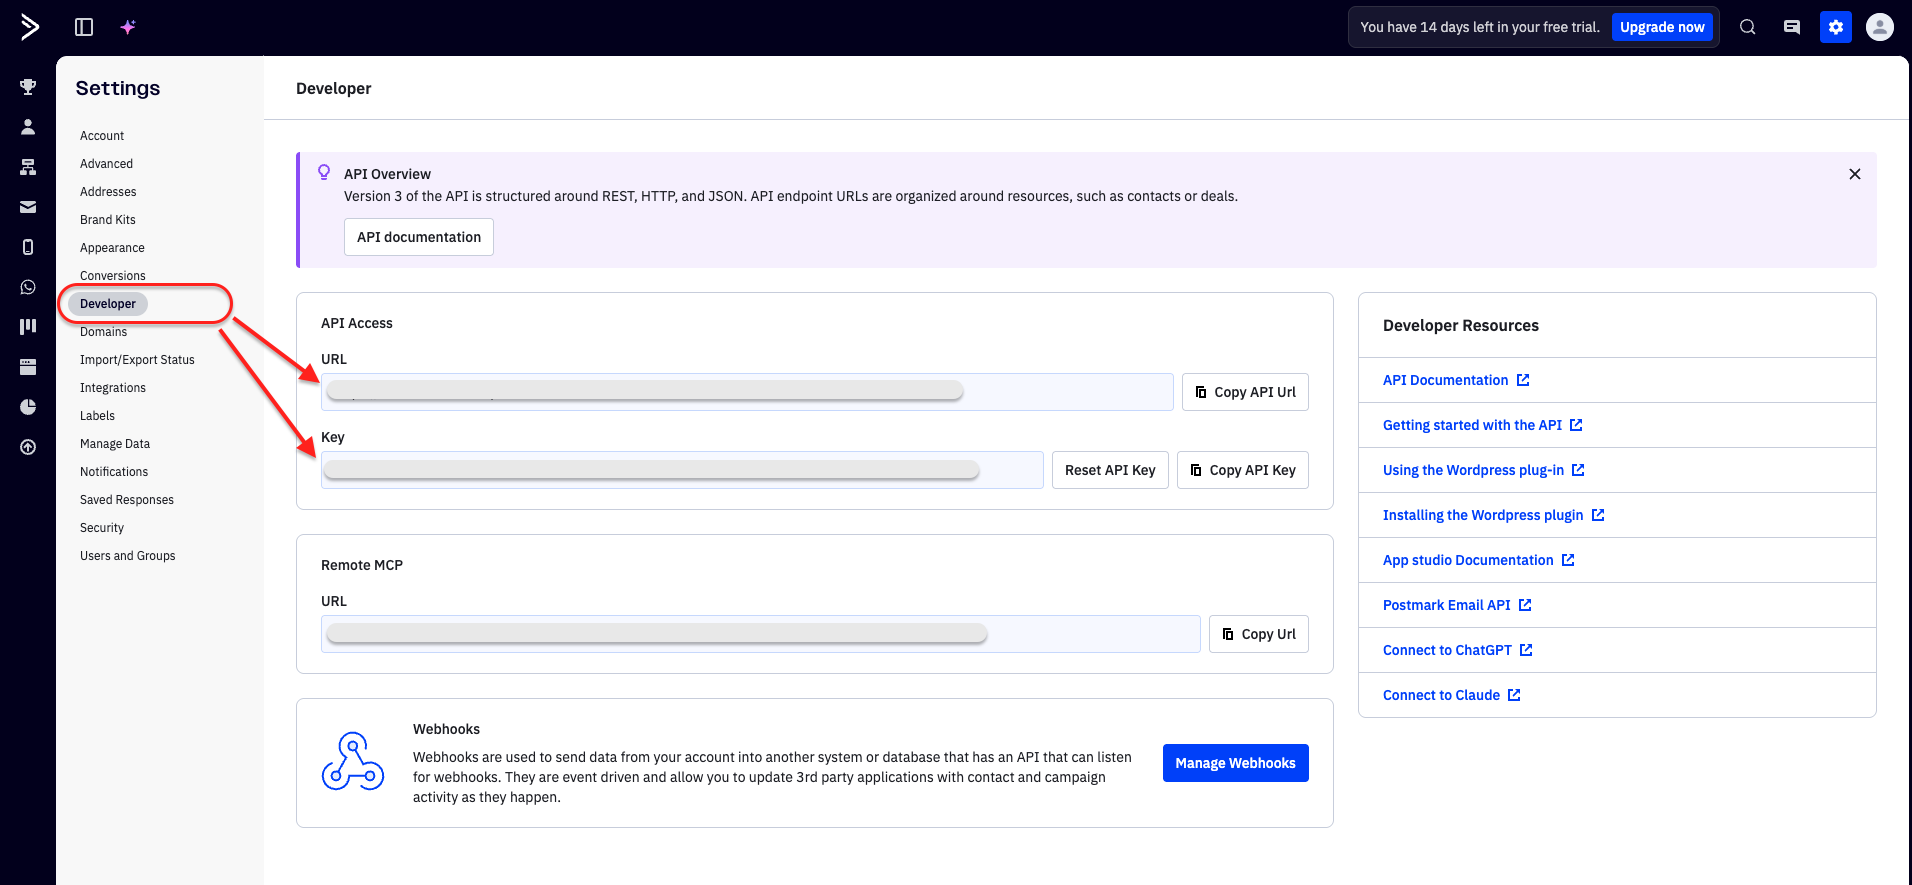
Login to your ActiveCampaign account dashboard.
Visit the settings page of your ActiveCampaign account. Click on the gear icon on the top right, next to your profile image.
Once in the settings area, click on Developer tab from the left. Note and copy the URL and Key values within the API Access area. You’ll need them for the next step. Go back to your WordPress with the Ninja Forms ActiveCampaign plugin installed.
Back in your WordPress, from the Ninja Forms menu, select Settings.
Scroll down to the ActiveCampaign area and input your ActiveCampaign URL and API Key (from step 3).
Enter your plugin license
From Ninja Forms menu, click Settings.
Click on the Licenses tab and enter the license key that you received when you purchased this plugin — alternatively you may visit your Ninja Forms Dashboard and head over to the License Keys section of your account.
Adding an ActiveCampaign Action to Your Form
Under Ninja Forms, click Add New to create a new form — or if you already have a form you can click on Dashboard from the Ninja Forms Menu.
Version 3.1.0
Version 3.1.0 of ActiveCampaign now gives you the ability to connect separate ActiveCampaign accounts per form. Meaning, you can connect one ActiveCampaign per form. At this time you CANNOT use conditional logic to connect multiple accounts. One form = one account.
Once you’re inside of editor for your form, click Emails & Actions from the top.
Click the plus icon in the lower right to add an Action.
Under the Installed section choose ActiveCampaign.
After choosing the ActiveCampaign option, you will see a list field. Select the List your subscribers will be placed in.
The List Field Mapping area will expand. The fields that show here are from your ActiveCampaign account, these include both AC’s built-in fields and any custom fields you define. In order to map fields from your Ninja Forms to your ActiveCampaign fields, you’ll need to click the merge tag icon on each field where you wish to create a mapping.
This integration also allows you to assign tags to your Ninja Form that will be assigned to contacts who submit a form. You may assign multiple tags to a form in comma-separated format.
To enable navigate to Ninja Forms > Settings > Advanced Settings > tick ‘Dev Mode‘. Enabling this feature will give you access to the Advanced settings within Ninja Forms.
API URL & API Key Connect an ActiveCampaign account that is form-specific.
If you don’t add ActiveCampaign credentials to the Ninja Forms settings these will act as a default.
Enabling Double Opt-in functionality (Optional)
By default, ActiveCampaign will accept your new subscribers and enroll them to the appropriate list based on what you selected in your Ninja Forms actions. Generally, that works just fine! Depending on your needs, you may require that new subscribers confirm that they did, in fact, sign up for your list. ActiveCampaign has a double opt-in feature that you can utilize for this use case. So, ActiveCampaign has an interesting (read: not great) way of implementing double opt-in functionality.
You’ll need to create a form in your ActiveCampaign account, or use an existing form with that account.
Login to your ActiveCampaign account and then go to Website >Forms.
You may select an existing form or create a new form. Note: Make sure that your form has an action to subscribe to list and that you have list selected.
New forms
While in the forms screen, click the Create new form button.
Enter the title of your form
Make sure to add at least one action Subscribe to List and assign a list to the action. This adds users to that list once they have confirmed their subscription. And then click Create
On the next screen, you’ll be able to edit your form. Click the Options tab on the right and then simply click the pencil icon next to the Subscribe to List action.
The next screen is the Edit Form Action configuration. Be sure that Opt-in Confirmation is set to on.
Edit your opt-in email and actions as needed. And be sure to enter your business address.
Existing forms
While in the forms screen, click the Edit button next to form that you wish to configure double opt-in for.
On the next screen, you’ll be able to edit your form. Click the Options tab on the right and then simply click the pencil icon next to the Subscribe to List action.
The next screen is the Edit Form Action configuration. Be sure that Opt-in Confirmation is set to on.
Edit your opt-in email and actions as needed. And be sure to enter your business address.
Kaboom! That’s it, you’re done!! When a user submits a form their data will be sent to your ActiveCampaign account and their contact will be added to the appropriate list and tagged appropriately.
[su_box title=”ActiveCampaign Tutorials & Blog Articles” style=”noise” box_color=”#eceff7″ title_color=”#EC494D” radius=”8″] Get More Newsletter Signups
[/su_box]