How to Upload Files to Google Drive from WordPress
When you build a form that collects files, client project assets, event photos, volunteer applications, those files land on your own web host by default. That eats into your storage plan fast, and if you’re running several client sites or a nonprofit on a shoestring hosting budget, watching your disk usage climb every time someone submits a form gets old quickly.
The fix most people are searching for is exactly this: a way to upload files to Google Drive from WordPress without your server ever touching them. That keeps your hosting bill flat no matter how many people submit files, and it puts every upload somewhere you can browse, share, and back up without opening your WordPress dashboard at all.
This guide covers connecting your site to Google Drive, routing an upload field to it, and the one verification step that keeps a “successful” submission from silently going nowhere.
What you’ll need
To follow along, you’ll need Ninja Forms (free) and the File Uploads add-on (included with memberships or available as a standalone add-on).
You’ll also need your own Google account to authorize the connection. Google handles that authorization step, not Ninja Forms, so keep the login you plan to use for Drive storage handy before you start.
Which WordPress plugin uploads files to Google Drive?
Ninja Forms does, through its File Uploads add-on. Connect your Google account once in your WordPress admin, and any File Upload field on any form can send new submissions straight to Google Drive instead of your server. No code, and no separate plugin, required.
The same add-on connects to Dropbox and Amazon S3 through the identical settings screen and form action, so if your storage needs change later, switching providers doesn’t mean rebuilding anything.
Connect your WordPress site to Google Drive
This part happens once, site-wide. You’re authorizing Ninja Forms to talk to your Google account so every form on the site can use the connection afterward, not configuring anything per form yet.
- Go to Ninja Forms > File Uploads in your WordPress admin, then click into the External Settings tab.
- Under Google Drive Settings, click Connect and sign in to authorize your Google account.
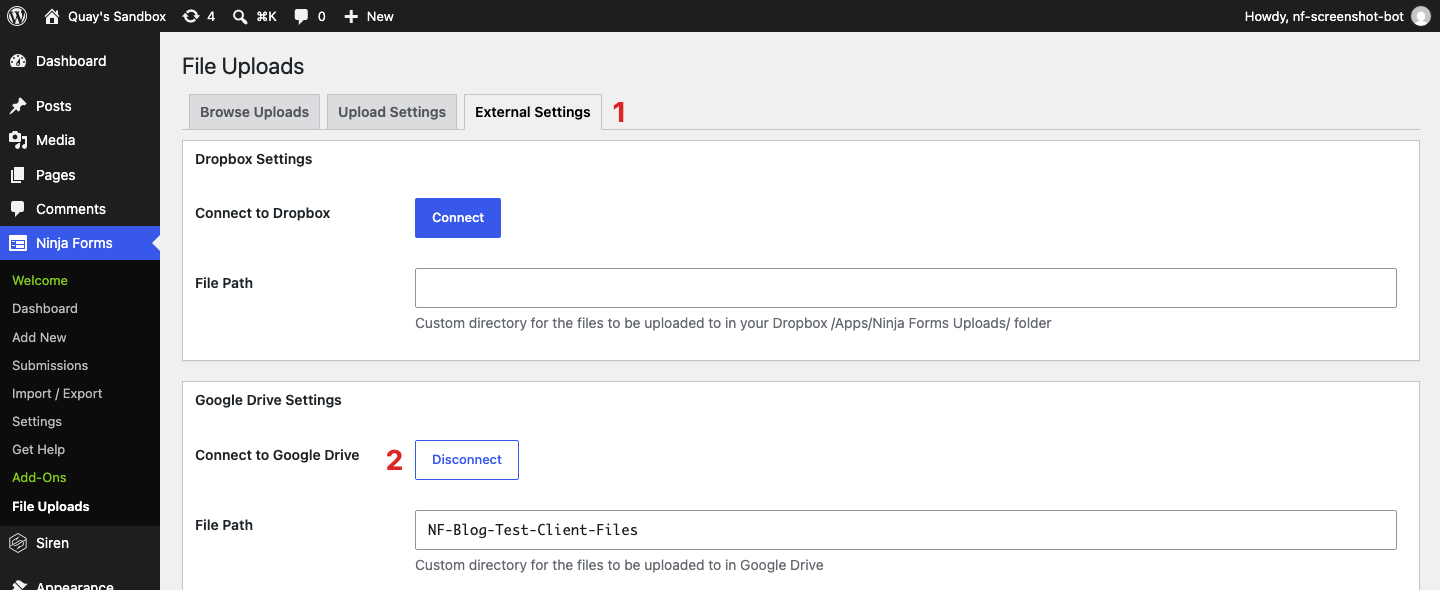
Once connected, the button switches to read Disconnect, confirming the authorization went through. If you want uploaded files organized into a specific folder instead of landing loose in your main Drive, type a folder name into the File Path field on the same screen (pictured above) and save. Leave it blank and files go straight to the top level of your Drive.
The same tab also has a Use Public URL option toward the bottom, off by default. Turning it on makes uploaded file links viewable by anyone with the link instead of only logged-in users of your site, worth knowing if you ever need to share a file with someone who doesn’t have a site login.
Turn a file upload field into a Google Drive upload
The connection you just made is site-wide. Sending a specific form’s uploads to Drive takes one action on that form, added under Emails & Actions, and it only takes a minute.
- Open your form and make sure it has a File Upload field. Add one from the Fields window on the Form Fields tab if it doesn’t.
- Click into the Emails & Actions tab, click the blue (+) icon to open the Actions window, and add the External File Upload action.
- Inside that action, turn on the Google Drive toggle listed next to your file upload field. Uploading large files, like multi-page PDFs or zipped folders? Turn on Background Upload too, so the transfer runs after the visitor submits instead of making them wait.
One thing to know: the External File Upload action only shows up in the Actions window once a storage service is connected, which is why the connection came first. If you don’t see it, go back to External Settings and check that Google Drive reads Disconnect.
Decide whether to keep a local copy too
Each File Upload field also has its own Save to Server toggle, on by default, in the field’s settings window. It doesn’t route anything to Drive. It decides whether a copy stays on your own server once the Drive copy exists.
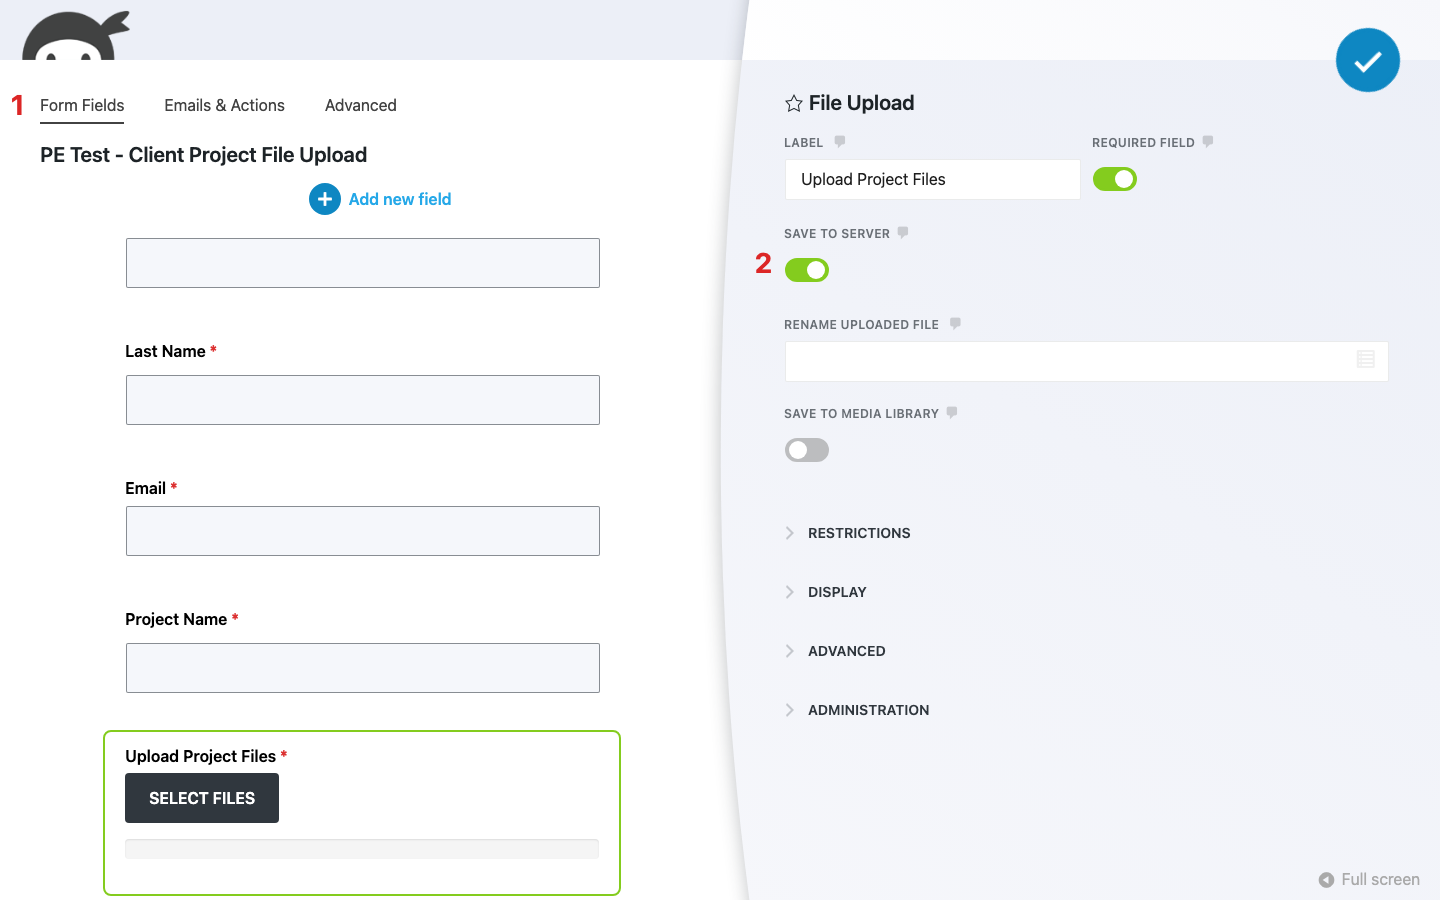
Leave Save to Server on and you keep a local backup alongside the Drive copy. Turn it off and Ninja Forms drops the local copy, so the file lives in Drive only. Before you turn it off, read the next section.
Verify your connection before you turn off local storage
Before you flip Save to Server off for good, submit a real test file through the form with the toggle still on. This is the one step worth not skipping.
Here’s why: if your Google Drive connection ever stops working, from a revoked permission or an expired authorization, a submission with Save to Server off still shows the visitor a normal success message. Nothing on the frontend, and nothing in your WordPress admin, flags that the file didn’t actually go anywhere. The submission just quietly has no working file behind it.
Checking is simple. After a real submission, open Ninja Forms > File Uploads > Browse Uploads and look at the File Location column for that file.
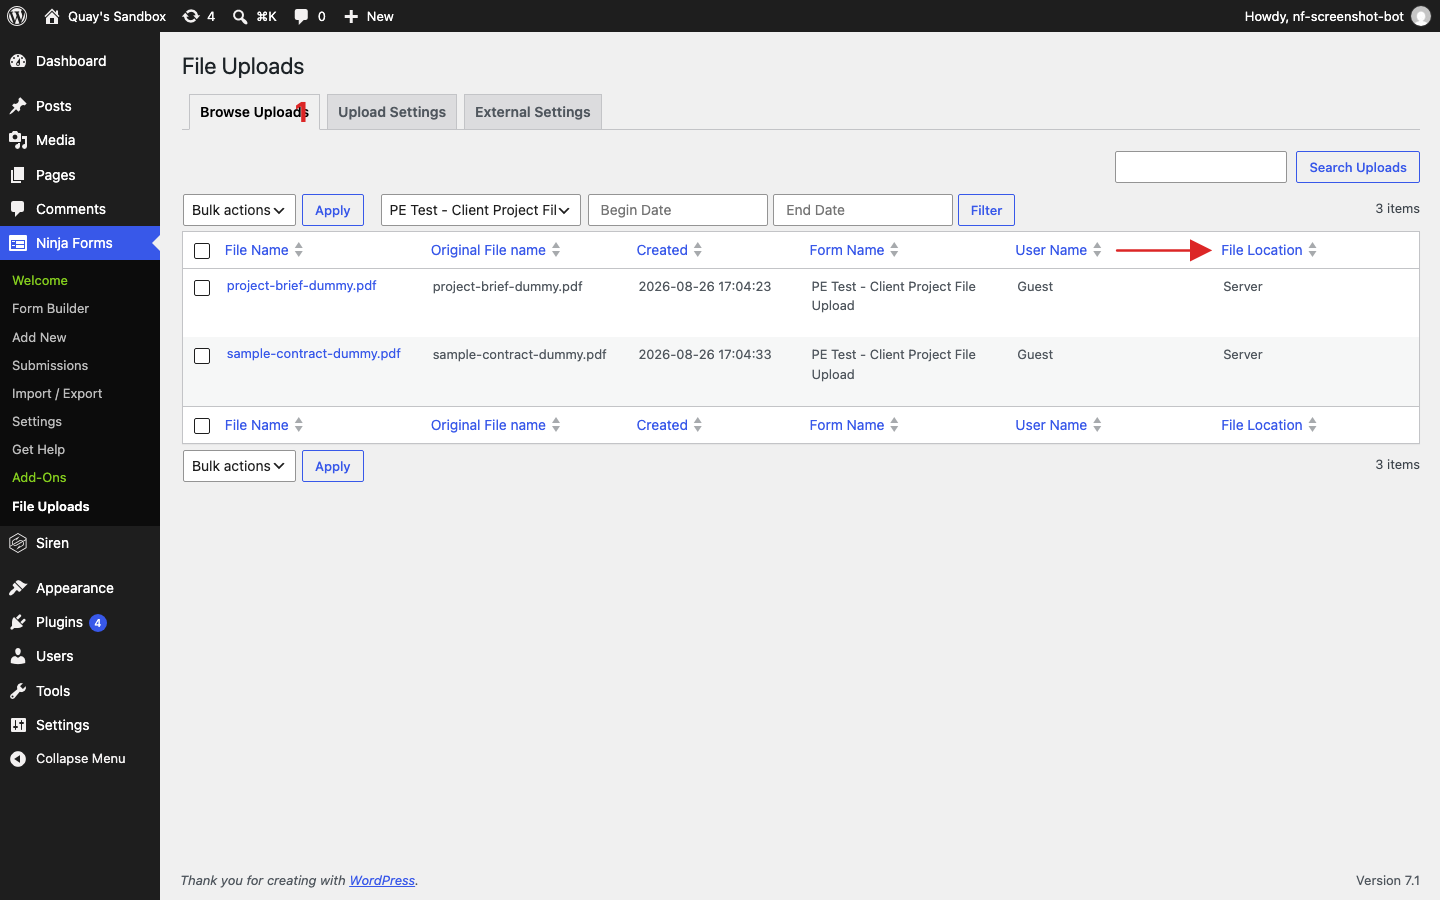
Once File Location reads Google Drive for a real test file, it’s safe to turn Save to Server off and rely on the connection for new submissions. If it doesn’t show Google Drive, check that the External File Upload action is on the form with its Google Drive toggle on, then disconnect and reconnect in External Settings and test again before trusting it with real submissions.
Keep your Google Drive uploads organized
A Drive folder full of generic filenames repeated dozens of times isn’t much better than a cluttered server directory. Two settings fix that, and both are already available once File Uploads is active.
The File Path field you set in External Settings (pictured above) controls the folder every upload lands in, so start there if you haven’t already.
For the filename itself, open the field’s settings window and use the Rename Uploaded File setting to build a custom pattern from merge tags, something like {field:last_name}-{field:project_name}, instead of whatever name the visitor’s file happened to have.

Between a named folder and a merge tag filename, you can open Google Drive weeks later and find a specific client’s file by name instead of clicking through dozens of identical uploads. If you also want to limit which file types or sizes a field accepts, the complete guide to the File Upload field covers those restriction settings in detail.
One connection, and every new upload has somewhere better to go
You’ve now got the whole path: connect Google Drive once in File Uploads, add the External File Upload action to the forms that should use it, confirm the first real submission actually lands in Drive, decide whether to keep a local copy, and name the results so they’re easy to find later.
Try Ninja Forms Today
Always free, with premium features available through our memberships.