Connect Your Forms to Anything
Send WordPress form submissions to any API or external endpoint in real time using GET or POST webhooks.
Risk-Free 14 Day Guarantee
You'll love it or we'll refund you fully. No questions asked.
Not every service has a ready-made WordPress plugin. When a direct integration doesn’t exist, webhooks let your forms talk to any system that can receive data over HTTP. The Ninja Forms Webhooks add-on sends your form submissions to any URL you choose, in real time, the moment someone clicks submit.
No third-party relay required. No custom code to write or maintain. Just configure an endpoint, map your fields, and your form data goes exactly where it needs to go.
With Webhooks, you can:
Key Features
Send to Any URL
Deliver form submissions to any HTTP endpoint the moment someone submits.
GET & POST Support
Choose the request method your receiving endpoint expects, GET or POST.
Field Mapping
Map form fields to named parameters using the ARGS key-value interface and merge tags.
JSON Payload Format
Encode your mapped fields as a structured JSON object for APIs that expect it.
Real-Time Delivery
Webhooks fire immediately on submission with no queue, batching, or delay.
Multiple Webhooks
Add multiple webhook actions to one form and feed several endpoints simultaneously.
Works with All Actions
Runs alongside email notifications, submission storage, and every other form action.
And much more…
Debug mode, static key values, and full compatibility with Ninja Forms’ merge tag system.
Key Features of Ninja Forms Webhooks
Send form data to any URL
Every webhook starts with a destination. Enter any endpoint URL into the Remote URL field and Ninja Forms will deliver submission data there on every form submit. If the receiving system can accept an HTTP request, it can receive your form data. That covers custom APIs, internal business tools, serverless functions, and any third-party service with a webhook endpoint.
GET and POST method support
Choose how your data travels. POST sends submission data in the request body, which is what most APIs and modern endpoints expect. GET appends your data as query string parameters in the URL itself, which works well for simpler integrations or services that expect parameters that way. Both options are available from a single dropdown inside the webhook action settings.
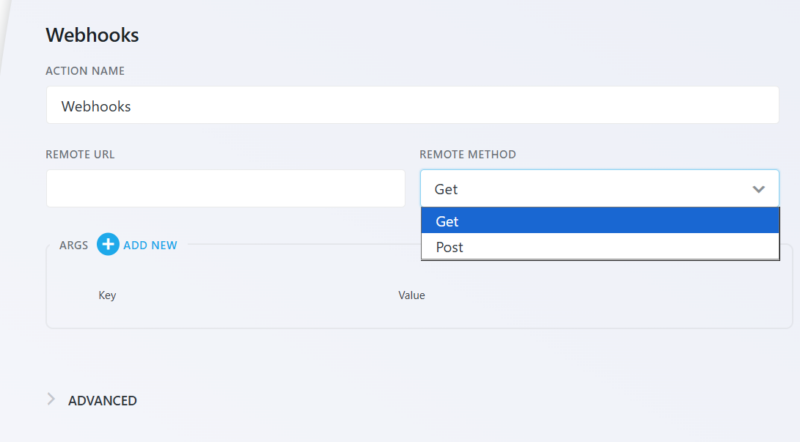
Field-to-parameter mapping
Control exactly what data gets sent and what it’s called on the receiving end. The ARGS interface lets you create key-value pairs where each key is the parameter name your endpoint expects, and each value is a form field pulled in via merge tag. No code needed. Use the merge tag picker to select fields visually and map them to whatever parameter names your receiving service requires.

JSON payload format
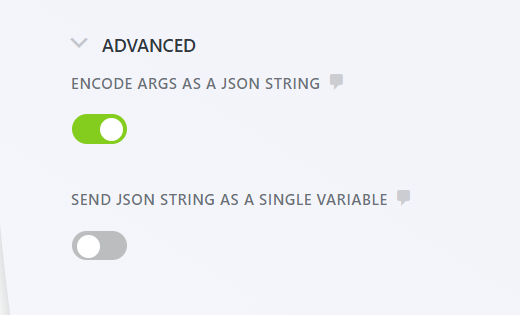
APIs that expect structured data need a JSON payload, not raw form field strings. Enable the “Encode ARGS as JSON string” option and your mapped fields are formatted as a proper JSON object before delivery. This is the format most REST APIs, serverless functions, and custom backends are built to receive. Technical buyers evaluating webhook implementations will find this setting in the Advanced section of the action.
Real-time delivery
Webhooks fire the moment a form is submitted. There is no queue, no batching, and no scheduled cron job delivering data in bulk. Your receiving system gets the data immediately, which matters when you’re feeding a CRM, triggering an automation, or pushing data into a live pipeline that should respond right away.
Multiple webhooks per form
A single form submission can feed multiple systems at once. Add more than one Webhooks action to the same form and each configured endpoint receives the data independently. One contact form can simultaneously update your CRM, notify a Slack channel, and log to an internal system without any additional logic or relay service.
Works alongside other actions
Adding a webhook to a form doesn’t change anything else about how it works. Email notifications still send. Submissions still save to the database. Redirects still fire. The Webhooks action runs in parallel with every other action you have configured, so you’re extending your form’s behavior rather than replacing it.
Send form data to any API in real time
Fire a GET or POST to any endpoint the moment a form is submitted, connecting your forms to custom databases, internal tools, or any service with an API, no middleware. Add it to your cart and start sending form data anywhere.
Backed by priority email support and a 14-day money-back guarantee.
How Webhooks Work With WordPress Forms
A webhook is a way for one system to notify another the moment something happens. In the context of Ninja Forms, “something happening” is a form submission. When a visitor submits your form, the Webhooks add-on immediately sends an HTTP request to the URL you specified, carrying the form data you mapped. The receiving system processes that data however it’s built to.
Think of it as a direct pipeline from your WordPress form to any destination that can receive an HTTP request. The receiving end could be a public API, a private internal endpoint, a serverless function on AWS Lambda or Cloudflare Workers, or a custom script on your own server. If it has a URL and can accept POST or GET data, it can receive Ninja Forms submissions.
Webhooks vs. Third-Party Relay Services
Services like Zapier sit between your form and your destination, adding another system to maintain, another monthly subscription, and another potential point of failure. Webhooks connect directly. Your form data travels from your site to the destination in a single request with no intermediary involved.
That said, Zapier and similar tools are excellent when you need to trigger workflows across many apps without custom configuration. Webhooks are the right choice when you need direct control over the payload, when your destination doesn’t have a Zapier integration, or when you want to reduce external dependencies. The two approaches serve different needs and can coexist on the same form.
What the Payload Looks Like
When you enable JSON encoding, your form data is delivered as a structured JSON object. Using a basic contact form as an example, a POST payload looks like this:
{"name":"Jane Smith","email":"jane@example.com","message":"I'd like to learn more about your services."}Each key corresponds to what you entered in the ARGS interface. Each value is the data your visitor submitted in that field. The receiving API receives a clean, predictable JSON object it can parse and act on immediately. For GET requests, the same data is appended as URL-encoded query string parameters rather than sent in the request body.
Common Use Cases
- Feed a custom CRM or internal database: Push contact form submissions directly to a proprietary system that doesn’t have a WordPress plugin. Map name, email, and any qualifying fields to the parameters your system expects.
- Trigger serverless functions: Fire an AWS Lambda function, Cloudflare Worker, or similar compute endpoint on form submission. Useful for sending confirmation SMS messages, processing payments, or running custom backend logic without a dedicated server.
- Connect to tools without direct integrations: Many specialized SaaS tools accept incoming webhooks even when they don’t have a WordPress plugin. If their API accepts POST data, your form can send to it.
- Log submissions to a third-party data store: Send form data to Airtable, Notion, or any similar tool via their API endpoints. Keep a live record of submissions in the tool your team already uses.
- Push data into automation platforms: Send to Make (formerly Integromat), n8n, or similar automation platforms that expose webhook trigger URLs. Start complex multi-step workflows the moment a form is submitted.
- Notify internal systems in real time: Trigger inventory updates, support ticket creation, or order processing in internal business systems the moment a form comes in, without manual data entry or batch imports.
Your endpoint, your payload, your rules
Set the request headers, choose GET or POST, map fields to the request body, and let Ninja Forms deliver it in real time so your own systems stay in sync. Add it to your cart and wire your forms up your way.
Priority email support and a 14-day money-back guarantee included.
Frequently Asked Questions
-
A webhook is an HTTP request sent automatically when something happens. With Ninja Forms Webhooks, that "something" is a form submission. The moment a visitor submits your form, the add-on sends your configured form data to any URL you specify. The receiving system can then process that data however it's built to.
-
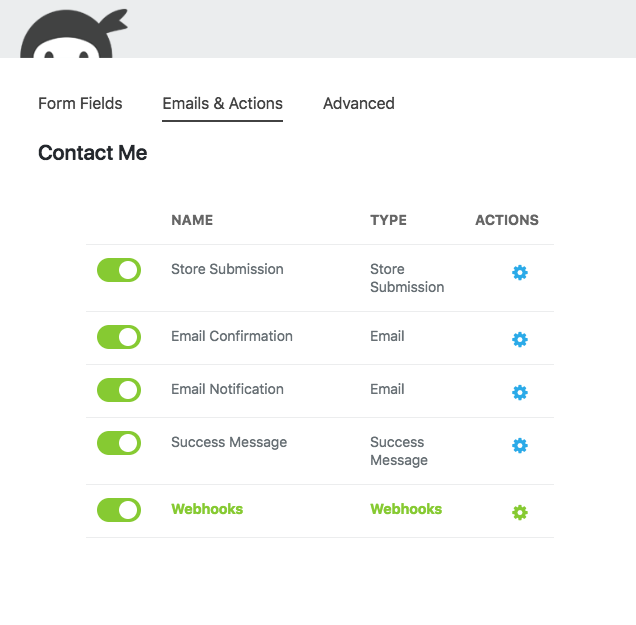
Install and activate the Ninja Forms Webhooks add-on, then open any form and add a Webhooks action from the Emails & Actions tab. Enter your API's endpoint URL, choose POST as your method, map your form fields to the parameter names your API expects using the ARGS interface, and enable JSON encoding if your API requires structured data. No custom code required.
-
Yes. The Webhooks add-on sends data to any URL you enter, whether that's a public third-party API, a private internal endpoint, a serverless function, or a custom script on your own server. If the endpoint can accept an HTTP GET or POST request, it can receive Ninja Forms data.
-
By default, data is sent as standard key-value parameters. If you enable the "Encode ARGS as JSON string" option in the Advanced settings, your mapped fields are formatted as a structured JSON object. This is the format most REST APIs and modern backends expect to receive.
-
Yes. Add multiple Webhooks actions to the same form and each one can be configured with a different endpoint URL, method, and field mapping. All configured webhooks fire simultaneously on a single form submission.
-
No. The Webhooks action runs alongside every other action configured on your form. Email notifications still send, submissions still save to the database, and any other actions still fire. You're adding behavior, not replacing it.
-
Yes. The Webhooks add-on is included with the Ninja Forms Elite membership plan. It is also available as a standalone purchase if you only need this specific add-on.
-
Licenses are subscription based and will auto-renew each year unless cancelled. If cancelled, you may still use your extensions but will no longer receive important updates or support once the license expires.