How to Upload Multiple Files at Once in WordPress
Your applicants need to send a budget, a site map, and a photo. So why does your form make them upload one file, submit, and start over? And when something finally comes through, which files did you get, and where did they go?
You just want visitors to upload multiple files in WordPress forms, in one go. Search for help, though, and most of what comes back is about the Media Library, which is for you, not your visitors. Meanwhile somebody on the other end has their scans and photos ready, and your form keeps telling them no.
Yes, it’s frustrating. But it’s also fixable, and most of the fix is one setting. Below, we’ll set up a form that takes several files at once, tell your visitors the rules before they choose anything, and show you what lands in your inbox.
What you’ll need
- Ninja Forms, the free form plugin
- The File Uploads add-on
Here’s how to upload multiple files at once in 2 easy steps
Most WordPress forms take one file per field until you tell them otherwise. In the Ninja Forms plugin, add a File Upload field and set its File Limit to the most files you want to accept. Visitors can then choose several files at once with the Select Files button, or drag and drop them onto the field.
1. Add a File Upload field to any form
Here’s the example we’ll build: a grant application for a capybara wetland restoration project, where applicants send up to three supporting documents (a project budget, a site map, and a photo of the marsh).
Open your form and stay on the Form Fields tab. Click the blue (+) icon to open the Fields window, and add a File Upload field from the File Uploads add-on.
2. Set File Limit to the number of files you want to accept
Click the field to open its settings, expand the Restrictions settings accordion, and set File Limit to the most files you want from one visitor. For the grant form, that’s 3.
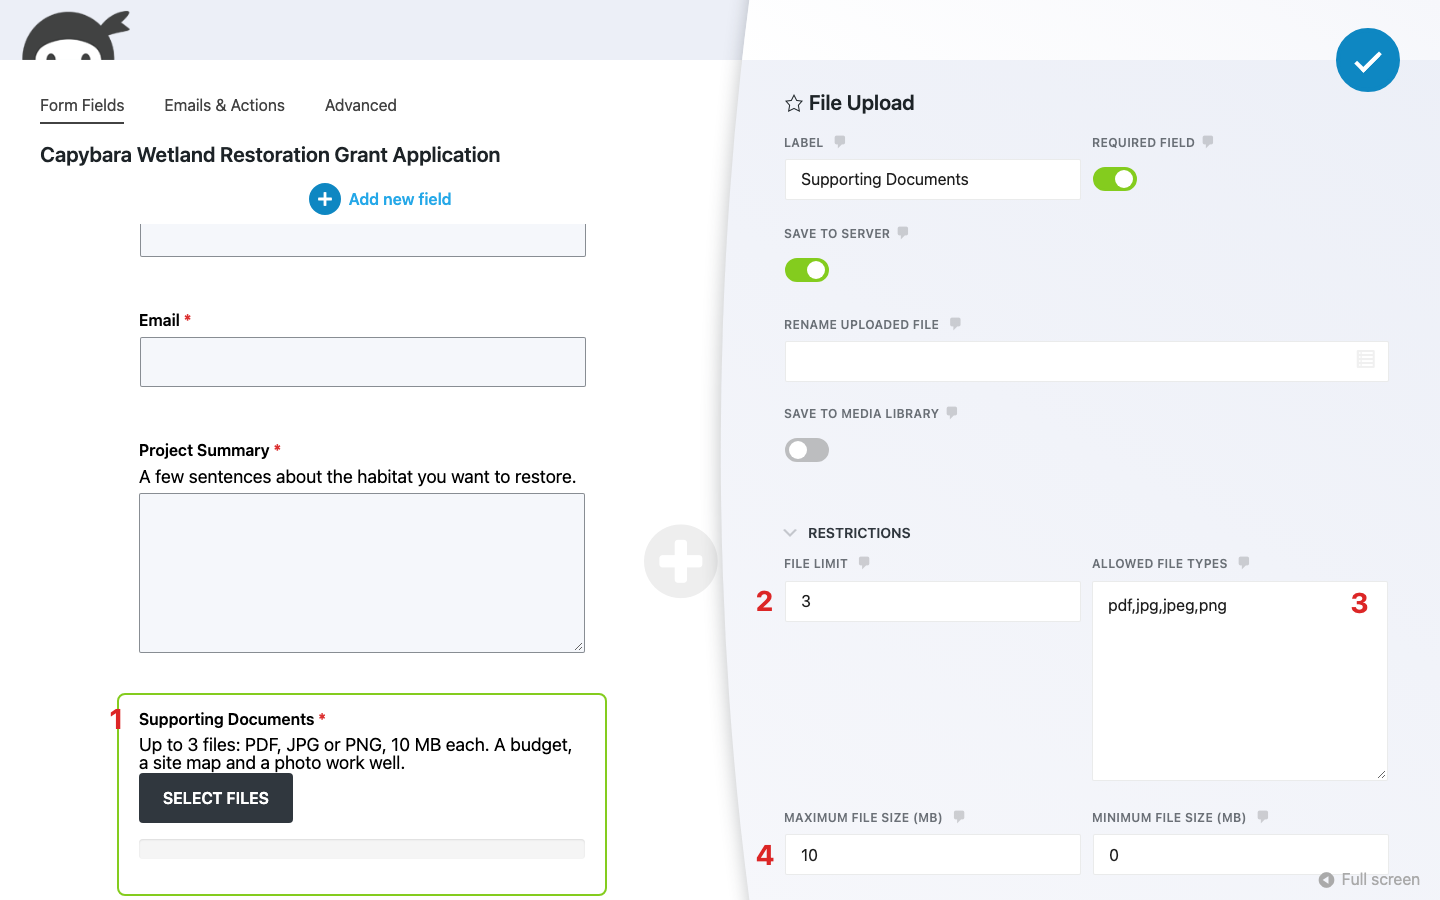
Whether it’s a bulk batch of photos or three specific documents, File Limit is the setting that decides how many come through. There’s no minimum, though. If you need several particular documents, like a budget and a site map, give each one its own required File Upload field instead.
Publish the form, open it on your WordPress site, and choose a few files to see it work.
That’s all there is to it. Your form now takes several files in one submission.
Optional extras: file types, size limits, and instructions for visitors
Those two steps are all you need. When you want more control over what comes in, these settings are there for you, and none of them are required. For everything else the field can do, the complete guide to the File Upload field walks through every setting.
Choose which file types and sizes you’ll accept
In the same Restrictions settings from step 2 (pictured above), list your Allowed File Types, separated by commas. The grant form takes pdf,jpg,jpeg,png.
Need something unusual? Here’s how to allow additional file types in your WordPress form.
Then set Maximum File Size in MB. The grant form uses 10. It’s checked per file, so a file over the limit is refused on its own, and the other files chosen with it still go through.
Your server has its own upload limit, and it sits above all of these. Your host sets it, and a Maximum File Size higher than your server allows won’t help. If you need bigger files, ask your host to raise the limit, then follow these tips to upload large files in WordPress forms.
A good rule of thumb for any multiple file upload form: set File Limit to the real number you need, keep Maximum File Size comfortably under your server’s cap, and allow only the types you plan to open.
Tell visitors the limits before they choose files
Nobody likes finding out about a rule after they’ve broken it. A visitor who picks five photos for a three-file field loses the whole batch and has to start over.
So expand the Display settings accordion and write your limits into Description, where visitors read them before uploading anything. The grant form’s reads “Up to 3 files: PDF, JPG or PNG, 10 MB each. A budget, a site map and a photo work well,” and it stays on screen between the label and the Select Files button.
Help Text works differently: it sits behind a small “i” icon next to the label. Its tip opens when a visitor reaches the icon, but it’s easy to miss. Keep the limits in Description, and use Help Text for extras if you like.
It’s a small thing that saves your applicants a lot of redos. If you want the reasoning behind it, the W3C explains why instructions belong before the input.
With or without the extras, your form is ready. Next, let’s look at it from the other side of the screen.
What your visitors see when uploading multiple files
Visitors click Select Files, and their file chooser opens ready to take more than one file. They hold Ctrl, Command or Shift to pick several, and each file they choose appears in a list under the button with a Delete link next to it. A visitor with a bulk batch of photos can also drag and drop them onto the field, or add a second round of files later, up to your File Limit.
Drag and drop isn’t the only way in, either. The Tab key reaches the Select Files button, and Enter or Space opens the file chooser in multi-select mode. The file chooser also starts out filtered to the file types you allow, so most visitors won’t even see the files your form would turn away.
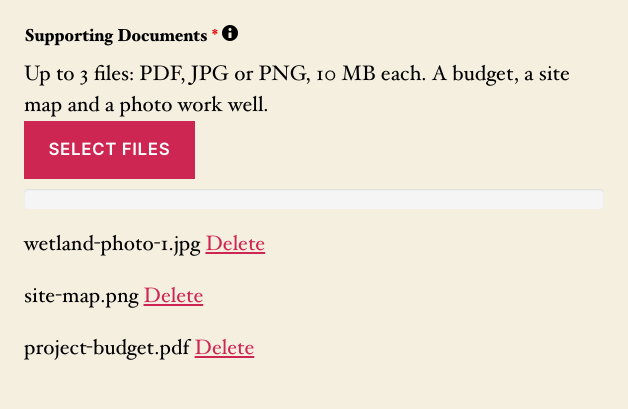
Here’s what a visitor sees when a file doesn’t fit:
- Too many files in one go. A browser pop-up says “Max 3 files are allowed,” and none of that batch is added. They choose again.
- One file too many in a second round. The same pop-up appears. The extra file is left out, and the files already in the list stay put.
- The wrong file type. Red text under the field reads “File extension not allowed.” The good files from the same batch stay in the list.
- A file that’s too big. Red text reads “File exceeds maximum file size. File must be under: 10MB.” Again, the other files in the batch are kept.
For the type and size errors, a “Please correct errors before submitting this form.” message also shows near the submit button until the visitor adds a file that fits.
Where do the files go once the form is sent?
Every file is saved with the submission in your WordPress dashboard, and your notification email lists each one as its own link.
Here’s where to find everything from a multiple file upload:
- In your email. On the Emails & Actions tab, open your email action. Any merge tag for the File Upload field, or the full fields table, lists every file as a link.
- As attachments. In that same email action, expand the Advanced settings accordion and turn on Attach File Uploads to get the files themselves, too. Don’t see the toggle? Publish the form, reload the builder, and look again.
- In your submissions. Each entry under Ninja Forms > Submissions in your WordPress admin holds every file the visitor sent. Files saved to your server are also listed under Ninja Forms > File Uploads, on the Browse Uploads tab.
Two applicants both send a file called budget.pdf? No worries. The second one is saved with a number added to its name, so nothing gets overwritten.
Want your file uploads somewhere other than your server? The External File Upload action can send them to Dropbox, Google Drive, or Amazon S3. And since you’re taking files from people you don’t know, it’s worth a few minutes on keeping your WordPress file uploads secure.
Multiple file upload not working? Check these first
Form published, test files chosen, and the plugin still won’t take them? Uploading problems almost always come down to one of these:
- A “Max files” pop-up appears. The visitor chose a bulk batch bigger than your File Limit allows. Raise the limit, or say the number in Description so they choose fewer.
- “File extension not allowed.” Add the extension to Allowed File Types (in the optional extras above).
- “File exceeds maximum file size.” Raise Maximum File Size, staying under your server’s limit (more on that above).
- An error stays on screen after the bad file is deleted. Adding a file that fits clears it. Reloading the page also gives the visitor a fresh start.
Start taking multiple files at once with your WordPress forms
Remember that applicant with a budget, a site map, and a photo? They can now send all three in one go. Pick a limit, tell visitors up front, and check what arrives.
That’s how you let people upload multiple files in WordPress forms without the back-and-forth. Set File Limit to the number you need, and let the Description do the explaining.
Ready to stop asking people to email you the rest? Pick up the File Uploads add-on, and keep the File Uploads documentation handy while you set up your first field.
Try Ninja Forms Today
Always free, with premium features available through our memberships.