Add an E-Signature to a WordPress Form (No Extra Software)
You need someone to sign something on your website. A liability waiver before the trek, a permission slip for the field trip, a “yes, I read the rules” before a booking goes through. So you search for a WordPress e-signature tool, and the first thing you find is a price tag: $15, $25, $50 a month for what amounts to one line on a form.
Then come the questions. Does a typed name even count as a signature, or does it have to be a squiggle drawn with a finger on a phone? Can you make the signature line show up only after they tick the “I agree” box, and where does the signature end up once they click submit?
That is a lot of worry for one form field. The good news is you can put all of it down. Ninja Forms has a Signature field built into the free plugin, so you can collect an e-signature in WordPress right on the form you already have, and below you will add it, decide whether typed or drawn is enough for your situation, and see where each signature goes after someone signs.
What you’ll need
- Ninja Forms (free, and the Signature field is included)
- Optional: the Conditional Logic add-on (standalone, or included with memberships), only if you want the signature line to appear after the visitor agrees
- Optional: the PDF Form Submission add-on (standalone, or included with memberships), only if you want a signed PDF copy
Yes, you can collect an e-signature in WordPress without paying for signature software
Ninja Forms includes a Signature field in its free core plugin. A visitor can type their name, which renders in a cursive font, or draw a signature with a mouse, finger, or stylus. Each signature is stored with the submission and shows on the Submissions screen in your WordPress admin.
No add-on. No third-party account. No code, and nobody gets bounced off your site to sign somewhere else.
Think of the clipboard at the front desk of a gym or a clinic. Read the sheet, tick the box, sign the line, hand it back. That is the job this field does, and for waivers, consent forms, permission slips, and everyday agreements, it is all most sites need.
If you found an older article of ours that had you fake a signature with a text field and a checkbox, you can forget it. The real field replaces that workaround and does more, for free.
Does a typed name count as a real signature?
A typed signature or a drawn signature in Ninja Forms is a record that someone read your terms and agreed to them. It is not a certified legal e-signature. The Signature field does not meet the ESIGN Act, UETA, or eIDAS compliance standards, and we say so plainly in the field’s documentation.
So where is the line? If you need a record that a customer accepted your cancellation policy, a parent okayed a field trip, or a hiker acknowledged the risks, a typed or drawn signature on your form does the job. If a lawyer may one day need to prove who signed and when, with identity checks and an audit trail, you want a dedicated signing service.
That second case has its own article: accept a legally binding e-signature in a WordPress form walks through connecting your form to DocuSign. Everyone else, keep reading. You have it easy.
Here’s how to add a signature field to your WordPress form
This is a few clicks in the form builder, and you will not touch a line of code. We will build a liability waiver for a llama trek (yes, really), but the same steps work for any electronic signature form, from a permission slip to a rental agreement. Name, email, the terms, an “I agree” box, then the signature.
Put the terms and an “I agree” box on the form first
- Go to Ninja Forms > Add New and pick Blank Form. To use a form you already have, go to Ninja Forms > Dashboard and choose Edit from the row’s chevron menu.
- On the Form Fields tab, click the blue (+) icon to open the Fields window, then add an HTML field and paste your terms into it.
- Back in the Fields window, add a Single Checkbox from Common Fields. Label it something like “I have read and agree to the waiver terms above.”
- Click the checkbox on the canvas to open its field settings window and switch on Required Field.
Leave the box unchecked by default. A pre-ticked consent box generally does not count as consent, and it undercuts the whole point of asking.
Add the Signature field
- Still on the Form Fields tab, click the blue (+) icon again. In the Fields window, find Signature under Common Fields and click it (or drag it into place).
- Drag the new field so it sits after the checkbox and before the Submit button.
- Click the Signature field on the canvas to open its field settings window and switch on Required Field.
- Leave Signature Method on Both Options. Visitors get a Type Name button and a Draw Signature button and choose for themselves.
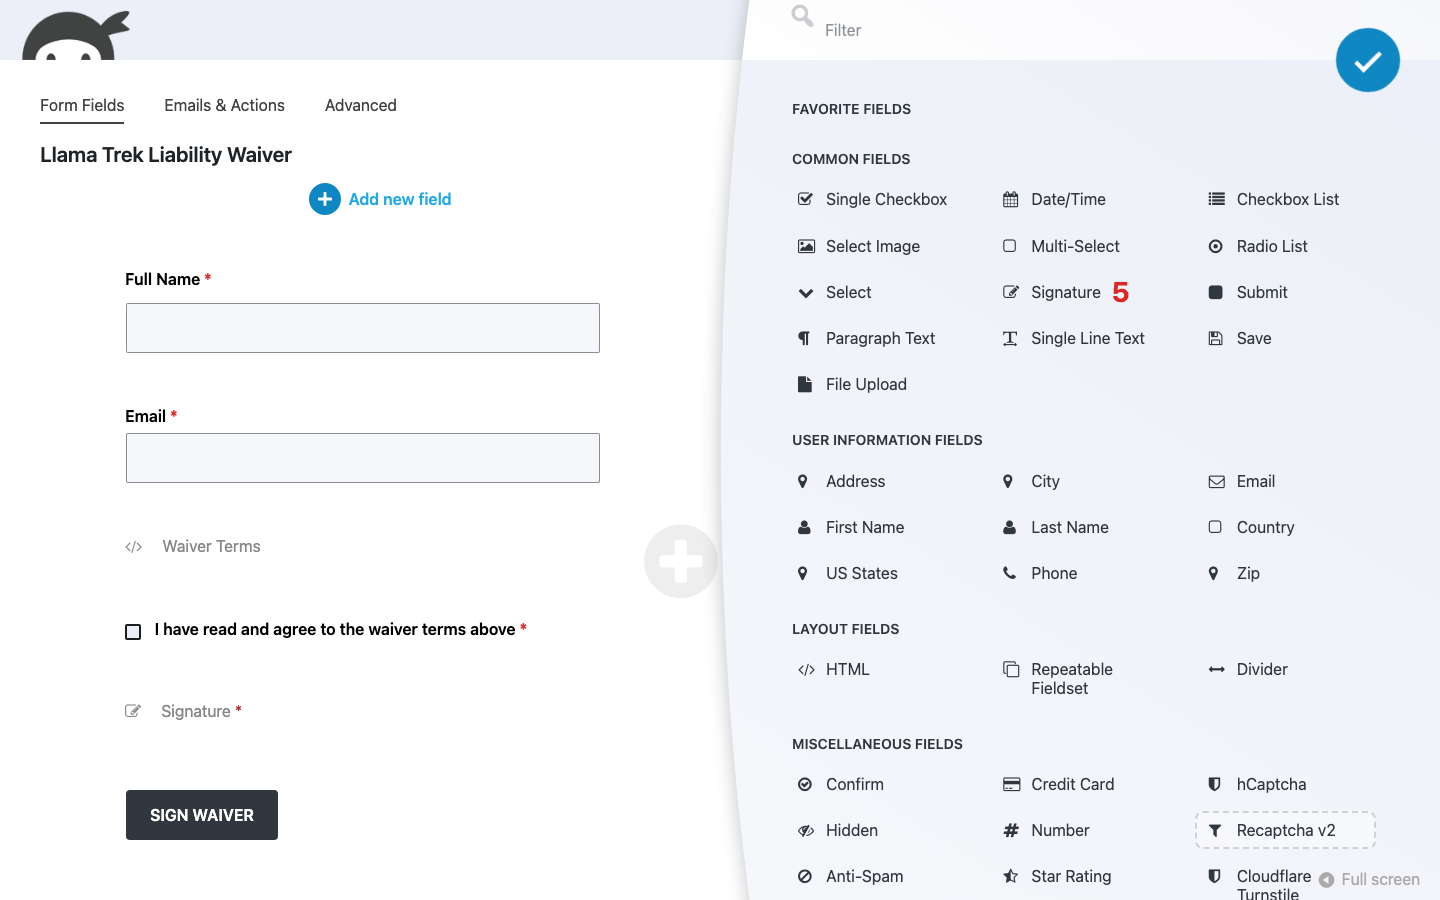

The rest of the settings are cosmetic, and the defaults are sensible. Typed names render in Dancing Script, drawn ones get a 400 by 150 pixel canvas with black ink on white. Change them if you like, but you do not have to touch them to get a working form.
Publish it and sign it yourself
- Click Publish, then open Preview Form at the top of the builder (or the page where you embedded the form).
- Submit once with a typed name, then once more with a drawn signature. Try the drawn one on your phone too.
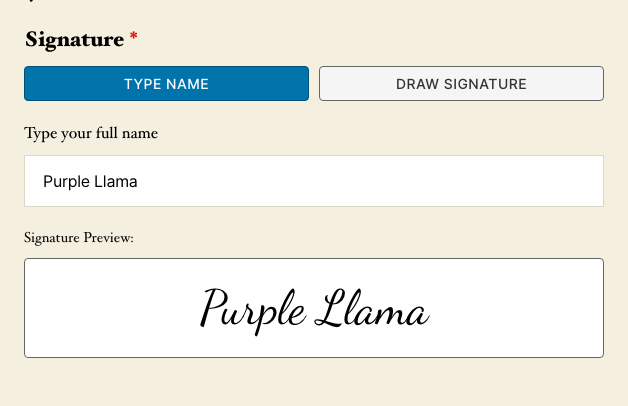
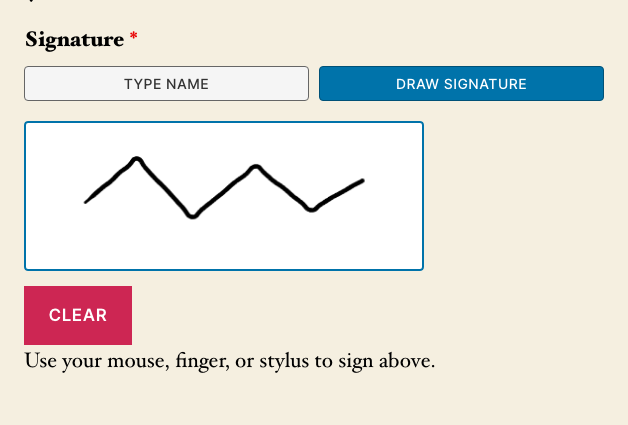
Here is what your visitor sees. Two buttons, Type Name and Draw Signature, with Type Name selected to start. Typing a name shows a live preview in the signature font, and switching to Draw Signature swaps in a canvas with a Clear button and a hint to use a mouse, finger, or stylus.
Try to submit without ticking the box, or without signing. The form stops you both times. On a phone the canvas shrinks to fit the screen, so nobody has to sign sideways.
That’s all there is to it. Your form now collects signatures, and every one of them lands on the Submissions screen, which we will get to below.
Give Ninja Forms a try today!
Ninja Forms is free! Optional premium features available with any membership.
Want the signature line to appear only after they agree? Conditional Logic does that
On paper, you read first and sign second. A form can work the same way. With the Conditional Logic add-on, the Signature field stays hidden until the visitor ticks “I agree,” then appears right where they expect it.
This part is optional, and it is the only step in this article that needs a paid add-on. If you are happy with the signature line always showing, skip on down to the next section.
- Open the Advanced tab and click into Conditional Logic.
- Click Add New Condition.
- Under When, pick your checkbox field, then Is, then Checked.
- Under Do, pick Show Field and choose Signature.
- Under If the Condition Is Not Met, pick Hide Field and choose Signature.
- Click Done, then Publish.
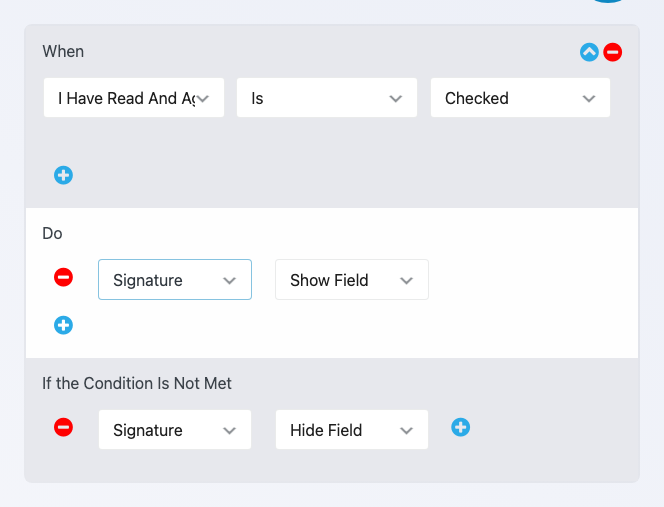
Now the signature line is nowhere to be seen when the page loads. Tick the box and it appears with both signing buttons. Untick it and it goes away again.
One thing to keep straight. Hiding a field does not stop anyone from submitting; the Required Field switch on your checkbox is what holds the form until they agree, so keep that on. If you would rather leave the signature visible at all times and only make it mandatory once the box is ticked, choose Is Required under Do instead of Show Field.
Here’s where the signature goes after they click submit
Someone signed. Now what? The signature is waiting for you in your admin, it can ride along in email, and with an add-on it can become a PDF.
On the Submissions screen
Go to Ninja Forms > Submissions and pick your form. The table has a Signature column: drawn signatures show as the image, typed names show in the cursive font. The Date column tells you when they signed.
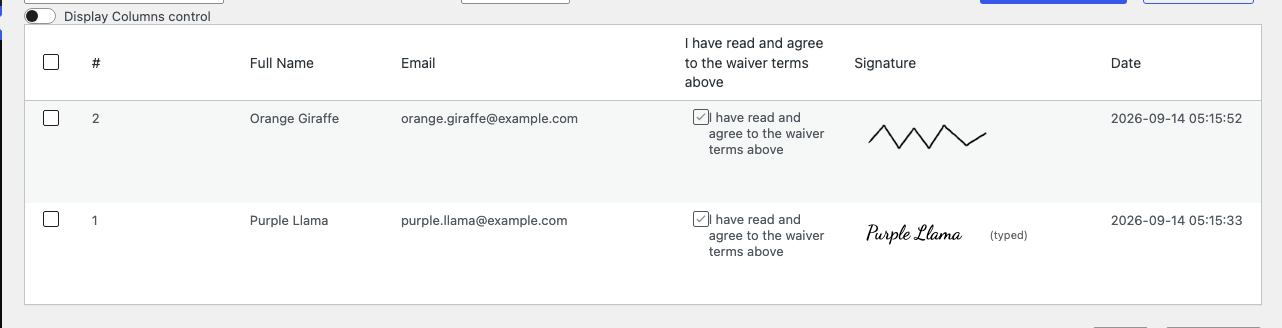
Signatures cannot be edited after submission, so what you see is what was signed. If you export submissions to a spreadsheet, the drawn image does not come along; the export notes the method and that the field was signed, plus the typed name if there was one. The Submissions screen is the place to see the signature itself.
In your email
The Admin Email action every new form starts with already includes the signature, because its message is the full fields table. To send the signer a copy, go to the Emails & Actions tab, click the blue (+) icon to open the Actions window, and add an Email action. Set To to your Email field’s merge tag and drop the Signature field’s merge tag into Email Message using the merge-tag picker.
In an HTML email, a drawn signature arrives as an embedded image and a typed one arrives as the name in its signature font. Some email programs block embedded images, so a drawn signature may not display in every inbox. It is always on the Submissions screen, so check there before you assume anything went wrong.
As a PDF copy (optional add-on)
Want a signed PDF the visitor can keep? The PDF Form Submission add-on builds one from each submission. Its form-level options live on the Advanced tab under PDF Submissions, and to attach the PDF to an email, open that Email action, expand its Advanced settings accordion, and switch on Attach PDF.
One setting matters for the signature. The default PDF layout shows a text stand-in (the typed name, or a note that a drawn signature was captured). To get the signature itself into the PDF, use a Custom Document Body with {fields_table} in it, as shown in the PDF Form Submissions docs.
Start collecting signatures on your WordPress forms today
Like we said at the top, a signature line should not cost you a monthly subscription, a second account, and a visitor who leaves your site to sign. Add the Signature field, switch on Required Field, and you are collecting typed and drawn signatures on your own form this afternoon.
For waivers, consents, and everyday agreements, the built-in field is all you need, and we would not pay for more. When a contract carries real legal weight, that is what the DocuSign route above is for. Go sign your own form once, on your phone, and see how it feels from the other side.
Try Ninja Forms Today
Always free, with premium features available through our memberships.