Automating WordPress GDPR Export and Delete Requests
A GDPR export request just landed in your inbox, and someone wants a copy of every bit of personal data you have on them. Or they want all of it deleted. So where does that data even live: your form entries, your user list, some plugin table you’ve never opened?
Search around and you’ll find legal explainers, privacy plugins with a dozen settings pages, and forum threads telling you to run a database query. You’re not sure if you need yet another plugin. And you really don’t want to dig through everything by hand for this request, and the next one, and the one after that.
Yes, it’s a little nerve-wracking, but it’s also very fixable. WordPress already has a home for these requests, and your forms can feed them straight into it, so every request reaches you verified and ready for a click or two. Below is the whole setup, start to finish (and if you’re after the broader compliance picture, our GDPR checklist for WordPress forms covers it).
What you’ll need
- Ninja Forms (free)
How do you handle a GDPR export or delete request in WordPress?
WordPress has two built-in screens for this: Tools > Export Personal Data and Tools > Erase Personal Data. Ninja Forms ships two free form templates, Export Data Request and Delete Data Request, that send a visitor’s request straight into those screens. WordPress emails the visitor a link to confirm it’s really them, and once they do, you send their data or erase it with a click, no add-on or separate privacy plugin required.
Here’s the whole thing in three steps:
- Tell each form that collects personal data which field holds the submitter’s email.
- Add the two request forms and put them on a page.
- Finish each request from Tools when it comes in.
Want old entries to clean themselves up too? Skip on down to the last section.
One thing to know before you start: these tools help you handle data requests, but they don’t make your site GDPR compliant on their own. Ninja Forms doesn’t act as a data controller or processor for your site; you’re still the one responsible for the data.
Map the submitter’s email so your form entries show up in a GDPR export
When a request comes in, WordPress goes looking for everything tied to that email address. Your Ninja Forms submissions join that search when each form’s Store Submission action knows which field holds the submitter’s email. Think of it as a name tag on every entry.
It’s one dropdown per form:
- Open a form that collects personal data (a contact form, a sign-up form) and click into the Emails & Actions tab.
- Click the Store Submission action to open its settings. In the list, its type reads Record Submission.
- Expand the Advanced section.
- In Designated Submitter’s Email Address, choose your form’s email field.
- Click Publish in the top right of the builder.
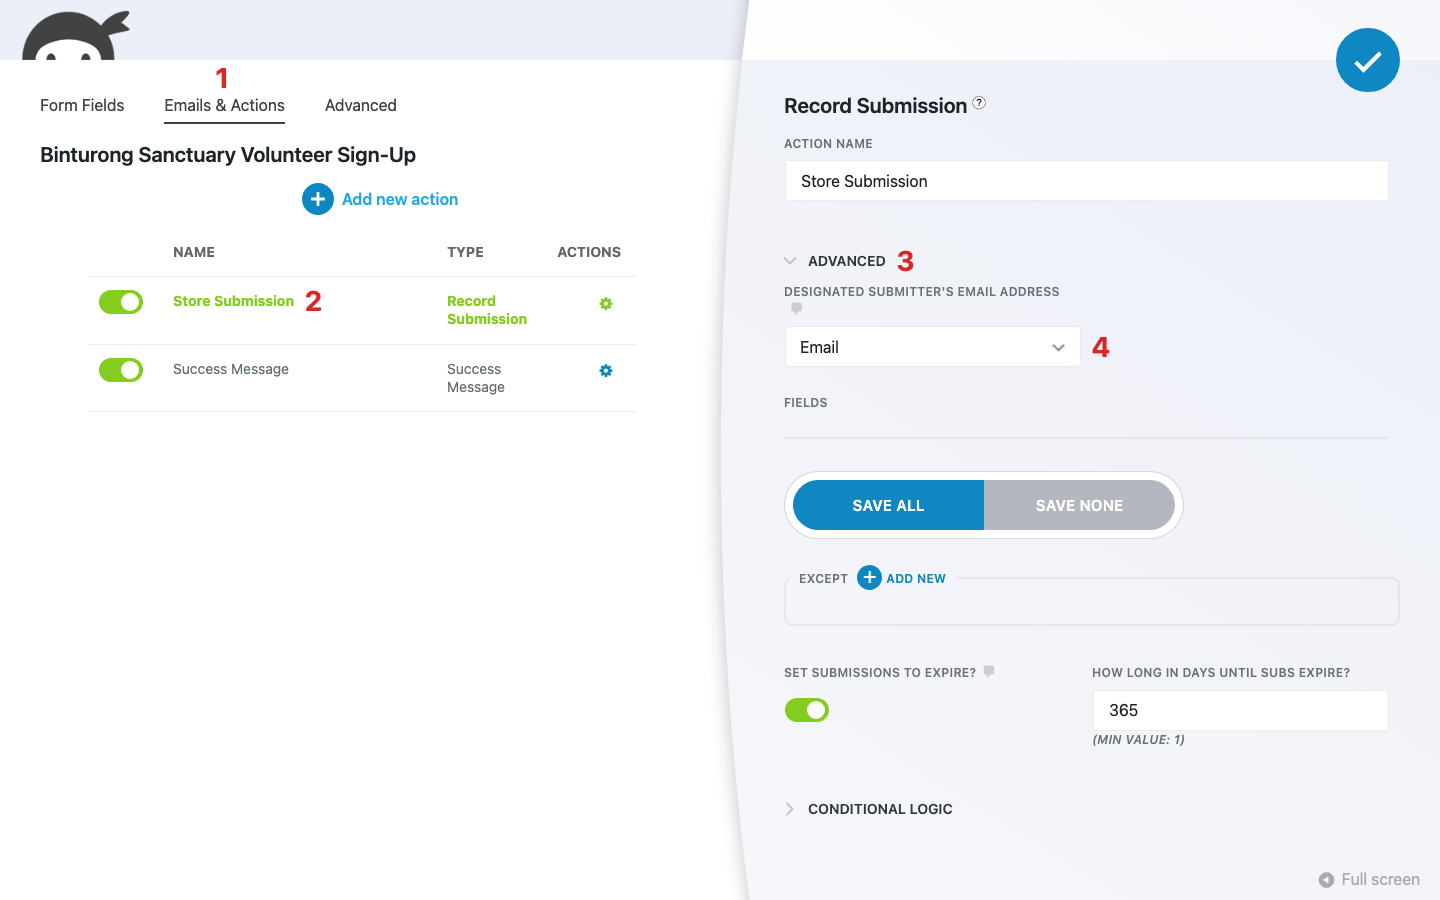
That’s all there is to it. Repeat it for every form that collects personal data. On our Binturong Sanctuary volunteer sign-up form, that’s the Email field, and it’s what ties each volunteer’s name, phone number, and shift choice back to them when they ask.
Add the Export Data Request and Delete Data Request forms
You have it easy here. Ninja Forms ships both request forms as templates, each with one Email field and the matching action already wired up.
Before you build them, make sure your site sends email reliably. WordPress emails every requester a confirmation link, and the request stays stuck until they click it. If your form notifications ever go missing, get your WordPress email working first.
- Go to Ninja Forms > Add New and pick the Export Data Request template.
- Click into the Emails & Actions tab and click the Export Data Request action.
- Check that its Email setting points to the form’s Email field. The template sets this for you, so leave it as is.
- Click Publish.
- Go back to Ninja Forms > Add New and repeat with the Delete Data Request template.
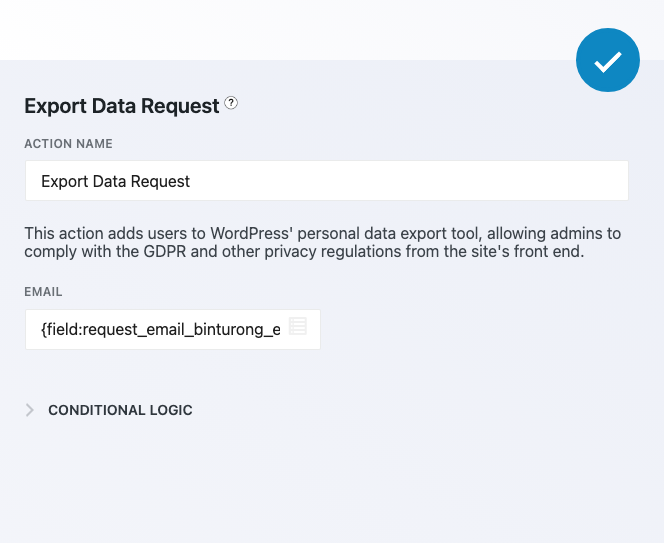
Logged-in visitors see their email already filled in. Everyone else types theirs, and they don’t need an account on your site for the request to find their form entries.
Now put both forms on a page with the Ninja Forms block, or paste each form’s shortcode from the Shortcode column on Ninja Forms > Dashboard. Your privacy policy page is the natural home, since that’s where people go looking. Test from that live page, not the builder’s Preview: Preview doesn’t create requests, so you’d see nothing in Tools and think it’s broken.
You can also add an Export Data Request or Delete Data Request action to any existing form (Emails & Actions, then Add new action). We wouldn’t do it on your contact form, though. Every message someone sends you would turn into a data request.
What happens after someone submits a GDPR export or delete request
The request shows up in Tools > Export Personal Data (or Tools > Erase Personal Data) with the status Pending, and WordPress emails the visitor a confirmation link. When they click it, the status changes to Confirmed. From there, you finish it in a click or two.
Send them their data
- Go to Tools > Export Personal Data and find the request.
- Once the status reads Confirmed, click Send export link in the Next steps column. WordPress emails them a download link.
- To grab a copy yourself, hover the requester’s email and click Download personal data.
The export is a .zip file with an HTML report inside. Each matching form entry gets its own group, labeled Ninja Forms Submission Data and the form’s title, with every field label and value. For our test binturong volunteer, that meant their name, email, phone number, and shift.
Erase their data
- Go to Tools > Erase Personal Data and find the request.
- Once the status reads Confirmed, click Erase personal data in the Next steps column. WordPress tells you “All of the personal data found for this user was erased.”
- Click Complete request to mark it done.
Can you skip the confirmation step?
The row actions work while a request is still Pending, so technically, yes. We’d wait. That confirmation click is how you know the person asking owns that email address, and handing someone’s data to a stranger is a lot worse than a slow reply.
Request stuck on Pending?
That means the visitor hasn’t clicked their confirmation link yet. Most of the time the email never arrived, so ask them to check spam, then check your site’s email setup. If they submit the form twice, no worries: a second request of the same kind for the same email doesn’t add another row while the first one is still open.
Give Ninja Forms a try today!
Ninja Forms is free! Optional premium features available with any membership.
Auto delete form entries in WordPress so there’s less to hand over
Ninja Forms can move a form’s submissions to the trash automatically after a set number of days. The setting is Set Submissions to expire?, in the same Store Submission action you opened above. The default is 90 days.
Our take: the easiest data request is the one where there’s not much to hand over. If you don’t need three-year-old sign-ups, don’t keep them.
One heads-up before you switch it on. It applies to the form’s existing submissions too, not only new ones, so anything older than your cutoff goes to the trash. Export anything you want to keep from Ninja Forms > Submissions first.
- Back in the Store Submission action’s Advanced section (pictured above), turn on Set Submissions to expire?.
- In How long in days until subs expire?, enter how many days to keep each entry.
- Click Publish.
That’s it. From then on, the form keeps only as much history as you told it to.
Let your forms handle the next GDPR request
Like we said at the top, a data request can feel like a scary email. Now it’s a form on your privacy page that drops a verified request into Tools, plus a click or two from you. Your form entries come along in every export because each form knows whose email is whose, and expiring old entries means there’s less to hand over in the first place.
You don’t need a separate privacy plugin for any of this. Set up your two request forms today, and the next request that lands will be the easiest one you’ve handled.
Try Ninja Forms Today
Always free, with premium features available through our memberships.
Hello,
There is a way to call the Complete Request function after pressing confirmation from the received email. Without an admin / authorized person completing the action by clicking the Complete request link?
Thank you.
Hello 👋,
If you would, please reach out to our customer support team, where we’d be happy to assist with your question: https://ninjaforms.com/contact/
Is it possible to redirect people after clicking confirmation link in email another custom page not the admin page
Hello Kenan,
Our Ninja Forms free core plugin comes with a Redirect action, that sends users to whatever page, post, or website you want them redirected to. To set up conditional redirects, see, https://ninjaforms.com/blog/how-to-setup-a-thank-you-page-redirect-for-ninja-forms/ and https://ninjaforms.com/blog/how-to-redirect-wordpress-forms-to-landing-page/. Let us know if you have any other questions or concerns.