Prioritizing leads based on their potential value to your company is a no-brainer. There are always going to be high quality leads that you want your sales team to act on asap. Problem is, trying to setup a good system for lead scoring can quickly turn into an overly complex mess or drain hours of valuable time and resources.
You know your customers best! Are you manually sifting through new leads one by one each day trying to determine who you need to reach out to first? You’re spending time and resources you don’t have to.
You may have realized this and hired someone outside your organization to qualify leads for you… but then you’re sacrificing the personal touch that’s so important to your business, and spending money to do it!
Tried managing lead scoring through your CRM? It’s often very complicated to implement and, unless you’re dealing with very high volumes, possibly way more than your organization needs in the first place.
You can automate lead scoring with WordPress easily, without spending a dime!
All you need to start lead scoring with WordPress is a contact form plugin that can handle calculations. That’s it. There are more advanced actions that you can take based on the lead’s score that we will look at further down the page, but for now let’s look at how to set up a form that will rank a lead based on the information they provide you.
Please note that for all Ninja Forms versions 3.4.11 and later (released 7 May 2019), all new installations of Ninja Forms will need to have Developer Mode enabled to see all the features described below.
Building a form to qualify leads in 3 easy steps
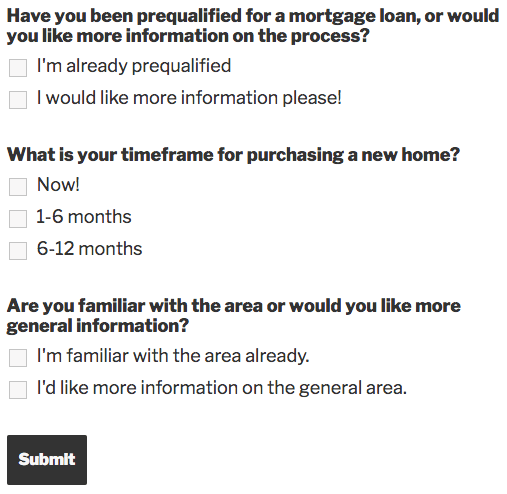
Below is an example section of a form with questions a realty company might ask prospective buyers. Based on the answers to these questions, an agent would know whether they have someone reaching out ready to buy, or someone that’s more casually browsing.
We’ll use this form to demonstrate how you can start lead scoring with WordPress:

Step 1: Assign each answer a value
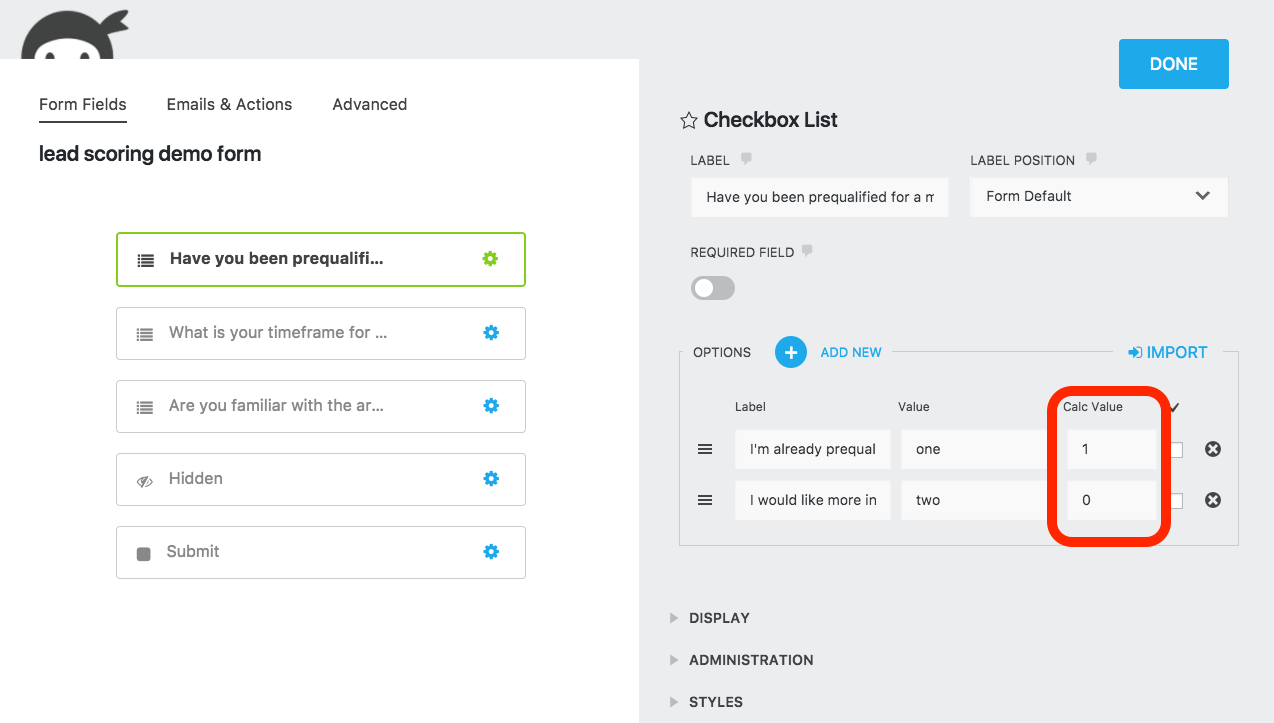
Using Ninja Forms, you can assign each checkbox list item (or many other fields) a Calc Value. The sum of these values will be the lead score we output when the form submits. In this example, we’ll assign a value of 1 to any lead that indicates that they’re already prequalified for a mortgage loan, and a 0 if they are not.

Do the same for each question that’s going to be a part of the overall lead score, and next we’ll set up a calculation to capture the overall score itself.
Step 2: Calculate the lead score
Now that we have our Calc Values in place, we’ll need to calculate the overall lead score based on these values.
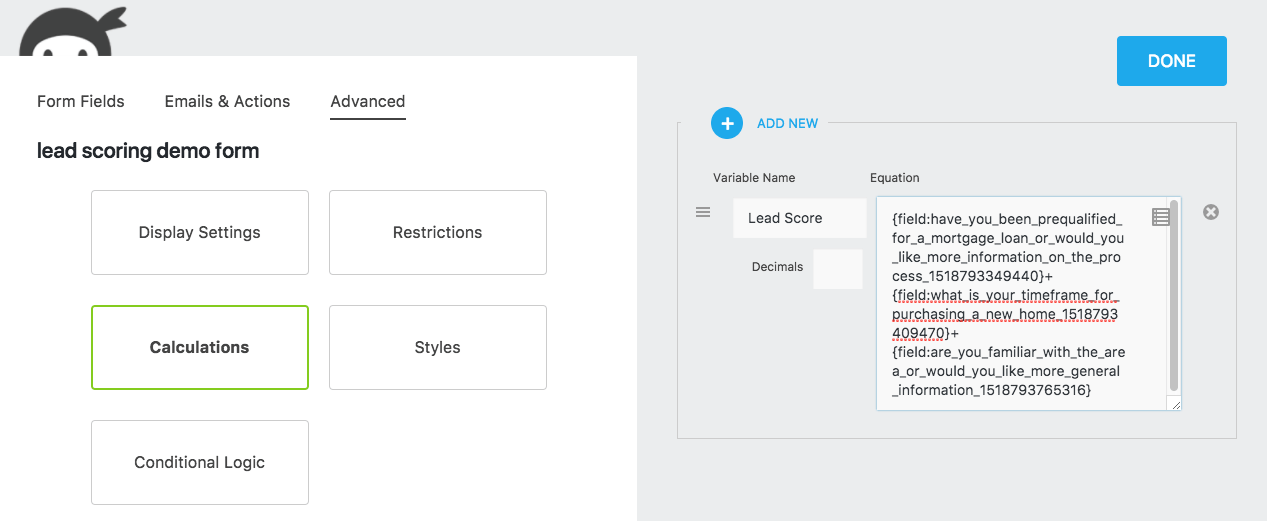
- Navigate to the Advanced tab of your Ninja Forms builder and select Calculations.
- Add a new calculation and name it (Variable Name)
- Define the equation by using the merge tag icon to select the fields for which you’ve assigned Calc Values (we have documentation on calculations here if you need more info).
In this example we’re just summing the three checkbox list fields in which we’ve assigned Calc Values to the list options. It looks a little complicated, but it’s simply Field 1 + Field 2 + Field 3:

Step 3: Output the lead score
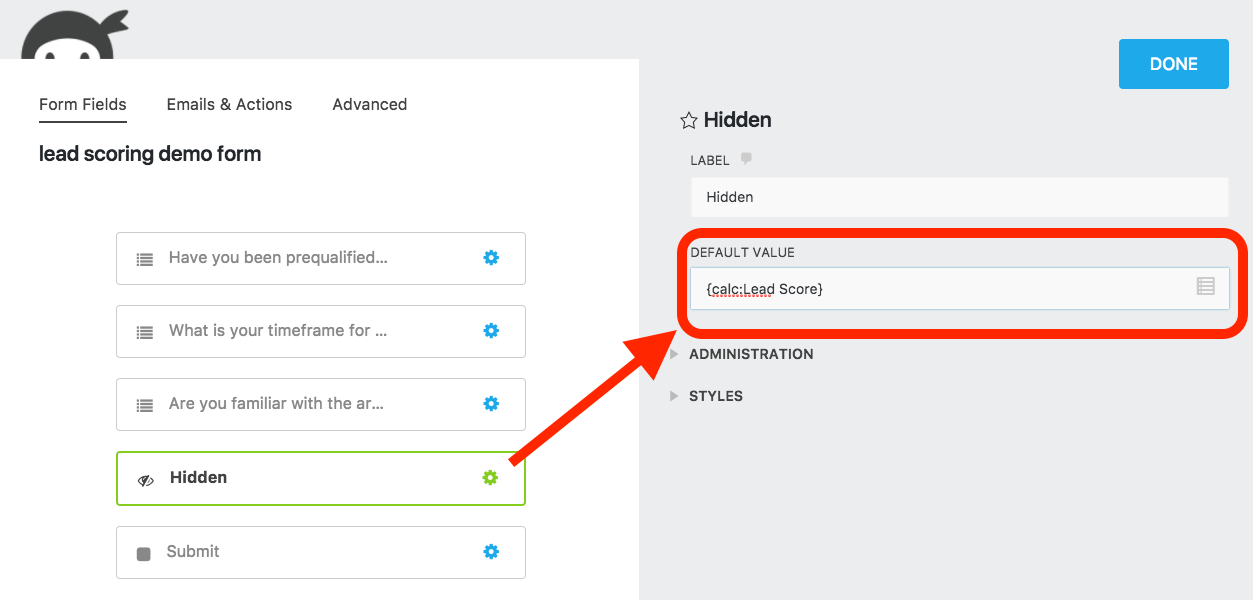
With the calculation set up, you can capture it ‘behind the scenes’ in a Hidden field. This will be invisible to users, but will appear in your form submissions and can be sent out in an email or other notification. Just pop a Hidden field onto your form and set its Default Value as the calculation you just created:

Bonus: 5 neat form tricks you can use with your new lead score
Using Conditional Logic, there are a number of very useful options at your disposal for working with your new lead based on the lead score you’ve calculated. Here are 5 ideas to get you started!
- Email specific individuals or departments when a new high quality lead is submitted.
- Send SMS/text notifications to specific individuals within your organization when a very high quality lead is submitted
- Display custom success messages to the lead based on their lead score
- Send a custom email or video response to each new lead based on their lead score
- Redirect the user to specific pages based on their lead score
Conditional Logic can be applied to email, redirect actions, success messages and more. Make them fire only if the users’ lead score value falls below, within, or over a chosen threshold to present custom responses or notify key members of your team!
Following the above steps saves your organization time, resources, and allows for faster response times to high quality leads
Lead scoring with WordPress means no fooling with complex implementations you may not need. No money spent on hiring someone else to do it for you. Keeping your customer relationships internal means with better results for your team and your customers.
Its a win-win! Want to share a similar setup that you’re using with Ninja Forms? Have suggestions on how we can improve this system to help you handle leads better? General questions? Sound off in the comments below!


