Send Conditional Email with Ninja Forms!

Sending email triggered by form submissions is simple! A question we’re often asked is about the ability to send email only to certain people or departments based on what a user inputs into their form. Let’s take a minute and look at how to send conditional emails with Ninja Forms!
Install the Conditional Logic extension
To send a conditional email you first need to get and install our Conditional Logic extension. Conditional Logic adds the ability to set conditional statements throughout your form. Adding criteria to send conditional emails is just one part of this add-on.
You can find the other settings for conditional statements in the Advanced tab of the form builder. Your email actions, however, have conditional logic options conveniently baked into the Emails & Actions tab. Let’s walk through exactly how to set up statements to send a conditional email now!
How to Send A Conditional Email
For the purpose of this tutorial, let’s use the Quote Request form template. It’s available to you when you create a new form. Here’s what ours looks like to the person filling it out:
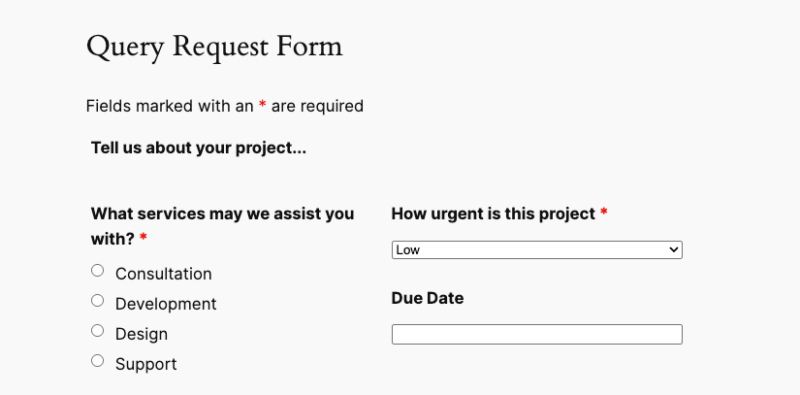
Say we want to send an email to the relevant department depending on how the “What services may we assist you with?” question is answered. If Consultation is checked, we want an email to go to the folks at consultation. If Development is checked, we want an email sent to the development people, etc. In short, we want an email sent to each department that gets ticked on this question, and if a department is left unticked, then no email is sent.
Let’s do this!
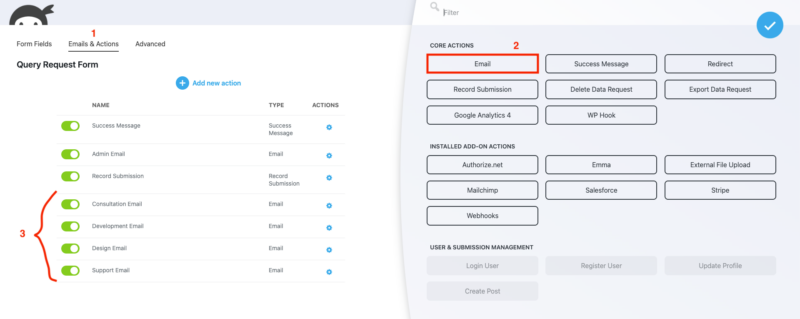
Step 1: Create an Email Action for Each Department
Easy peasy:
- Click the Emails and Actions tab in the form builder
- Add one email action for each department (click the little blue circle in the bottom right of your screen to slide open the actions menu window)
- Name each action appropriately so you don’t lose track of who’s who!
Step 2: Add a Conditional Statement to Each Email Action
This is also super easy. Click on the first email action to add a conditional statement. I’ll go with Consultation. That slides open the action’s settings window:
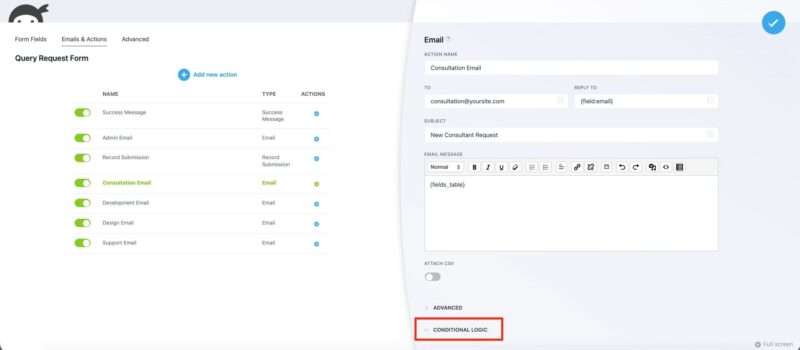
Set up the To field, subject, and email message as appropriate to your needs. With that done, expand the Conditional Logic options that I have circled in the above screenshot.
You can see below how I’ve set the conditional statement for this email. You want this Process This action when “What Services May We Assist You With” Has Selected the Consultation radio list option. This targets the Consultation radio list option of the “What services may we assist you with?” radio list field of the form, so that when it is checked and the form is submitted, this email action will fire. Now this email action will not fire unless this condition is met!
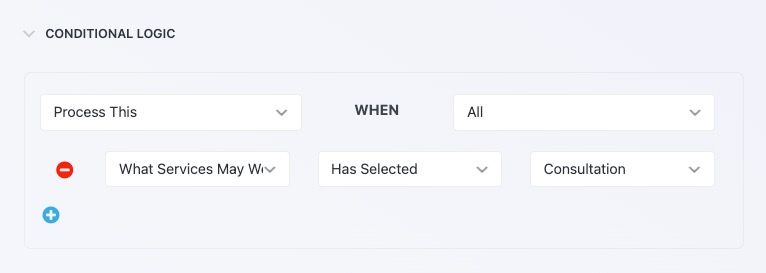
To finish, all you would need to do now is repeat Step 2 for the other 3 email actions, setting each conditional statement appropriately for that action. At that point, you have a form that will send a conditional email to any combination of 4 departments selected by the user in the form. Send conditional emails to specific recipients based on what a user inputs into a form? Yes you can!
Now, it’s your turn to send some conditional emails
The sky is the limit when you have the Conditional Logic add-on added to your emails. Want to send reports submitted from a job site to the appropriate parties? Check.
Set triggers in a form that notify relevant parties when those values drop below or exceed a certain threshold? Check.
Automate email responses to certain individuals when given criteria are met? Check.
Mix it with a newsletter extension like MailChimp? Also possible.
Let us know what you use your conditional emails for in the comments section!
Try Ninja Forms Today
Always free, with premium features available through our memberships.
Can conditional logic be applied to the “Collect Payments” action?
Yes it can!
Hi. Will NinjaForms conditional logic same as the above scenario works if the field value is change from the submission list edit screen and not from the frontend?
Hi,
Changes made in the back-end would not affect the conditional logic. Conditional Logic and emails are process at the time of the initial submission.
I hope that this helps to guide you in the right direction.
Best Regards,
Curtis
How do I use conditional logic to send reminder email using a formula for date.
Hi,
Hello! What you’re describing is something that would require custom modification of the plugin to achieve. Unfortunately, custom modification of the form builder is outside the scope of support that we are able to offer.
If you need assistance with custom development, we have a partnership with the folks at Codeable.io. You can reach out to them here: https://codeable.io/partners/ninja-forms/?ref=nVHqb
Best regards,
Curtis
Good morning,
could I with Conditional Logic send email replies in different languages to the one who submitted the form according to the language he has declared to speak?
Thanks,
Stefano
Sure could! Just make each email action in its own language, then fire only the action in the language that the user’s chosen from a field. e.g. Action 1 = French, Action 2 = English, Action 3 = German; user selects German, only Action 3 fires.
Cheers,
Quay
Hi Guys,
There is one limitation of the conditional logic feature on emails.
You can only apply one set of rules to each email, and this isn’t always enough. It would be good if you could add multiple layers of conditional logic in the same way that you can with the form fields.
For example, we have a form with an optional multi-select option containing four tick boxes. We want to fire email 1 if they tick no boxes, email 2 if they tick any of the first 3 tick boxes but not box 4, and email 3 if they ticked box 4 (they may have also ticked any of the first 3 options).
It would be really good if this could be incorporated into a future release.
Thanks for your thoughts! I’ll get this into a Conditional Logic feature request for our devs to take a look at when they next turn to feature updates for CL.
Cheers,
Quay
Is there any reason why I do not have “conditional logic” feature on my form? I also notice that Advanced feature on the form is not showing up with the same detail as in the Sending Email video at 4:40 mark — https://ninjaforms.com/docs/email/
Regina- hey! Apologies, this post is showing its age. You’ll need the Conditional Logic add-on in order to access conditional options on your form. The Advanced features can be displayed simply by enabling Dev Mode in your plugin settings.
Cheers,
Quay
Hi
Can I perform a condition based on the text value of a field?
I have a single form used in many pages. Each page is for a give UK postcode area.
The form is a sent to the appropriate email address for the postcode location (different people provide a service in different areas).
This generally works well in the people land on the correct page for their area, complete an enquiry and the right person gets it.
It falls over when the user lands on the wrong page for their area and send an enquiry. The wrong person gets the email.
I want to validate the form on submit to check that the postcode they have entered in one of the fields is the correct postcode for that form.
So, we have a form for postcode area B1. Somebody types into that form that their postcode is CV1. I need to let the user know that they are on the wrong form and give them a link to a page where they can search for the correct one (a postcode search page).
Can I achieve this in the form with conditional logic?
Presently I’m having to wait until the form is submitted, its integrates into ActiveCampaign, AC then holds the logic to check the postcode is correct for that form (based on a hidden field with the staff members name in) and if not send them another email saying “hold on, you filled in the wrong form” and ask them to click a link to have another go. Its messy. Would be great to not let them submit the form.
Thanks
It would be great to be able to have conditional content in a single email. For example, if a field is not empty, display a chunk of HTML in the email. I am having an issue with my emails containing labels with empty data because an optional field was not filled out. It would be nice to be able to pretty that up without having to create a bunch of separate emails with duplicate content.
Is it possible to include field value(s) in the subject line of the notification email? This would make it easier for busy recipients to scan email messages and prioritize them without having to open each email.
Hello Kat,
To add field values to the subject line of the Email action, click on the merge tag icon to the right of the subject field. This will bring up a list of merge tags including the form fields. If you need additional assistance, please reach out to our support team, here.
Is it possible to use google recaptcha to prevent bots to send emails?