WordPress MCP Plugin: Let an AI Agent Build Your Forms
You describe the form you want to Claude, it hands you a tidy plan, and then guess who drags every field into place anyway? You do. Or you manage client sites, and every “can you tweak the contact form?” means another login and another hunt for the form, with a small voice in the back of your mind asking whether you even want an AI poking around inside your site.
Yes, it’s a lot of clicking, and it’s also fixable. With the WordPress MCP plugin (the MCP Adapter) and the WordPress Abilities API, your AI assistant builds and manages Ninja Forms for you, on your site, under the same permission checks that protect your admin. Quick signpost: this is a different thing from the AI Form Builder inside Ninja Forms (describe a form on the Add New screen, no outside tools), and this article covers the other path, where an AI agent outside WordPress does the work through MCP.
Below, we’ll cover what the MCP plugin and the Abilities API are, what your assistant can and can’t do with Ninja Forms today, why it’s safer than it sounds, and the setup from start to first form. Skip on down to the setup if you already know the “what.”
What you’ll need
- Ninja Forms (free; keep it on the current release)
- The MCP Adapter plugin (free, from the WordPress project’s GitHub releases page)
- WordPress, up to date (the Abilities API is part of core from WordPress 6.9 onward), on a site served over HTTPS
- An MCP-compatible AI assistant such as Claude Desktop or Claude Code, with Node.js on the same computer
What is the WordPress MCP plugin, and what does it have to do with your forms?
The WordPress Abilities API is a part of WordPress core that lets a plugin describe what it can do in a form an AI assistant can read. The MCP Adapter is the WordPress MCP plugin that publishes those abilities to your assistant over the Model Context Protocol, the open standard AI tools use to talk to other software. Ninja Forms registers its everyday form work as abilities, so once the adapter is active, your assistant can see them and use them.
Think of it like a restaurant: the Abilities API is the menu each plugin writes, saying here’s what I can cook. The MCP Adapter is the waiter who carries that menu out to your AI assistant, takes the order, and brings it back to the kitchen. You never go into the kitchen yourself.
One thing to know up front: AI-assisted form management through the Abilities API has shipped in Ninja Forms, and today it covers the core plugin only, with add-on abilities on the roadmap. So this is most everyday form work, not every last setting in the builder. We’ll point out the gaps where they matter below.
What can your AI agent do with Ninja Forms?
Out of the box, your assistant gets 29 Ninja Forms tools covering seven areas of the plugin. Three more (deleting a form, editing a submission, deleting a submission) stay hidden until a site admin turns them on deliberately. Here’s what’s on the menu:
- Create and manage forms. Build a new form from a description, duplicate one, update its settings, or pull its full configuration.
- Add and configure fields. Add core field types, change labels and required settings, reorder fields, or remove them.
- Set up actions. Add or change the email notification, the success message, a redirect, or whether submissions get saved.
- Build calculations. Add and update calculation equations for order forms and quote forms.
- Work with submissions. Search, filter, and export submissions, read one in full, or re-run an email action for a submission that needs resending.
- Import, export, and embed. Import a form file, export a form definition, embed a form on a page, or get its public link.
- Manage plugin settings. Read and update global Ninja Forms settings.
Notice what’s not on that list: field-level conditional logic, multi-step layouts, and add-on features. Those still get built in the builder. The assistant does the repetitive middle, which is most of it.
Is it safe to hand a WordPress AI agent the keys?
Safer than it sounds, and here’s why in plain terms. Every request your assistant makes runs through the same WordPress permission checks that protect the admin, using a login you can revoke in one click. On top of that:
- Admins only. Only an Administrator account can use the Ninja Forms abilities at all. An Editor’s login is refused for everything, even listing forms.
- Destructive abilities stay off. Deleting a form and editing or deleting a submission are switched off until an admin opts in with a small code snippet, which Ninja Forms doesn’t recommend on a live site.
- A password you can throw away. The login is a WordPress Application Password: a separate password for one app that you name, see in your profile, and revoke without touching your real password. Your admin password never leaves your head.
That still leaves ordinary caution. An assistant can build a form wrong the same way a rushed human can, so preview every form on a real page before you share it (more on why below).
If you’d rather ease in, start by asking it to list your forms and read a few settings before you let it build anything. You can do it.
Give Ninja Forms a try today!
Ninja Forms is free! Optional premium features available with any membership.
Connect your AI assistant to your WordPress site
Four short jobs: install the adapter, make a password for the assistant, point the assistant at your site, then say hello. No code on your site, no server access. About fifteen minutes the first time, and you only do it once per site.
Install the MCP Adapter (it isn’t in the plugin directory)
Searching for “MCP Adapter” under Plugins in your dashboard won’t find it, and that’s the step where most people get stuck. It’s an official WordPress project, but it lives on GitHub. Here’s the way in:
- Open the MCP Adapter releases page and download the mcp-adapter.zip file from the Assets list on the latest release.
- In your WordPress admin, go to Plugins, then Add Plugin, and click Upload Plugin.
- Choose the zip, click Install Now, then Activate.
That’s it. There’s no settings screen to fill in for the default setup. Once it’s active, your site has an MCP endpoint at /wp-json/mcp/mcp-adapter-default-server, and you’ll paste that path in a minute.
Create an Application Password on an Administrator account
Remember from above: it has to be an Administrator. On any other role the assistant will look like it’s failing, when what’s really happening is WordPress politely refusing. Log in as an admin and:
- Go to Users, then Profile, and scroll to the Application Passwords section.
- In New Application Password Name, type a label you’ll recognize later, like “Claude.”
- Click Add Application Password.
- Copy the password WordPress shows you right away. It appears once, and you can’t get it back; if you lose it, revoke it here and make another.
Don’t see the section? WordPress only offers Application Passwords on sites served over HTTPS (or a local development site). Sort out your SSL certificate with your host first, then come back (the WordPress core team’s overview of Application Passwords has the background).
Point your assistant at your site
Your assistant reaches your site through a small bridge from Automattic, mcp-wordpress-remote, which Node.js launches for you. You give it three things: the endpoint address, your admin username, and the Application Password. In Claude Desktop, add this to the config file the Claude Desktop MCP guide points you to, then restart Claude Desktop:
{
  "mcpServers": {
    "my-wordpress-site": {
      "command": "npx",
      "args": ["-y", "@automattic/mcp-wordpress-remote"],
      "env": {
        "WP_API_URL": "https://yoursite.com/wp-json/mcp/mcp-adapter-default-server",
        "WP_API_USERNAME": "your-admin-username",
        "WP_API_PASSWORD": "your-application-password"
      }
    }
  }
}
Using Claude Code instead? The same three settings go in one terminal command, per the Claude Code MCP docs:
claude mcp add my-wordpress-site \
  --env WP_API_URL=https://yoursite.com/wp-json/mcp/mcp-adapter-default-server \
  --env WP_API_USERNAME=your-admin-username \
  --env WP_API_PASSWORD=your-application-password \
  -- npx -y @automattic/mcp-wordpress-remote
One gotcha that catches nearly everyone: the address must be the full endpoint path ending in /wp-json/mcp/mcp-adapter-default-server. A bare domain points the bridge at an older, retired endpoint and the connection quietly fails.
Say hello and see what it can do
Ask your assistant: “What can you do with Ninja Forms?” It should list forms, fields, actions, calculations, submissions, import and export, and settings, the same seven areas from above.
If it lists nothing, walk back through the three steps; it’s almost always the endpoint path or a non-admin account. No worries, it takes a minute.
Describe your form and let the agent build it
Now the fun part. Before you ask, two things worth knowing so nothing you build gets undone:
- Using the Multi-Step Forms add-on? Forms built by the assistant currently render with no fields on sites where Multi-Step Forms is active, so build forms in the builder there for now and let the assistant handle submissions and settings instead.
- Country and US States fields. On any site, either of those added by the assistant currently stops the whole form from displaying. Add those two field types in the builder yourself; everything else in the core field list is fair game.
Here’s the request we used, and it’s a good template for yours:
Create a contact form with name, email, phone number, and a message field. Send submissions to hello@example.com with the subject line “New Contact Form Submission.” Add a success message that says “Thanks for reaching out! We’ll get back to you within 24 hours.”
A few seconds later, here’s what you have:
- A form called Website Contact Form with four fields: Name (required), Email (required), Phone Number, and Message (required), plus a Submit button.
- An email notification to that address with that subject line.
- A success message with your exact wording.
- A Record Submission action, so every entry is saved in your dashboard.
Ask for its public link, or ask it to embed the form on a page, and it’s live.
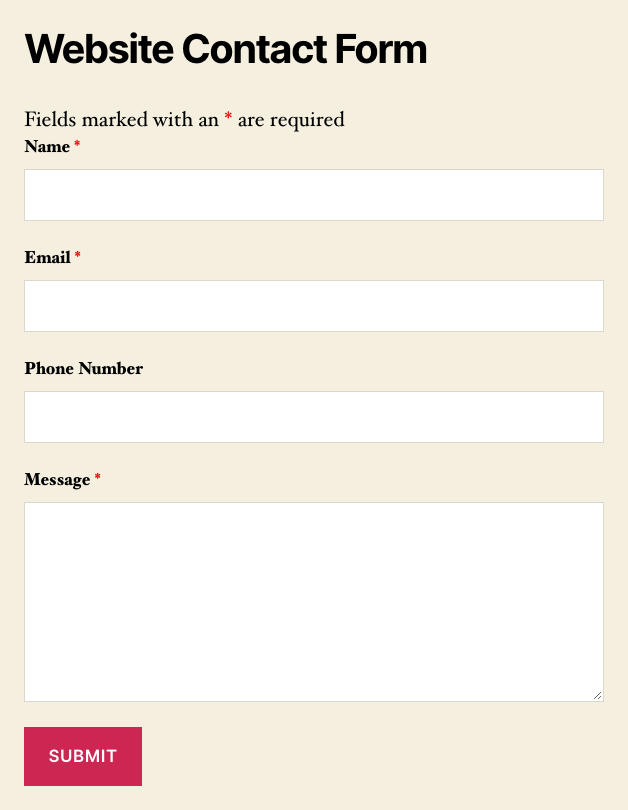
Want changes? Just say so: “Make the phone number required,” “Change the success message,” “Add a dropdown asking how they heard about us.” The same connection handles the edits and the form updates in place, and that’s all there is to it.
Check the form on a real page before you share it
Do this every time. Open the form’s public link or the page it’s embedded on and confirm every field shows. Then fill it out once and submit; you should see your success message, and the entry should appear under Ninja Forms, then Submissions.
A form that builds cleanly but renders empty is the failure to watch for, and it’s the one you’ll only catch by looking.
For a closer look, open the form in the builder from Ninja Forms, then Dashboard. Two tabs tell you what the assistant did:
- The Form Fields tab shows the four fields, in order.
- The Emails & Actions tab shows the email notification, the success message, and the Record Submission action.
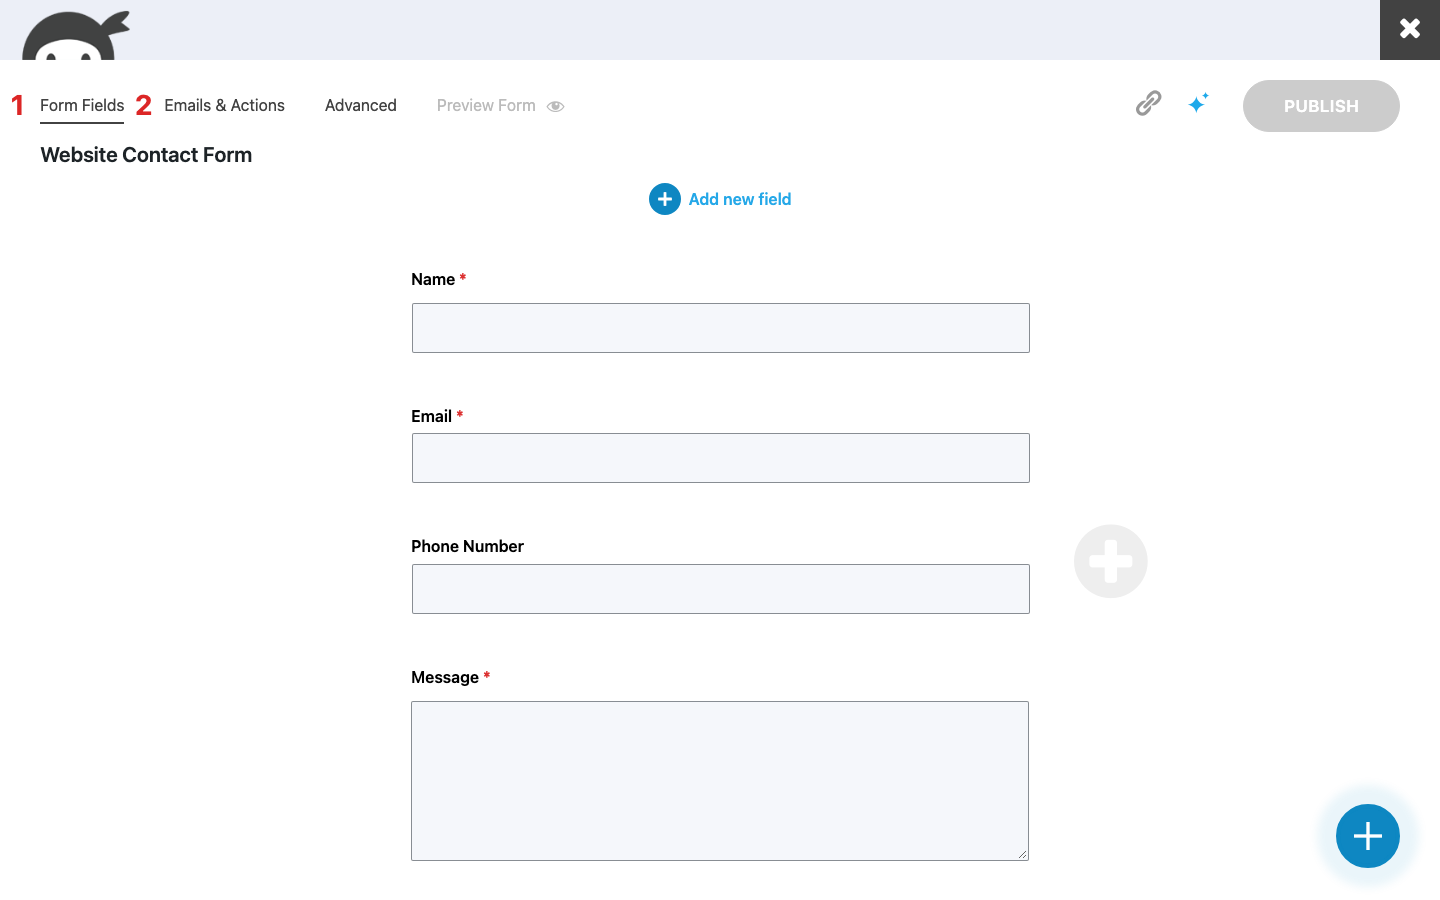
Anything you’d tweak by hand is right there. The builder and the assistant edit the same form, so you can finish a job in whichever one is faster for the task in front of you.
Manage forms on several sites without logging into each one
If you look after client sites, this is where the setup above pays for itself. Each site gets its own Application Password and its own entry in your assistant’s config, so one WordPress AI agent connection per site, and from then on the work is a sentence, not a login.
“Add a consent checkbox to every form on the bakery site.” “Change the notification address on all of the clinic’s forms.” “Export last quarter’s submissions from every form on the school site.”
Those are repeated requests under the hood, one form at a time, so give them a look when they finish, the same as you would with a new hire. And when a client emails asking for a new form, it can be built and embedded on their site before you’ve finished reading their message. That’s the part that changes how many sites one person can look after.
Let your AI agent do the form work today
Like we said at the top, the goal was never the clicking. You wanted the form, and now you have a way to get it by describing it. Install the WordPress MCP plugin, hand your assistant an Application Password you can revoke any time, and let it handle the everyday building while you check its work on a real page.
Our opinion: for most contact, inquiry, and registration forms, that is the fastest route from “we need a form” to “it’s live,” and it only gets better from here. Give it one form this week and see how long it takes you.
Try Ninja Forms Today
Always free, with premium features available through our memberships.
Hi This is pure joy.