Have you ever wanted to collect data from your form fields but keep these fields hidden from your visitors? What you need is a field called a hidden field in your WordPress form. Not visible to your users, it can be used to store a default value, static value, or a calculation in order to apply a discount.
Many times you’ll want to get information on a logged-in user without having to ask them to fill in basic info like their name and email each time they submit a form. Or, you need to collect the IP address of the user who submits your form. All this and much more can be done with Hidden Field.
Let’s dig deeper into our Hidden Field, so you can take advantage of this awesome feature that is free for any Ninja Forms user!
Table of Contents
- What is Hidden Field?
- When to use Hidden Field? (Practical Examples)
- Bonus: Show or hide fields based on the user’s selection on the form
1. What is Hidden Field
Hidden Field in WordPress forms is a form field that is invisible to the user on the front end. This field does not affect the appearance of your form as it does not display to your user. It can be only viewed from the form builder by a logged-in administrator.
You can add a hidden field to your form by clicking the blue plus icon on your form builder. This will open the list of available form fields. This field is located under the Miscellaneous Fields section. Please note, if required fields are hidden, they are not going to be treated as required.

General Hidden Field Settings
After you add your Hidden Field to your form, you can see various settings. You can rename the Label and the name will only show in the Ninja Forms builder. It will not display to your users.

The most important setting you want to pay attention to is Default Value. This field will load pre-populated with any text entered as the Default Value.
The setting supports the use of merge tags to display unique or custom values. Don’t worry if you don’t understand it at this moment. We will show you practical examples of what to enter into the Default value in the section below.
2. When to use Hidden Field?
Hidden Field is an excellent way to store information that you want to be passed into submission data. You can also send it along in an email, but not displayed to the user. Additionally, you can use this field to add notes to already completed submissions that will be editable for admin in the submissions.
Although the Hidden Field is located under the miscellaneous fields and is overlooked by many users, in reality, offers a wide range of possibilities for data collection.
Here are some practical examples you can apply to your WordPress forms and take your form building to another level:
Add notes to already completed form submissions
Hidden Field lets you add and edit extra notes to already completed submissions. You’ll want to make sure you add a hidden field to your form first and leave the Default Value empty.

Once your users submit your form, you can navigate to Ninja Forms > Submissions and select the submission where you would like to add some extra notes. Click Edit.

This will open a pop-up with user-submitted values. If you added the invisible Hidden Field (we renamed the field to Additional Notes), you will see the field Additional Notes.
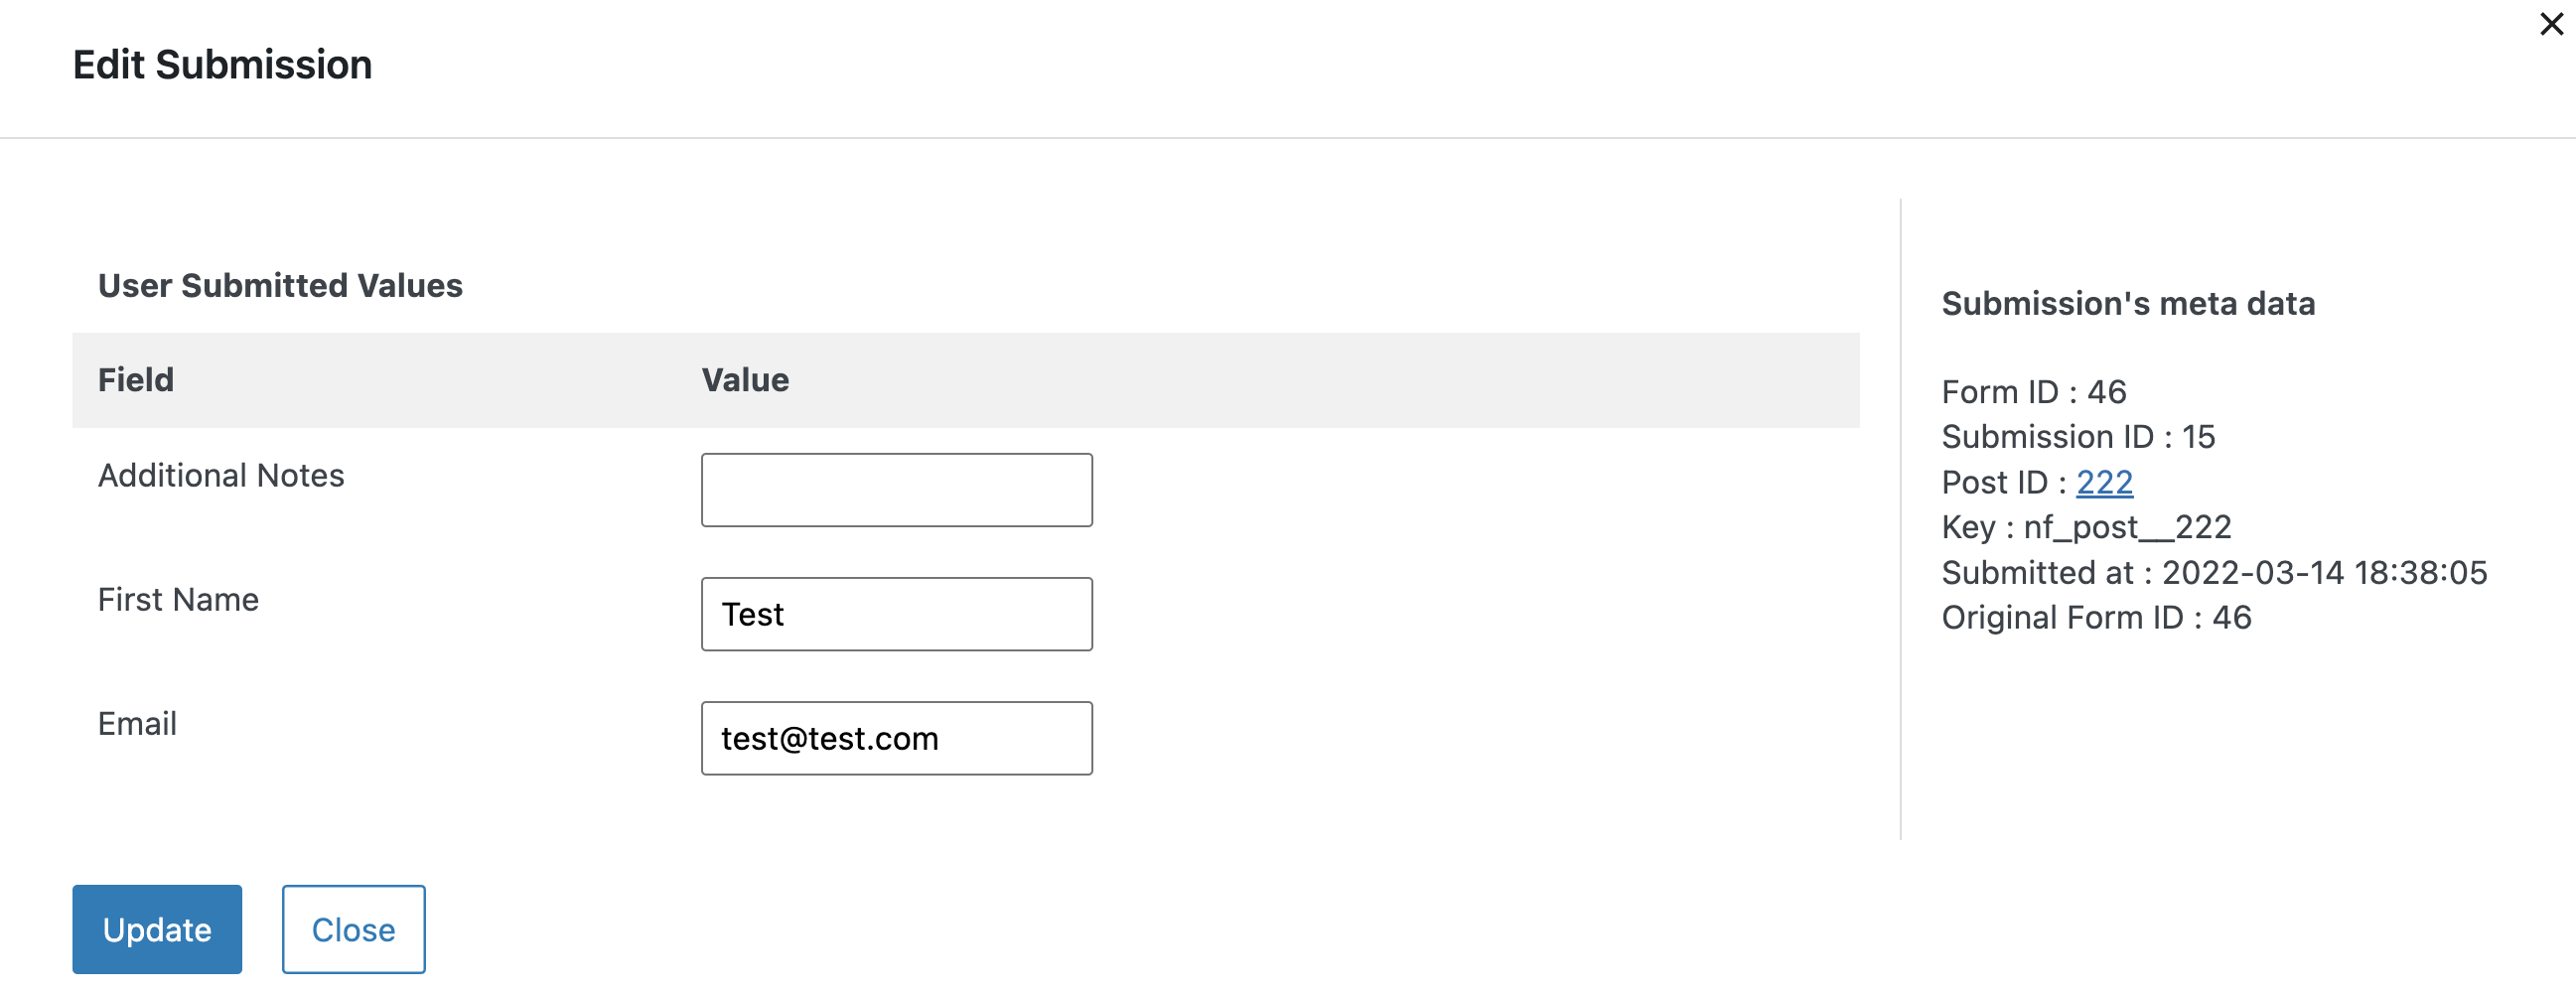
Here you can write in your notes and click update to save these notes. You can always come back later and edit these notes again.

Apply discount code with Hidden Field
If you are thinking of using your WordPress forms to offer a discount in the form of coupon codes, you will need a hidden field to set up the discount rate. Depending on whether you want to offer a percentage discount or a flat discount, you will enter the value to the Default Value field.
If you’re offering a percentage discount, you will need to set the Default Value to 1. If you’re offering a flat discount, set the Default Value to 0. The example below shows how you would set up your hidden field for a percentage discount.
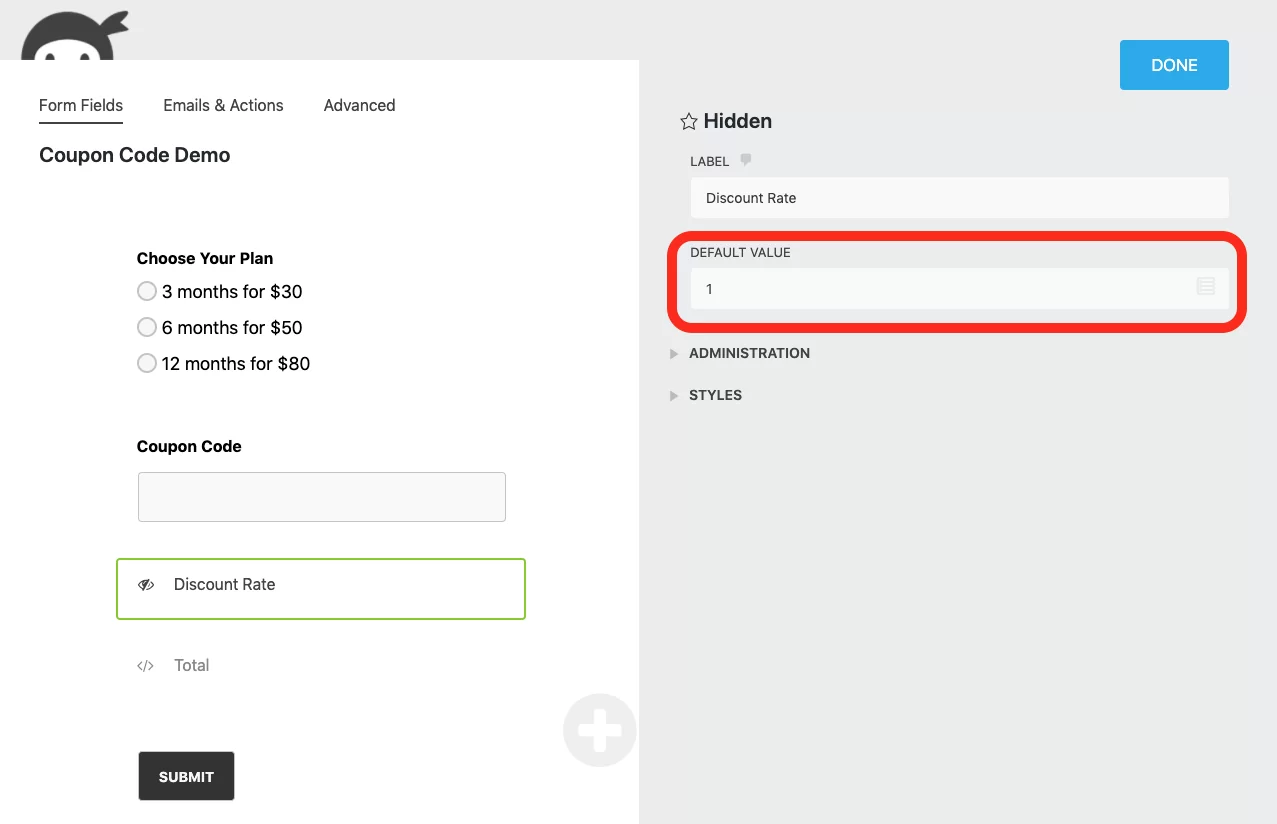
If you want to see the full guided tutorial on how to create coupon codes in your form, visit our blog post 3 Easy Steps to Use Coupon Codes in WordPress Forms. This article will walk you through the entire process of creating a coupon code, from setting up all the necessary fields to creating calculations to modify your total after the discount has been applied to the user.
Capture WordPress Post and Page information with each submission
Do you need to determine what form was filled out on what page? It’s very easy to identify which form the information is coming from using our hidden field.
All you need to add a hidden field to your form and enter {wp:post_url} merge tag in the Default Value field. This merge tag returns the URL of the Post/Page the form was submitted on.

That’s it! If you’re wanting this in the email, be sure to include the merge tag for the hidden field in the email message body. If you’re using the {fields_table} merge tag, you’ll need to switch to the {all_fields_table} merge tag instead, or specifically include the Hidden field merge tag in addition to the {fields_table} tag.
Create a unique form submission ID
Want to assign a unique form submission ID to each submitted form, so you can track submissions? With our Hidden Field, this is an easy task.
All you need is to include a hidden field on your submission notification email and assign a random 5 number string applied via merge tag as the default value to a hidden field.

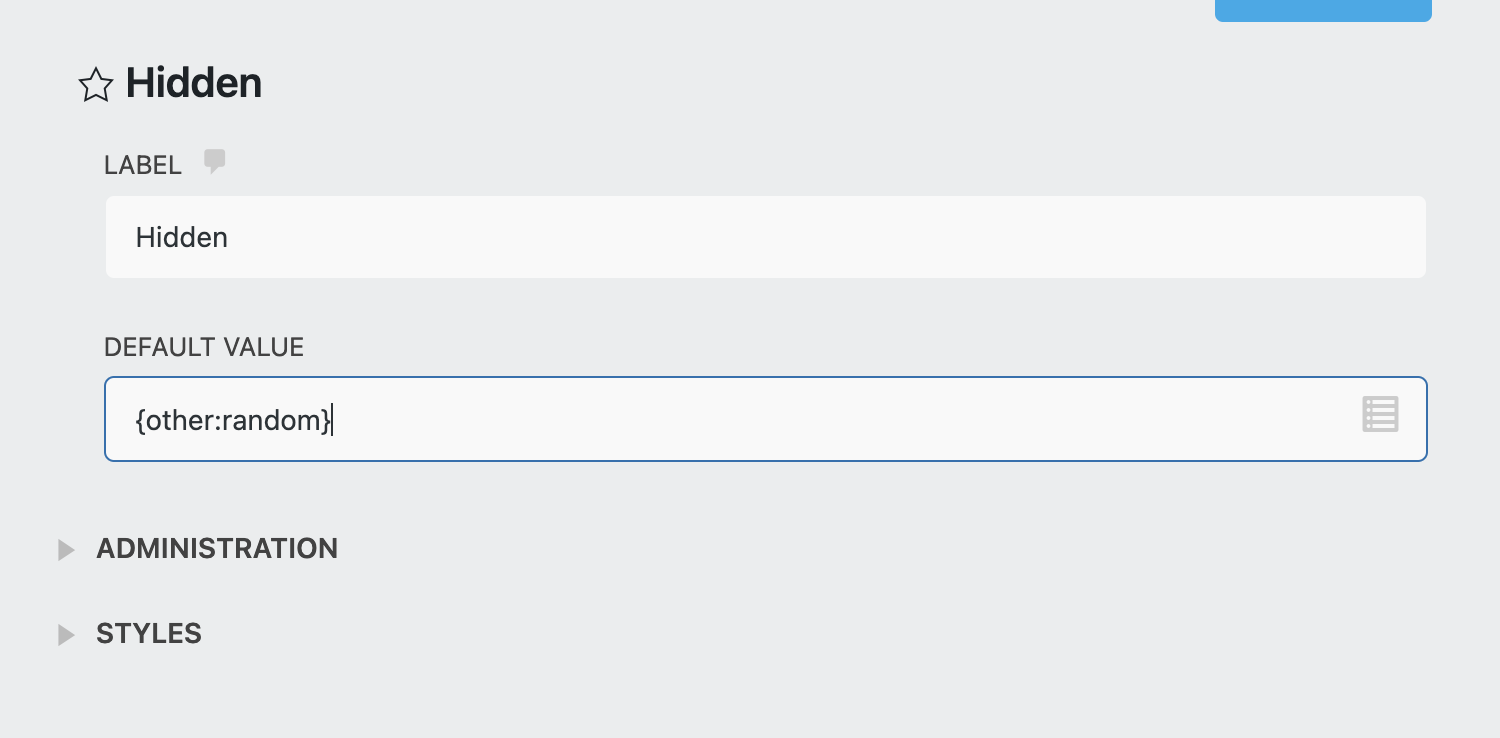
Another way to track submission, allowing auto-increment function is to use the submission count merge tag {submission:count} or submission sequence merge tag {submission:sequence} in the Default Value field. For more information please see our Merge Tags documentation.
Capture the IP address of the user who submitted your form
By default, Ninja Forms does not store the IP address associated with a form entry. You can however add it yourself. This feature is free and you’ll need the following:
Add a hidden field to your form and enter the merge tag for IP address {other:user_ip} to the default value field.

Now, you can create an email confirmation message. Within the email body, you can include the IP address merge tag or any additional fields you wish to share.
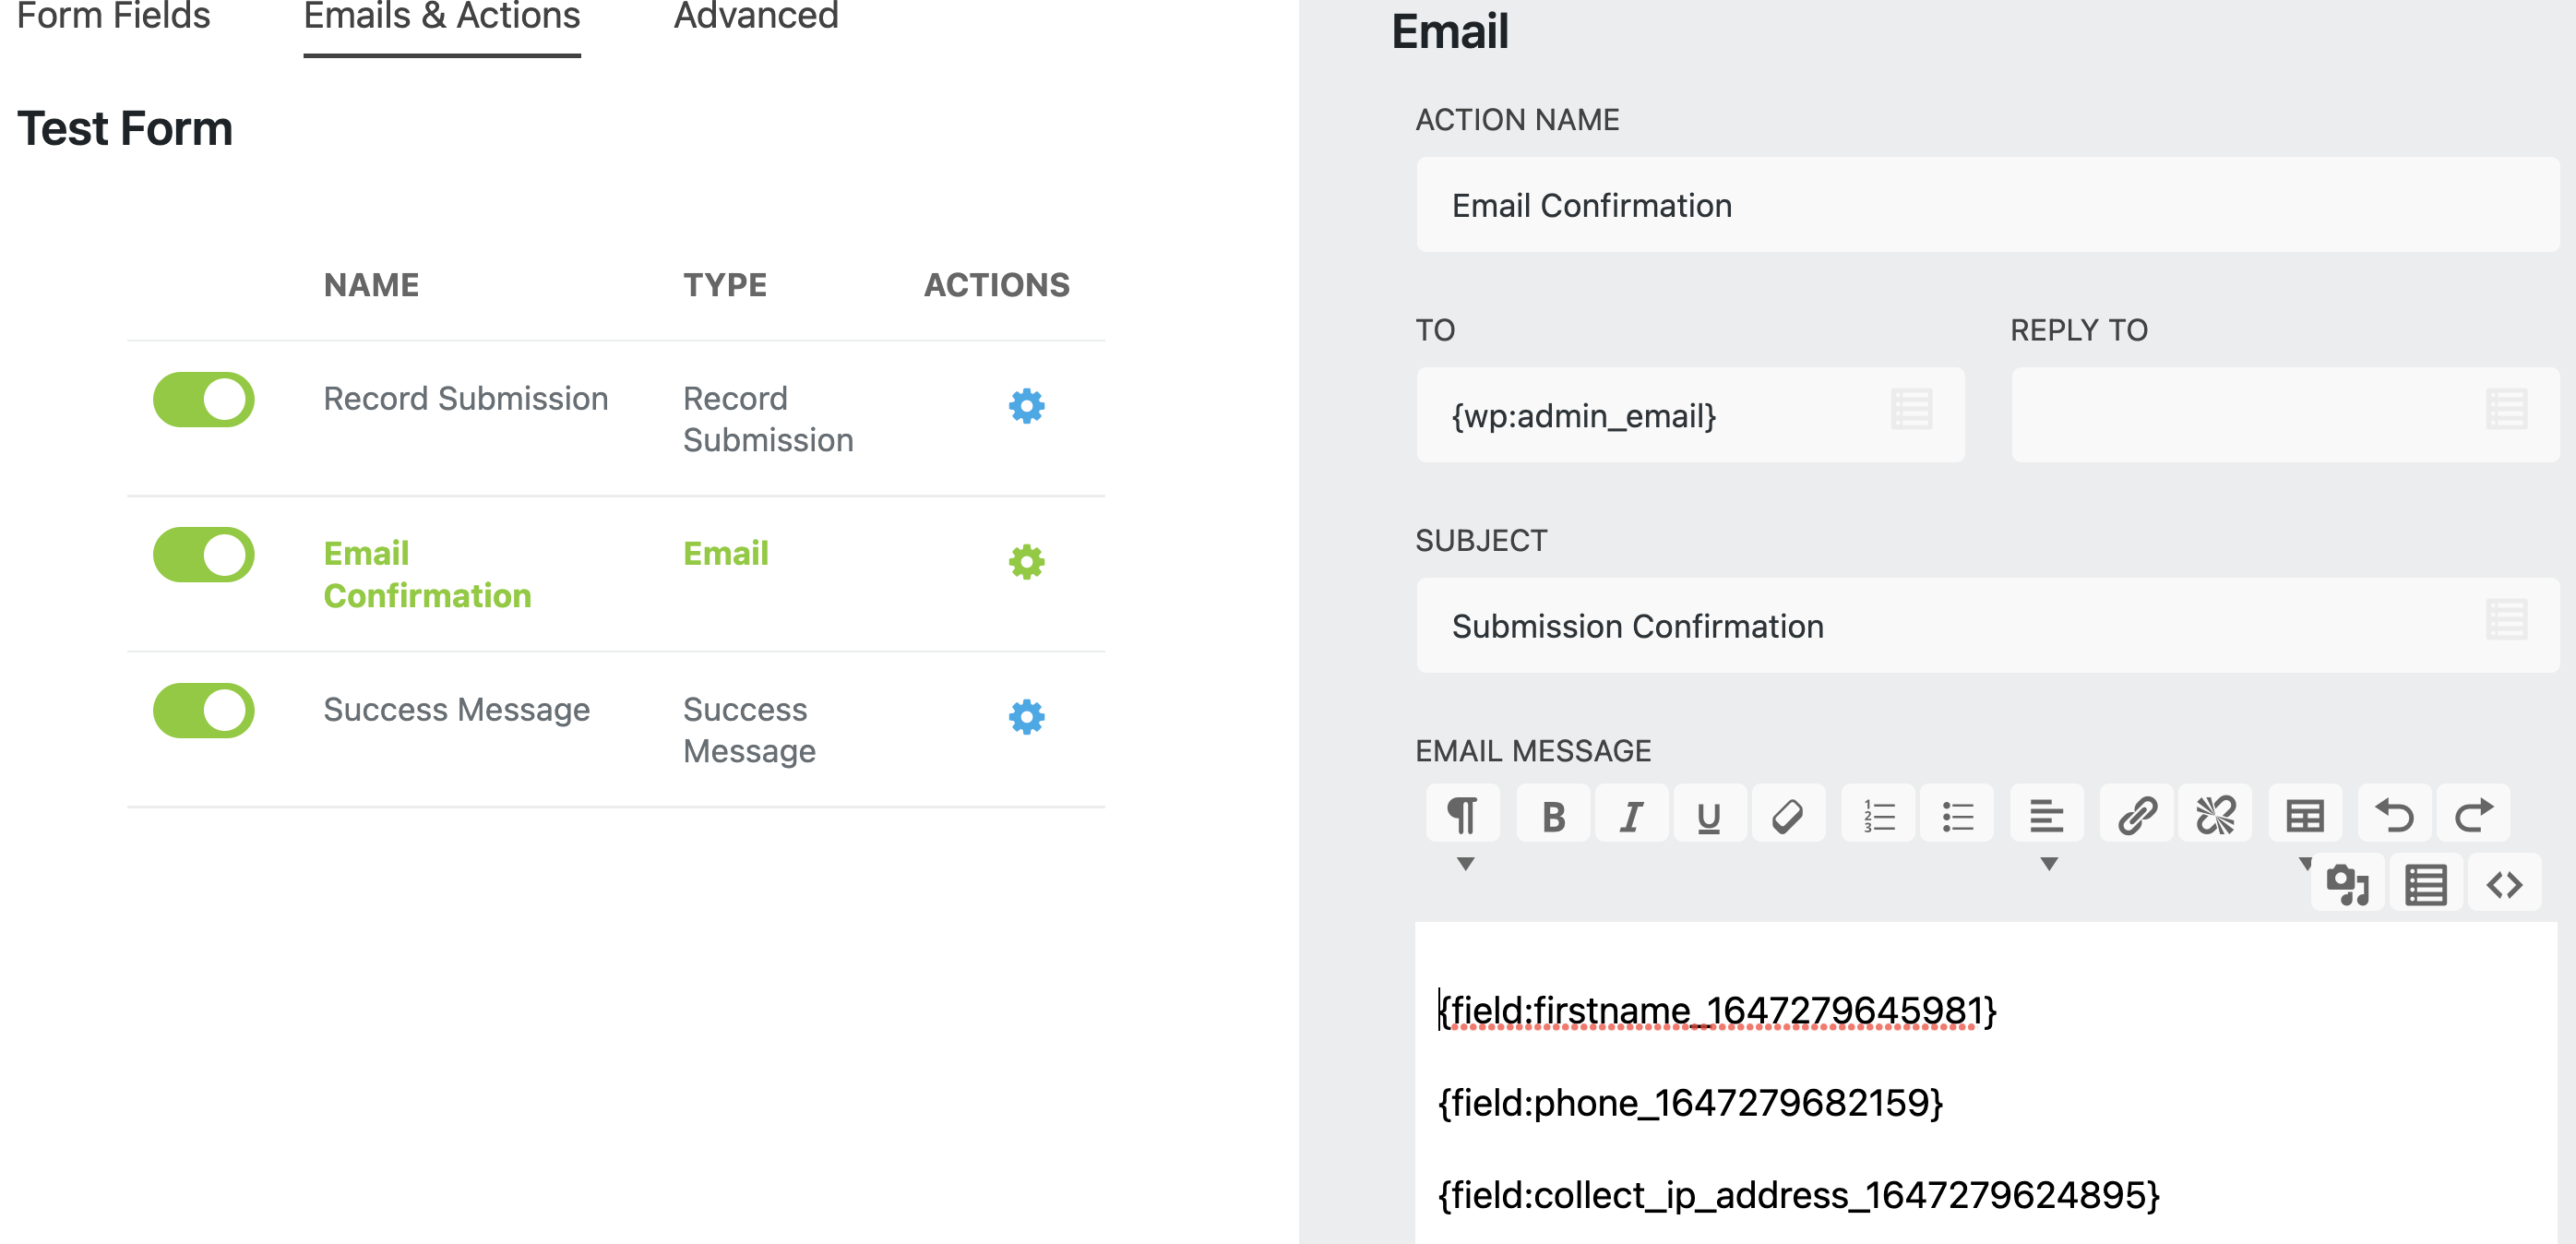
If you want to collect additional data on your WordPress form, make sure to check 4 Tricks for Capturing Additional User Data or How to Auto-populate Form Fields Using a Query String!
Using Hidden Field with Unique Field Restrictions
At this moment, Hidden fields are not accepted by the Unique Field restrictions, so you will not find a hidden field in the list of fields under the Restrictions setting. What you’ll want to do instead, is create a Single Line Text Field, assign the default value such as a specific merge tag, and hide this field manually.
As an example, we want to limit the submissions based on the IP address. We start with adding a Single Line Text field. We renamed this field to IP Address. Now we need to set its Default Value to {other:user_ip} to capture the visitor’s IP address.

We don’t want to display this field to users on the front end, so we need to hide this field manually by using CSS and entering “display:none” to the field under the Advanced CSS settings.
If you don’t have our Layout & Styles add-on, you need to right-click and inspect the Text field to get the ID of that field. After that, you can add your own CSS to your WordPress site. (Appearance > Customize > Additional CSS)
Here is an example:
For more information on using Unique Field Restriction settings, you can check our blog post Limit Submission Entries in Your Form By User, IP, or Date.
Bonus: Show or hide fields based on the user’s selection on the form
If you don’t want to use hidden fields but you are looking for a way to hide fields based on users’ answers on their form, we have a solution. Whether you need to show or hide input fields based on a checkbox, dropdown, or other fields, this can be easily achieved with a Conditional Logic add-on.
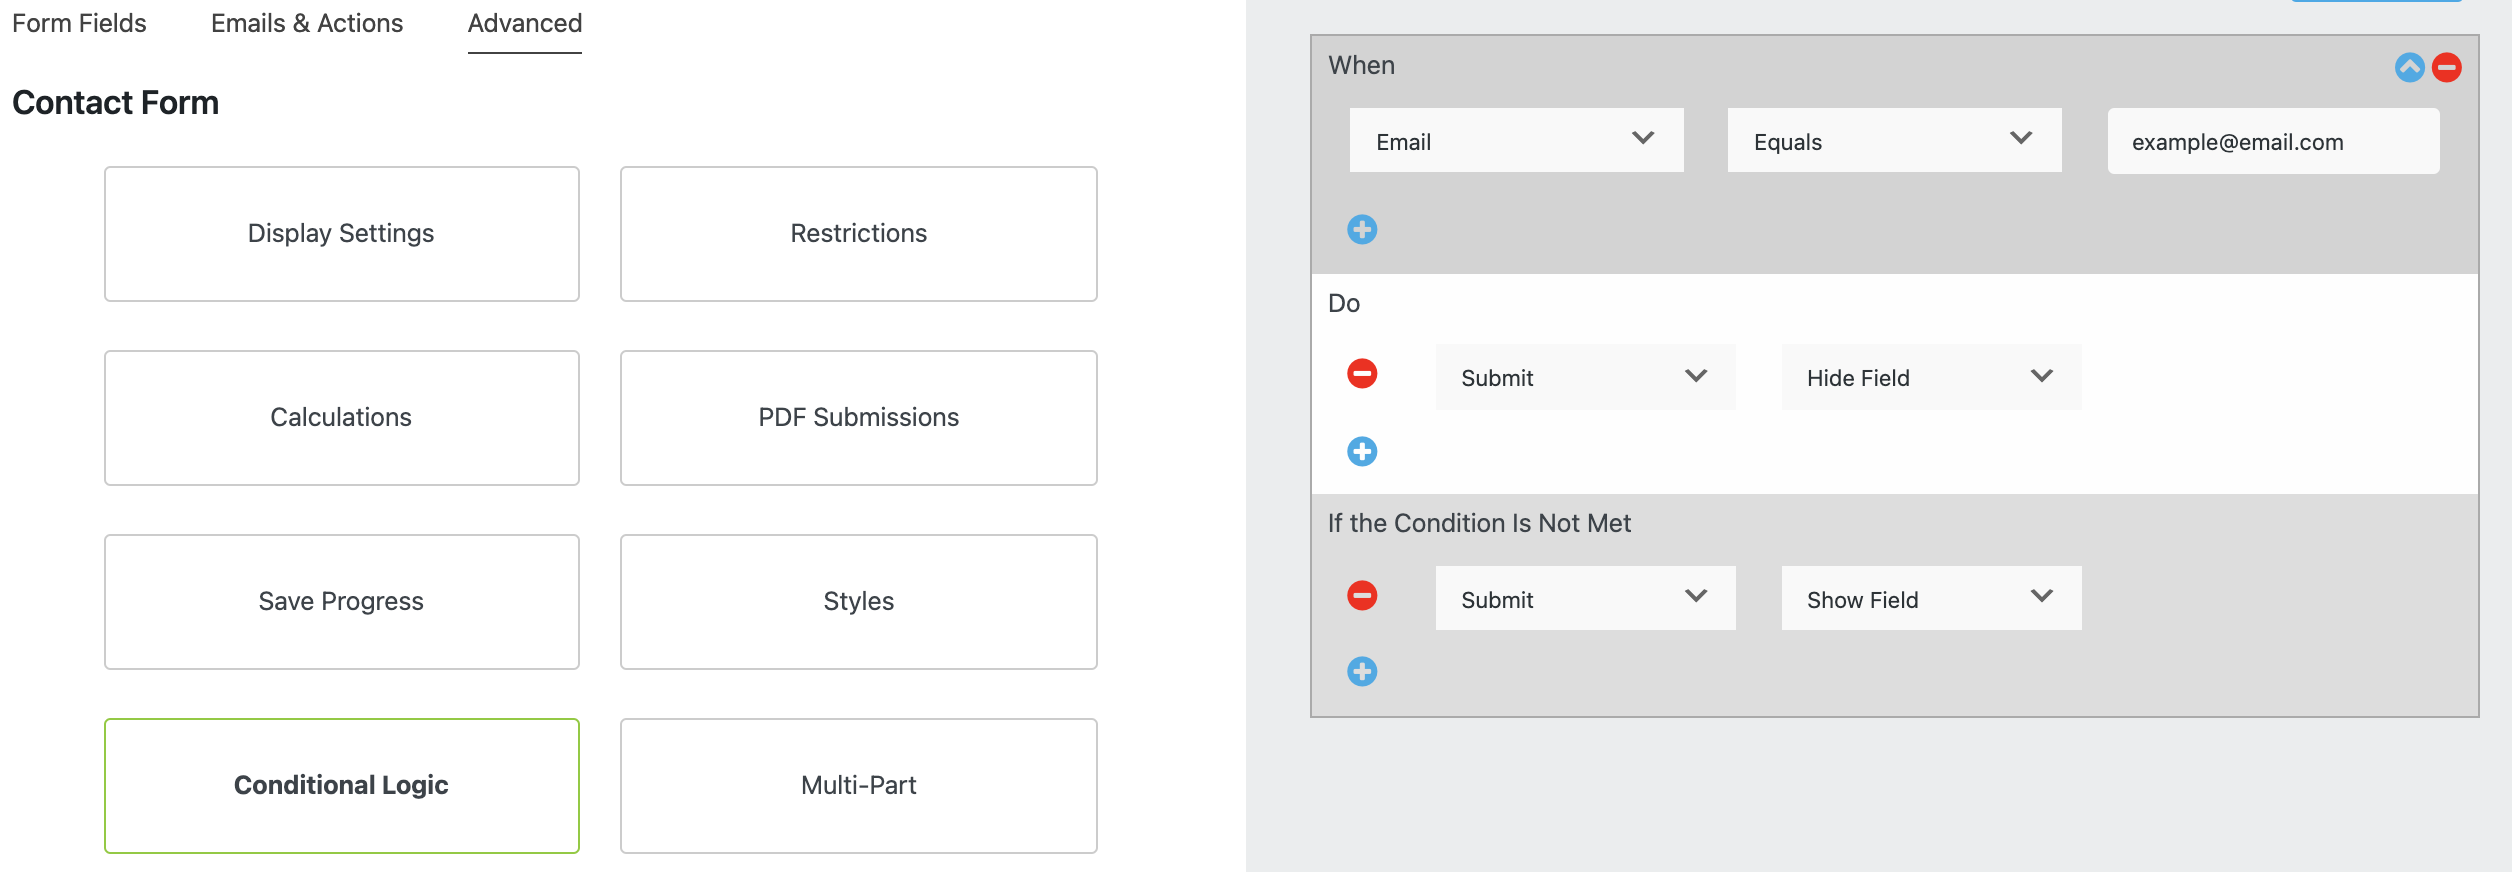
Let’s say you are getting a lot of spam submissions from one particular email address and you want to block this person. Using conditional logic, you can block this submission entry by hiding the submit button.
First, your form fields have to already exist on your form. With your Conditional Logic installed, you will see the Conditional Logic tab under the Advanced tab within your form builder. If you don’t see this, you need to enable Developer Mode.
Once you click on the Conditional Logic tab, you can start setting up the logic conditions. If you want to block a specific address, this is how you prevent the email address from submitting your form:
Another example is if you want to show or hide submit button based on the checkbox field:
Keep in mind, the logical operations will vary depending on the field type. While Checkbox Field has only options Is or Is Not, the Email Field has the following logical operations:

There are other ways how you can use the Conditional Logic add-on on your WordPress forms. If you are curious and want to learn more, check our Definitive Guide to Using Form Actions or 7 Time Savings Ways to Use WordPress Form Logic.
Start collecting more data on your WordPress forms!
That’s it! You’ve just learned a great way how you can find extra data about your users using our Hidden Field! Remember this field is invisible to your users but editable for admin in the form submissions. You can access data from Hidden Field under Ninja Forms > Submissions.
Additionally, we also showed you how you can hide or show specific fields based on the user’s input on the form using our Conditional Logic as this is very often asked by many WordPress users.
Did you enjoy this blog post? If so, make sure to sign up for our newsletter below so you never miss any content like this!


mohamed says:
i made two Google Ad campaign. how to determine which of those apply to my form?
Shaylee Hansen says:
👋 Mohamed,
Please reach out to our customer support team where we’d be happy to assist with your question: https://ninjaforms.com/contact/
Quay Morgan says:
Check out this article on auto-populating fields fro a source: https://ninjaforms.com/blog/how-to-auto-populate-form-fields-using-query-string/
In a nutshell, assign each ad a utm parameter in the url link back to your site that is unique to that ad, and the Hidden field can capture the utm for you.
Cheers,
Quay