4 Tricks for Capturing Additional User Data in WordPress Forms

As a digital marketer, you know that the key to running a successful campaign is maximizing the data you gather from each form submission. While getting basic information from users through form fields is straightforward, you often need more to understand your audience.
- Wondering from which source your users are coming?
- Need to pinpoint the exact post or page where a form was submitted on your site?
- Managing a multisite and looking to track the specific URL of a submission?
- Or, aiming to automatically capture a logged-in user’s name or email?
All these tasks can be achieved with the right know-how. They may seem daunting initially, but with our simple, lesser-known tips, you can effortlessly enhance your WordPress forms to collect essential additional user data.
Discover these easy yet powerful tricks now!
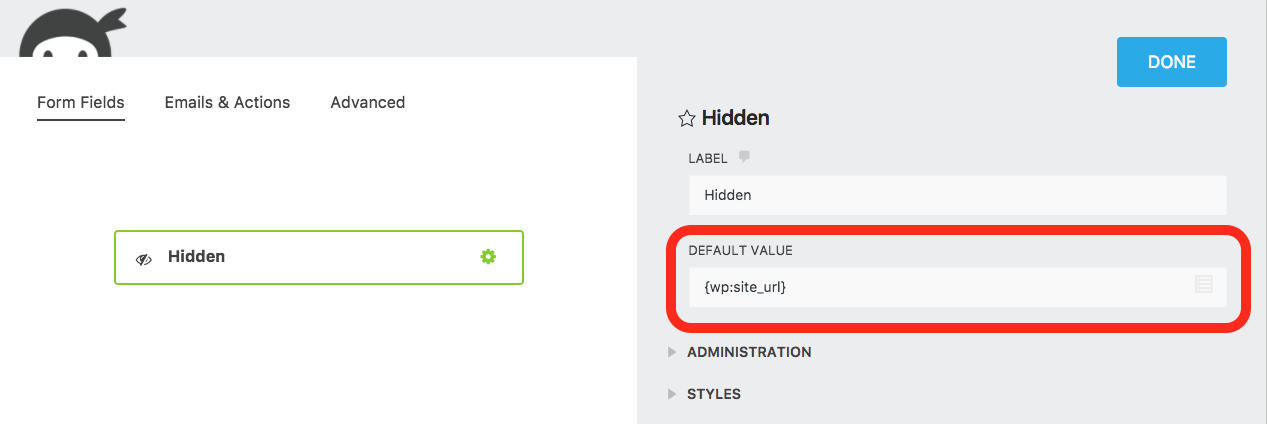
1. Capture WordPress Post and Page information with each submission.
There are lots of reasons why you might want the URL of the post or page the form is being submitted from to show up either in your WordPress forms submissions or in an admin email. Most commonly, we see users with a standard form placed in a widget or footer and need to know which page the submission took place on. That’s really easy to accomplish!
- Add a Hidden field to your form.
- Set the Default Value of the field to {wp:post_url}

That’s it! If you want this in the email, be sure to include the merge tag for the hidden field in the email message body. If you’re using the {fields_table} merge tag, you’ll need to switch to the {all_fields_table} merge tag instead or specifically include the Hidden field merge tag in addition to the {fields_table} tag.
2. Capture user data from a logged-in WordPress user
Many times, you’ll want to get info on a logged-in user without having to ask them to fill in basic info like their name and email each time they submit a form. Ordinarily, this would turn into a file editing headache, but with this trick, it’s super simple.
All you need to do to capture user data in WordPress forms is:
- Place the receiving field on your form (Hidden if you don’t want the user to see it otherwise, a field like first name, last name, etc.)
- Set the Default Value of the field to the WordPress user data to merge the tag you need.
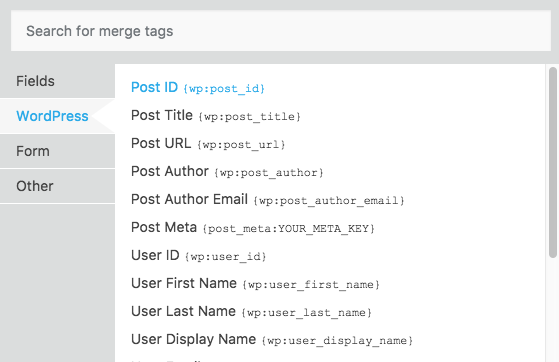
Some of the available WordPress user data merge tags are:
- {wp:user_first_name}
- {wp:user_last_name}
- {wp:user_display_name}
- {wp:user_email}
Example:

3. Capture the WordPress site URL or Title with each submission
If you’re collecting user data into a CRM from multiple sites, you may need to keep up with the website the WordPress form data is coming from. That’s as easy as adding a merge tag to a hidden field.
- Place a Hidden field on your form.
- Insert either {wp:site_title} or {wp:site_url} as the Default Value of that field
4. Capture the referring source for each user that lands on your form
This is a little more complex, but still pretty darn simple using a merge tag. We’ll be using a querystring value to do this. If you need a primer or refresher on using querystrings, check out the full article.
- Modify the URL the user is clicking to get to your form with the querystring key/value that you need to pass the data you want. For example, ?source=twitter
- Place a hidden field onto your form and set its default value as {querystring:source}, where “source” is the key you chose to use in the first step.
When the user clicks through to the form, the Hidden field will capture the Value you assigned the Key in the referring URL. In our example, it will show up as “twitter.”

There’s even more data you can capture in each of your WordPress forms!
These four tricks each use a merge tag to capture the data you need. They don’t even cover all the available merge tags at your disposal, though! For a full list of merge tags that you can use to capture user data in WordPress forms:
- Open your Ninja Forms builder
- Add a form field
- Click the merge tag icon in the Default Value setting of that field.
- Click on the WordPress or Other tabs of the modal that opens
Curious about more ways to utilize our merge tags in your WordPress forms? Dive into our comprehensive merge tags documentation or explore ‘12 Powerful Merge Tag Examples For your WordPress Form Submissions!‘ for innovative ideas!
Enjoy discovering the variety of data you can capture with your WordPress forms. If you have any questions or suggestions — perhaps something you wish we included but haven’t yet — please share them below. Your feedback is invaluable in shaping the future of our plugin!
Try Ninja Forms Today
Always free, with premium features available through our memberships.
Is there a way to capture the referring domain when you DON’T have the capacity to modify the URL the user is clicking to get to your form with the querystring key/value that you need to pass the data you want. So for example, if you’re showing up in google search results, where you can’t change the url, is it possible to have the form capture the referring domain as google.com? Please note that referring domain is different than the last page a visitor visited before submitting a form. For example, a visitor could go from Google > page 1 > page 2 > page 3 and submit a form on page 3. In the form, I would like to capture “Google” and Page 3 (or page 2 depending on whether I have a dedicated contact form page or if the contact form is on each page of the site). I hope this makes sense.
Dexter,
Unfortunately, no. For that you’d need something like Google Analytics. Sorry :/
Cheers,
Quay
Very useful, thanks!
On point 2 above, where can I find a complete list of WordPress user data merge tags?
The specific trouble I’m having is auto filling billing address, city and country by referencing this data from a logged in user who has filled this in before.
Thanks!
Gianluca,
Thanks! The only list lives in the form builder itself; if it’s available then when you click the merge tag icon you’ll see it there or in one of the associated tabs. Sorry!
Cheers,
Quay
Hi Quay, Greetings from a fellow Dead Head and Browns fan (we will get by).
Don’t know if you have mentioned this elsewhere, but I just figured out that you can also use merge tags to personalize a success message. For example:
Thank you {wp:user_first_name} {wp:user_last_name}.
We have received your request and will be getting back to you soon.
BTW… Your name is of course one letter off from one of the greatest albums of all time, Quah.
lol greetings and yes we will! Brownies actually starting to look like a contender after this free agency jackpot. Cautiously optimistic though as always 🙂
Yes! You can customize/personalize success messages and emails via merge tag. Thanks for adding that in!
I’m going to have to load up Quah now.
Cheers,
Quay
Hi Quay, how about adding a merge tag for cookie values?
Not a bad idea! I’ll bring it up to our dev team 🙂
Hi there, I’m wondering why there is no merge tag for username? (Only user id.)
This would be helpful, especially for building links (to a user profile for example), especially as the user url merge tag doesn’t work when using a plugin such as UsersWP (a very good plugin for user profiles that integrates with geodirectory).
There are some good merge tags for geodirectory, but not for userswp…
Hey! Give this a try: {wp:user_display_name}
Cheers,
Quay
Hi Quay!
Which would be the proper way of adding a hidden field with a specific id and name such as the one required for Google Ads?
“
Right now I’m using an HTML field with the input but if I get the info from the HTML field I’m not receiving the data from that field. Any ideas?
Thanks!
Sorry, the field got removed:
Thanks
I’m using a hidden form and capturing some custom meta. Is it possible to then use that value as the Post Category with my Create Post form?
Hello I need to add to each submission custom value – like registration ID for example with a year prepend. I am able to use {form: submission_count}, but there is a pitfall. If I remove some submissions from a submissions page it will count down its count and then the ID becomes not unique.
I also use this information number to communicate with clients and it is sent through e-mail after succesfull submission. So the count is added after submission – so the Submission ID could be used also I think.
Can you make a recommendation for possible ways to store a logged in user’s form submission data with their user data? So a user could fill out a form for favorite sports, for example, and it would store that data as part of their user profile? Or even better, a user could take a test and the result could be stored with their user data. Thanks in advance for any help you can offer on this.
Josh,
Sounds like the User Management add-on might be along the lines of what you’re looking for – it has a template form and features that will let your logged in users update their own profiles.
Cheers,
Quay
Hello,
How can I auto populate data from WordPress database in display default value other than given in the merge tags.
E.g. I want to display property address automatically instead of user entering it.
Thanks and Regards.
Jyoti
Jyoti,
If this is info a registered user has given you in the past, you can save it as custom user meta and then use a merge tag to pull that custom meta key/value.
After a severe incident, we had to restore a backup of our wordpress site and database. We think we have restored all plugins, however a Merge Tag that used to work, doesn’t work anymore. We need to show user profile data and we used these Merge Tags in the past
{billing_fields:billing_address_1}
{billing_fields:billing_postcode}
Can you point us in the right direction?
Thanks
Hi Bart, there could be a number of things going on. Best thing to do would be to reach out to our customer support team. If you do so within the plugin by clicking “Get Help” in the left sidebar under Ninja Forms, it will send us a report that will provide some diagnostic information.
Hi! I am using the fourth approach with the query string. This works beautifully for ‘logged in’ users, but doesn’t capture anything for other individuals being linked to the page and taking the survey. Any ideas?
Fantastic post! Loved the content and found it useful. Keep posting!