How to Create Conditional Fields in WordPress

Have you ever asked yourself how to show or hide fields on your WordPress form based on the user’s answer? The conditional fields in WordPress are the answer you’ve been searching for.
You no longer need to drive your users crazy with unnecessary fields that are irrelevant to them. Ninja Forms brings you an easy solution to create conditional logic forms and conditionally show or hide fields without any coding experience or help from the developer. Let’s dig in!
Table of content
- What are conditional fields?
- How do you create conditional fields?
- Calculation and conditional fields in WordPress
- Bonus: How to style conditional logic fields in WordPress
1. What are conditional fields?
Conditional fields in WordPress are fields that change based on user input on the form. These fields present dynamic field choices, turning your WordPress forms into smart and dynamic forms.
We’ve all seen the checkout pages that ask you if your billing address is the same as your shipping address. If you check the box that indicates that it’s not the same address, a new set of fields appears for you to enter the billing address into. The billing address fields are dynamic fields. There when you need them, gone when you don’t.
Let’s look at how to build these out for your WordPress forms using our Conditional Logic add-on!
2. How do you create conditional fields?
All you need is our free Ninja Forms core plugin and the Conditional Logic add-on to create a dynamic form with conditional fields. This functionality on your forms saves your visitors time and delivers better UI making your forms faster. This means more completed forms and less form abandonment.
Step 1. Install and activate Ninja Forms
First, install the Ninja Forms free core plugin by navigating to your WordPress Admin Menu, clicking Plugins > Add New. Locate the Search Plugins field, type “Ninja Forms,” then click the Install Now button and Activate.
Otherwise, you can upload the plugin by navigating to Plugins > Add New > Upload Plugin > Choose File.
Step 2. Install and activate the Conditional Logic add-on
Once you have access to the Ninja Forms conditional logic, you can download it from your Ninja Forms account, and upload it to Plugins. For a complete overview, see our installation guide for step-by-step instructions.
If you successfully follow the installation instructions, you should see the Conditional Logic tab under the Advanced tab of the Ninja Forms form builder.

If you don’t, make sure to enable the Developer Mode in your Ninja Forms settings. You can learn how to enable Developer Mode here to unlock advanced settings on your Ninja Forms.

Let’s look at our example below. You can see how certain fields are hidden for users, who select option No. On the other hand, when users select the option Yes, the content will change dynamically and another Radio list of options will appear.
In order to set this up on your form, you want to first create form fields with your options using the Radio list field. Make sure the Value of your form fields is filled out.

Then you’ll want to head to the Advanced tab and select Conditional Logic. Here you can add conditions for your form fields.

That’s it! You’ve just learned how to create dynamic fields and show the fields based on the user’s input on your form.
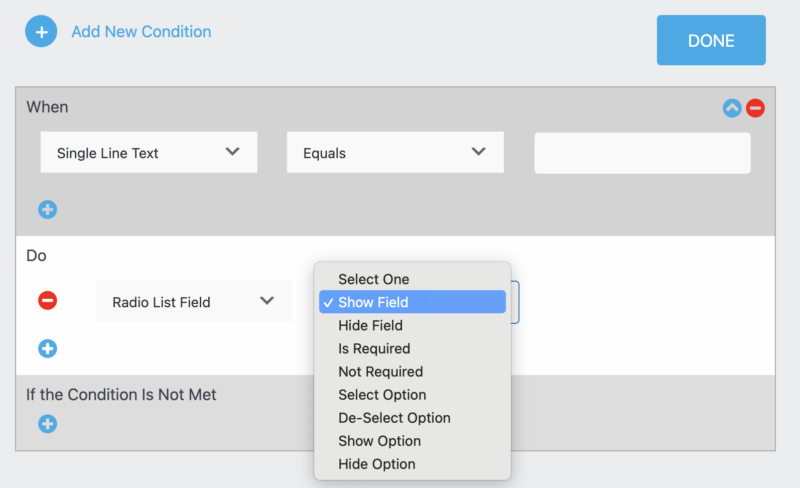
Hide and display list options, or pre-select them conditionally
Any list field option can be hidden or displayed in Ninja Forms using Conditional Logic. You can show/hide submit button if you don’t want all users to submit your form or if you want to disable specific users to submit their submission entries due to spam.
Another popular way to use conditional logic with your fields is by offering a custom response on your form. Let’s say your user does not choose a specific answer from multiple choices and chooses the option Other. You want to collect more data than just “Other” so, in order to let your visitors write their personalized answers, you can use a Single Line Text field.
Let’s assume, you created your Radio List field and Single Line Text field on your form. Now head over to Conditional Logic under the Advanced tab and set up the conditions as below:
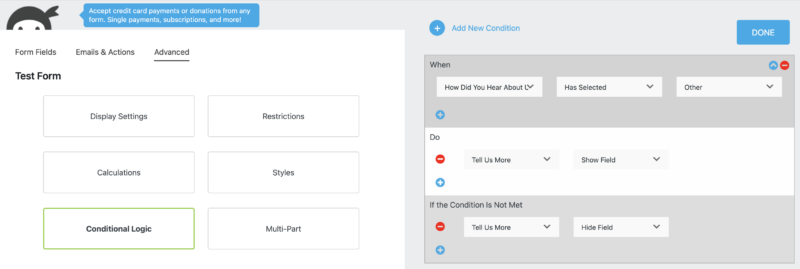
This is what it will look like in your form preview:
Similarly, you can have list options conditionally selected or deselected for the user without requiring their interaction. Just create a logic statement that’s based on earlier user interaction with the form.
Please note, that your conditional trigger options will change based on the form field types. As you can see from the screenshot below, the options are not the same for Single Line Text Field as they are for Radio List Field.

Show and hide the entire page on a multi-step form
Above, we showed you can easily set WordPress form logic to target form fields. The same logic can be applied to entire steps/pages of your form if you’re using Multi-Step Forms. You just use conditional logic statements on the individual pages instead of (or in addition to) fields.
Using our free Ninja Forms core plugin and Conditional Logic add-on, you can show or hide pages of multi-step forms. All you need is to break your groups of form fields out into sections and apply conditional logic to the sections rather than individual fields. Here’s what the form will look like broken into parts:
Now that we have our field groupings/sections in place, you’ll want to apply the Conditional Logic add-on. Here’s an example conditional that will hide Guest 2 Food Order and Guest 3 Food Order parts if the invitee selects one guest:

If you would like to see a step-by-step article on how to hide or display entire pages on your multi-step form, you can visit our article to get into the specifics.
As you can see, using conditional logic help you streamline your forms and save visitors from a lot of frustrations. Your form visitors don’t want to waste their time filling fields or groups of fields that are not relevant to them, and you probably don’t want to lose valuable submissions. The Conditional Logic add-on is the perfect solution to streamline your WordPress forms and make sure your visitors are completing them.
3. Calculation and conditional fields in WordPress
Unlike other form builders, the Calculations is a free feature of Ninja Forms. You can use calculations to collect payments, calculate a quiz score, create a quote form without making a payment, and much more!
But before we get to show you how to work with calculations and conditional fields, we will quickly demonstrate how to create calculations without using WordPress form logic. There are two primary steps you need to follow when creating a calculation:
Step 1. Creating the fields on which to base the calculation
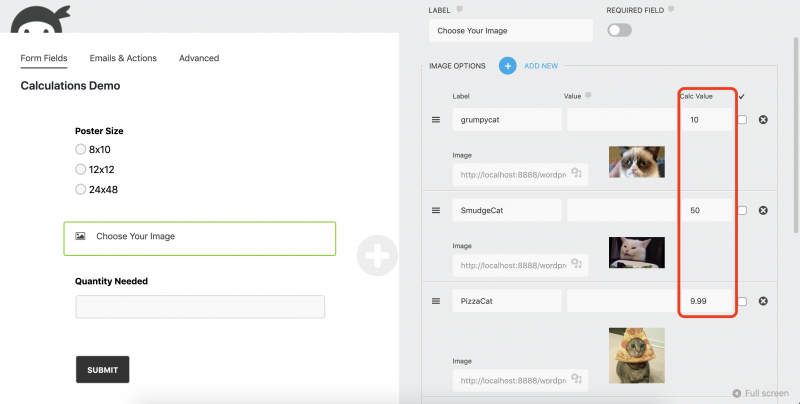
Each of our list fields (radio, dropdown, select, image, etc.) has a Calc Value setting for each list item. That’s where your price goes.
You can assign each list item option a Calc Value, and then calculate a running total for all of them as the person fills out the form. This value will be sent to any calculations referencing this field.
In our example, we assigned Calculation values to options under the Select Image field:
If you want to create a calculation that includes a Quantity field, we recommend you to use our Number Field as it only supports numeric characters.
Step 2. Creating the calculation itself
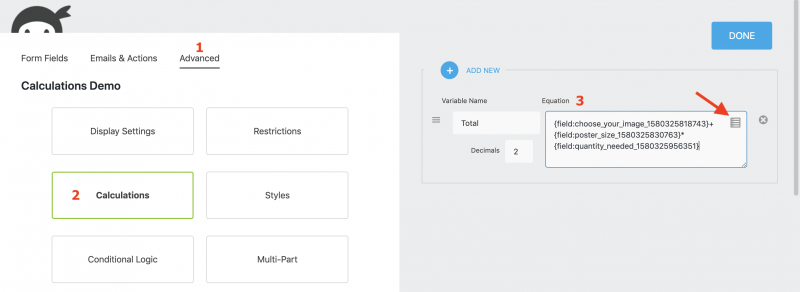
Navigate to your form builder and click the Advanced tab. If the Developer Mode is enabled, you will see the Calculations option.
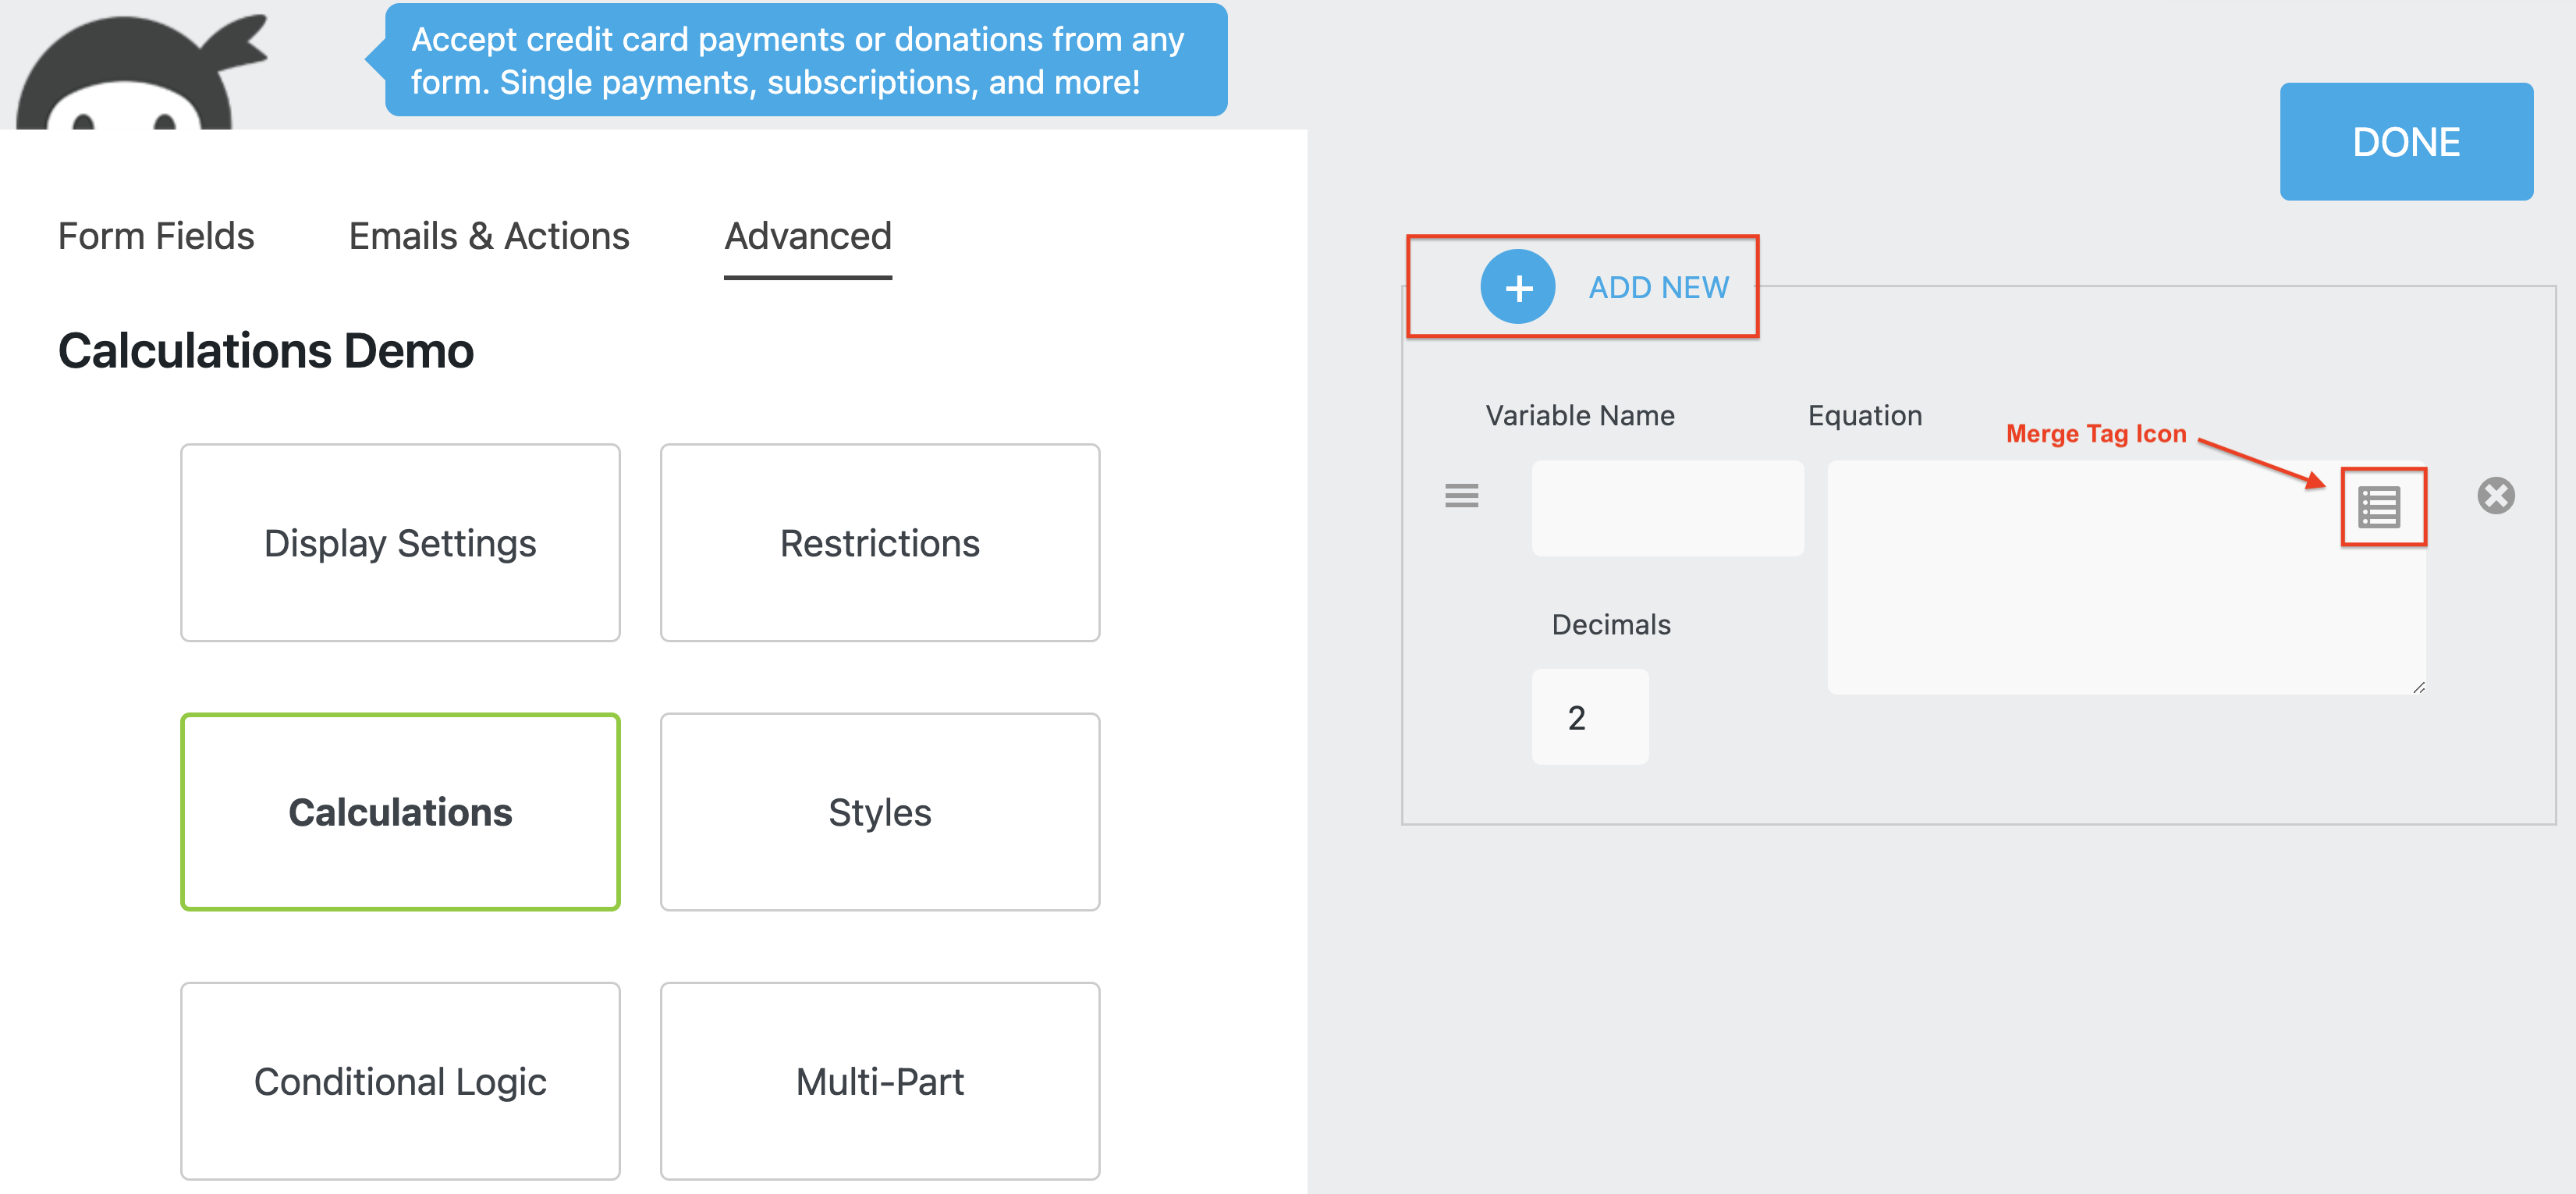
To create a new calculation in your WordPress form, click Add New and give it a name (Variable Name). Decimals are set to 2 by default. Add your fields by clicking the Merge Tag Icon within the Equation box.
Just choose your fields from the list that opens and that will place the merge tag of the field into the calculation’s equation. You can add (+), subtract (-), multiply (*), and divide (/) field values this way. Exponents (^), parentheses, and Order of Operations are respected, too.
In our example below, we created a calculation named Total. Using the merge tag icon we added the Select Image field to the Poster Size field and multiplied it with a quantity field to create a calculation that totals the combined prices.
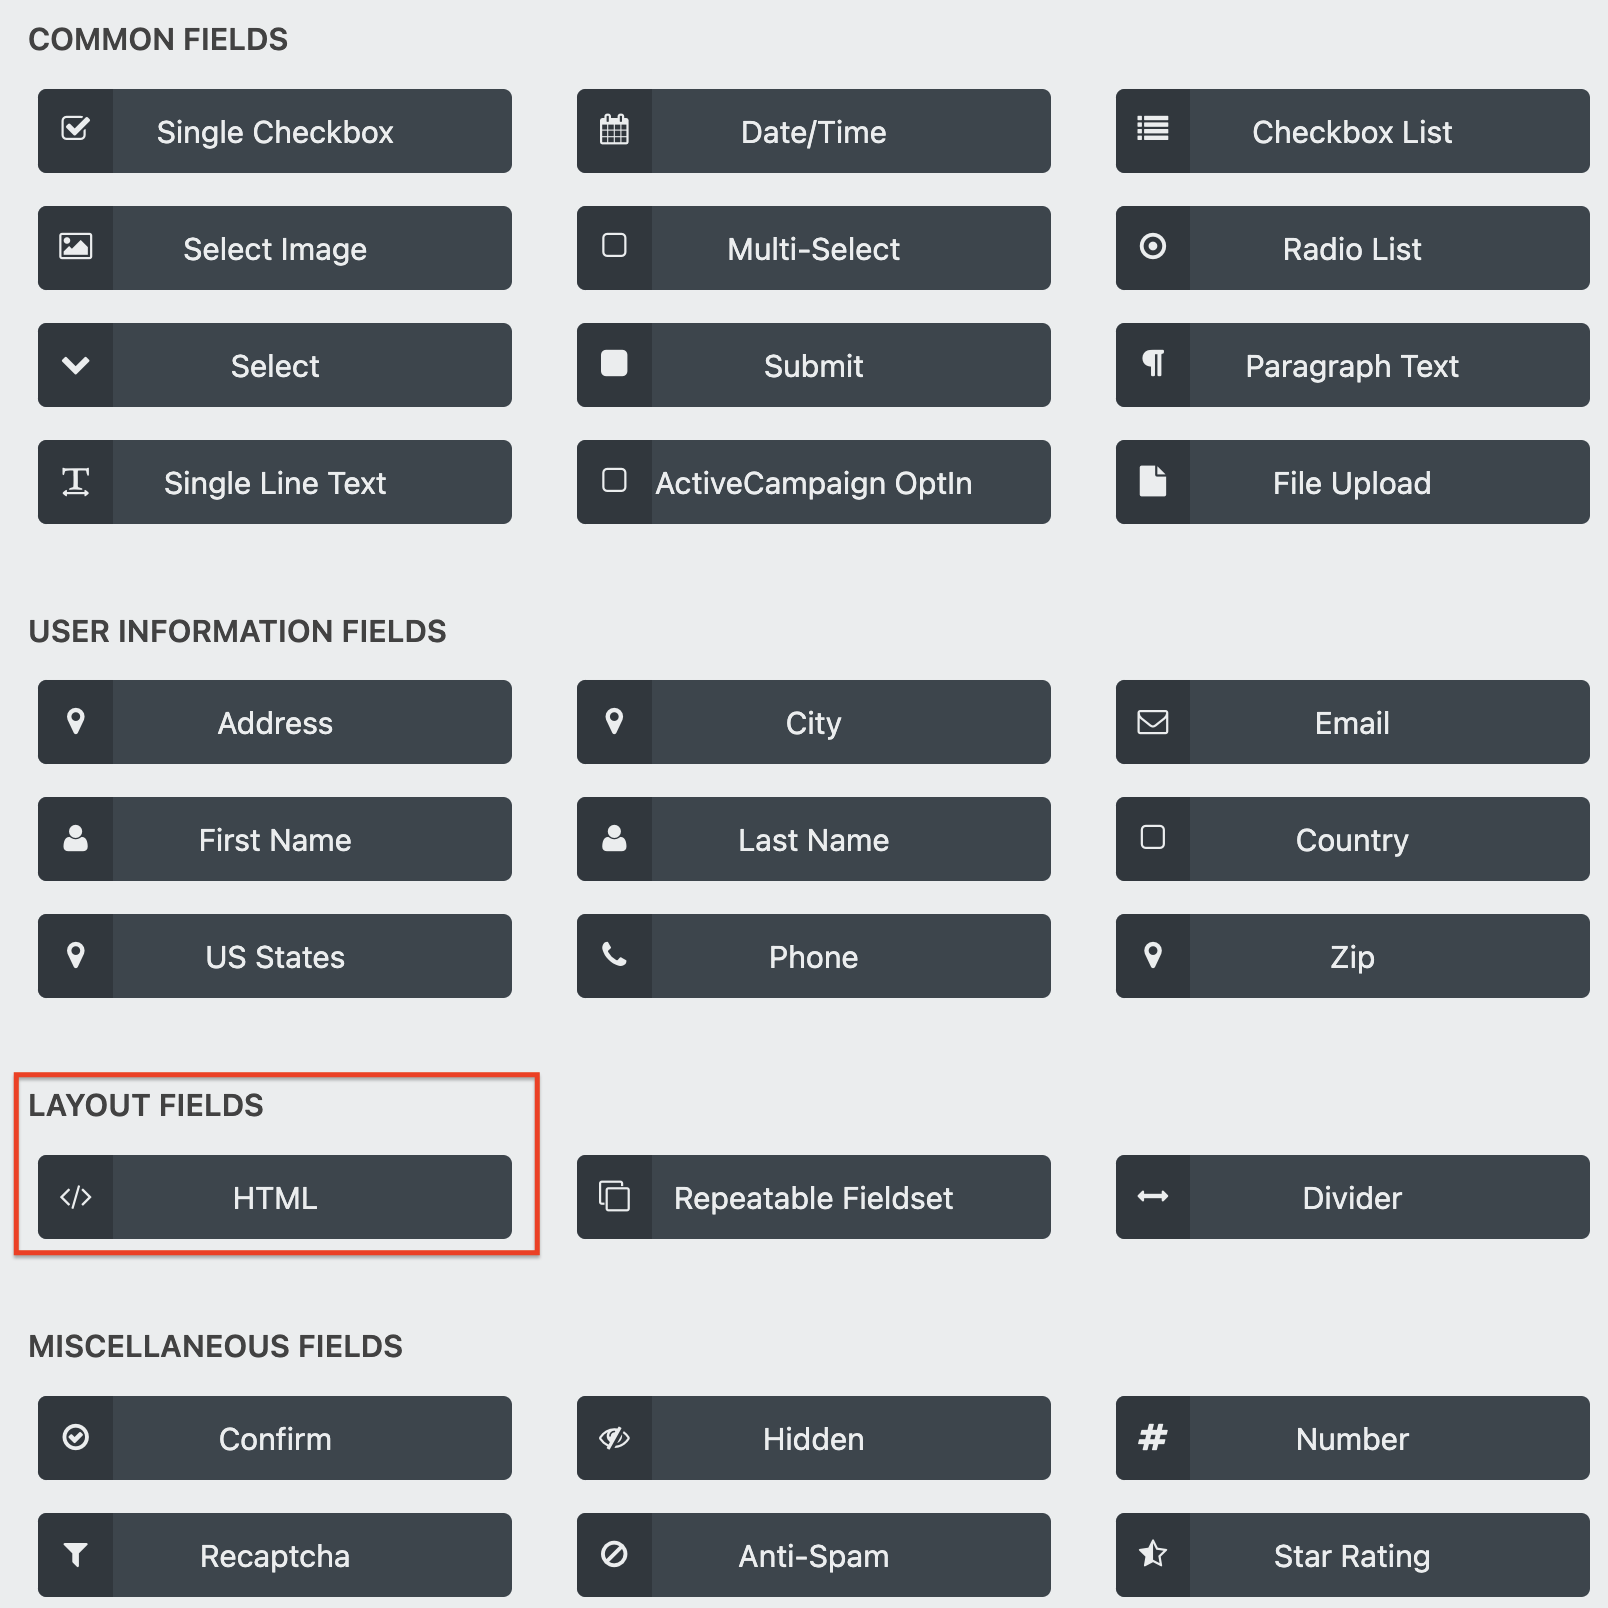
Now if you want to display your total on your WordPress form, you add the HTML field to your cost calculator form. This field is located under the Layout Fields in your form builder.
Click on the merge tag button and place the calculation’s merge tag into the HTML field’s text editor.
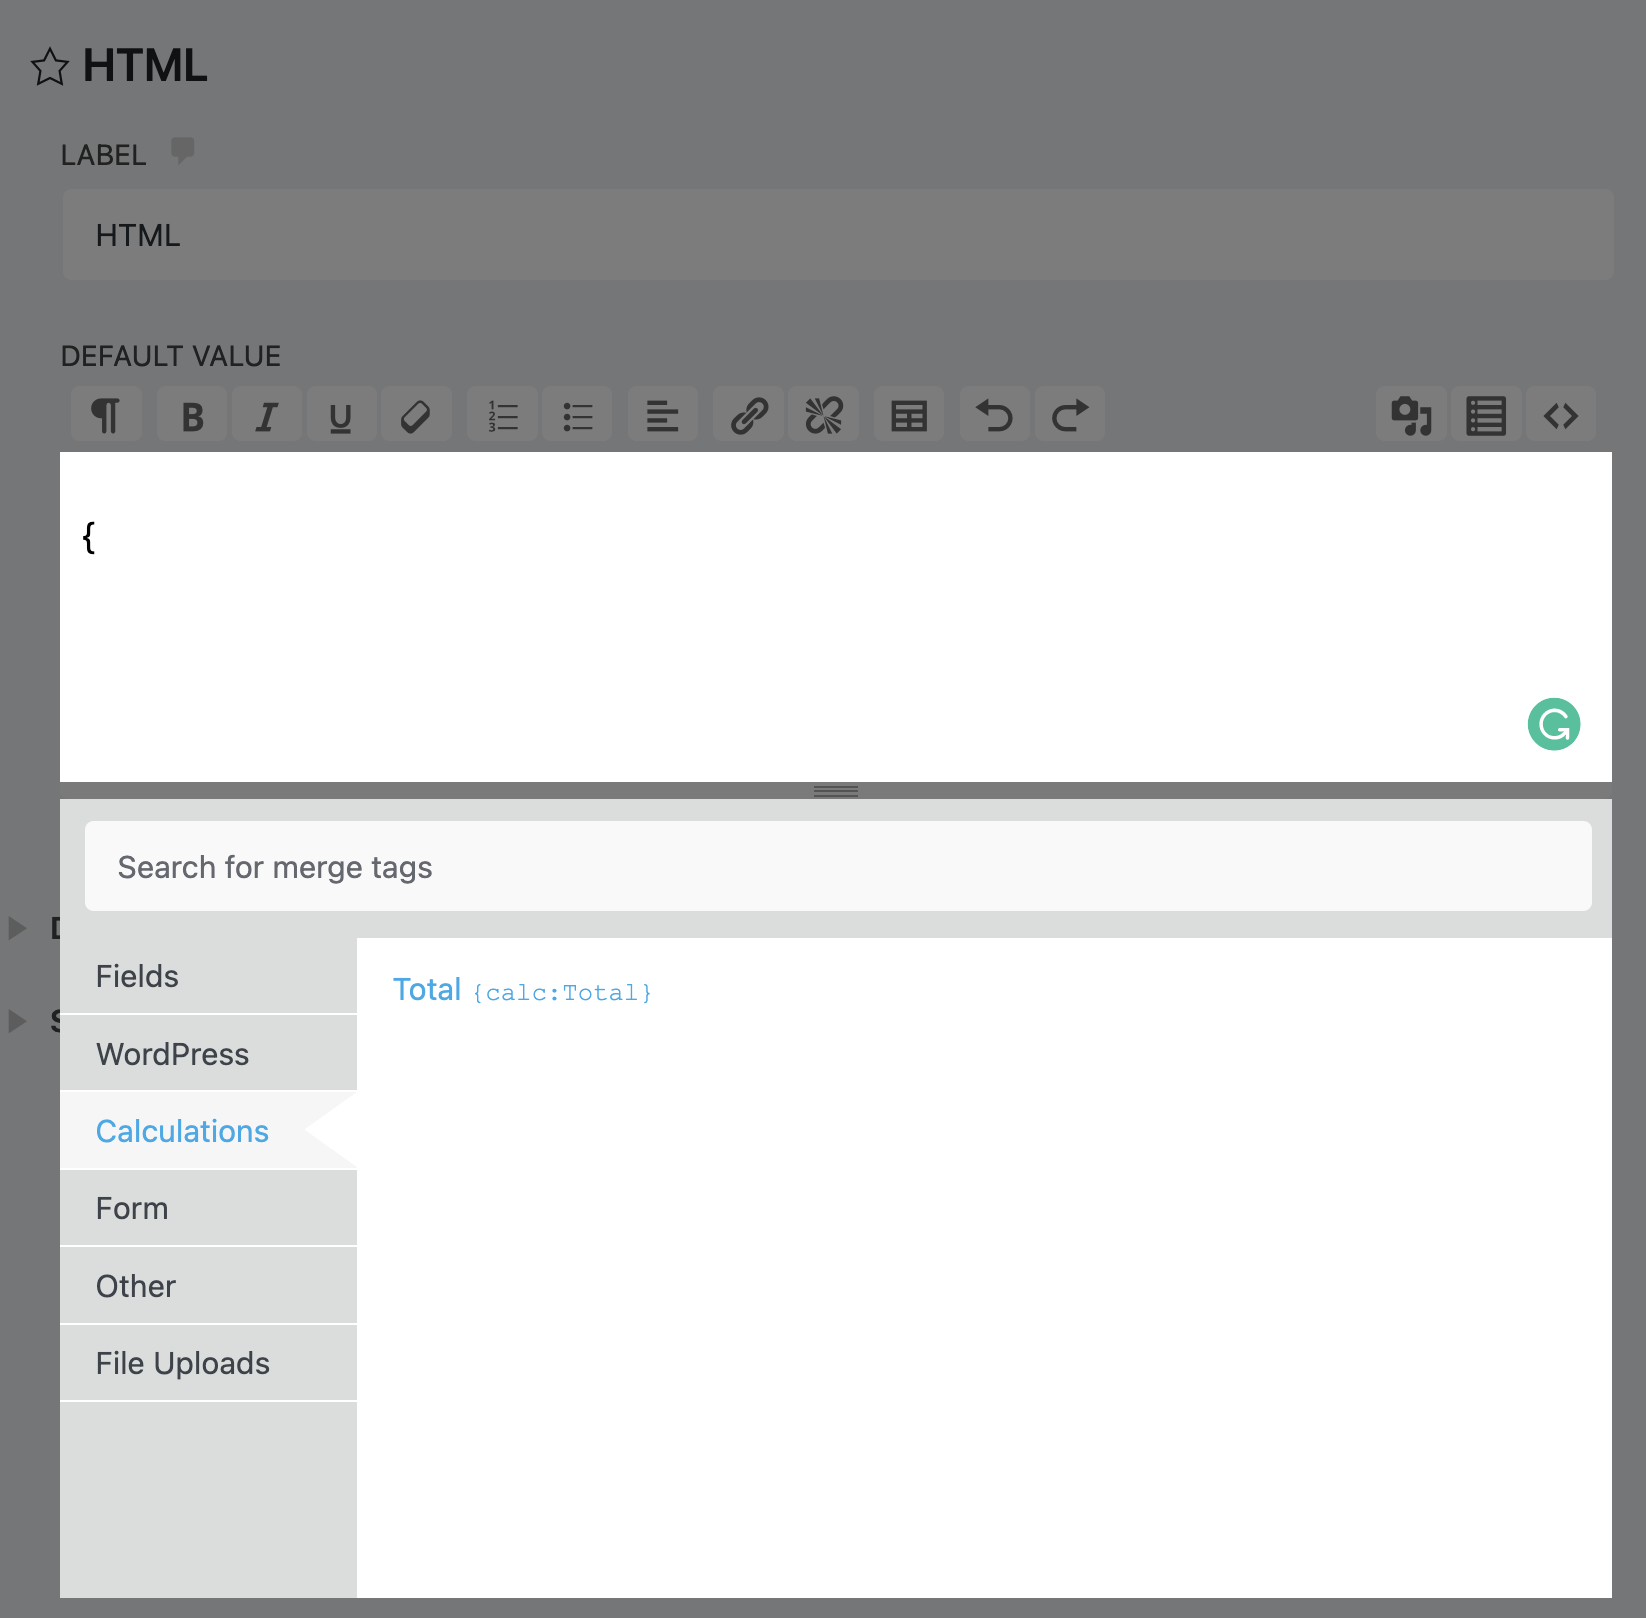
if you want to add a currency symbol or any text to your calculation, you can add it before or after the merge tag as shown below:
Total: $ {calc:Total}
How to use calculations with conditional fields
Now here comes the cool part! Applying calculations to conditional fields lets you change the output value of your form fields. The perfect example of using calculations with conditional logic is offering discounts for volume pricing. Let’s say you want to offer different pricing based on the quantity your customer wants to purchase.
Here is an easy example:
You are selling a book that costs $30 but you want to offer a 25% discount to customers who purchase more than 5 books.
The hidden field is used to be the discount rate. For percentage discount, set the Default Value to 1. For a flat discount, set the Default Value to 0. As we want to offer a percentage discount we set the Default Value to 1.
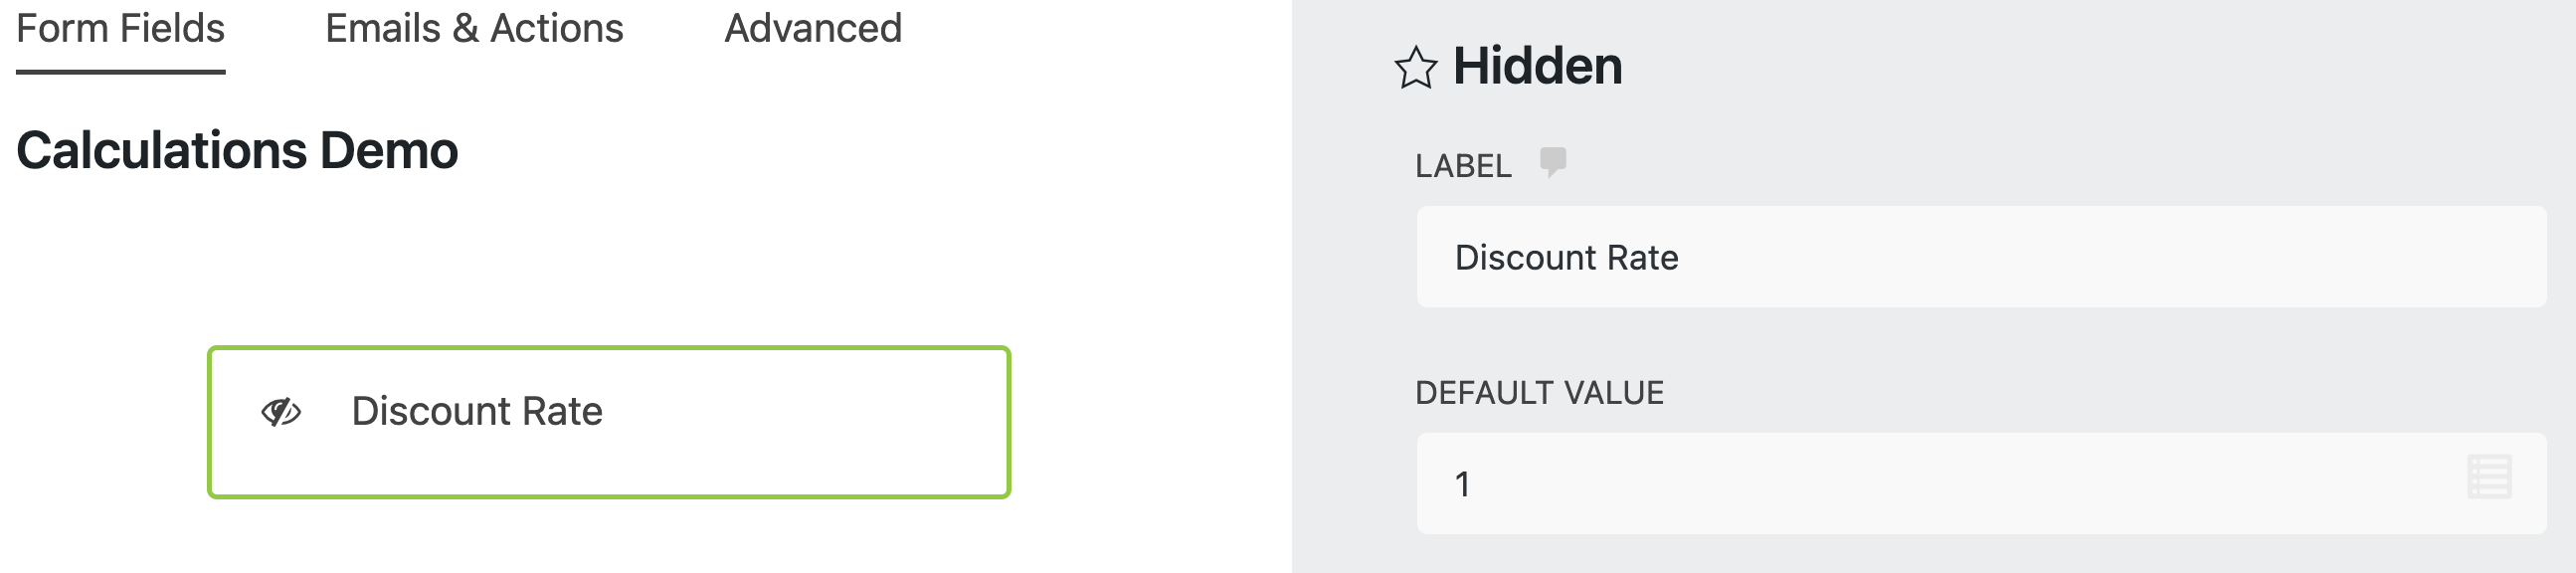
Using a hidden field and conditional logic you can change the value of the hidden field to change the outcome of the calculation.

Want to explore our calculations feature further? Take a look at our article 3 Easy Steps to Use Coupon Codes in WordPress Forms to find out how to change the value of the total field based on conditional fields and calculations.
You can also check our following blog posts: How to Build A Request A Quote WordPress Form (Template) and How to Create a WordPress Payment Form with Calculations to learn how to create powerful cost calculator forms in WordPress.
4. Bonus: How to style conditional logic fields in WordPress
For any WordPress forms, including conditional logic forms, the form design is critical to earning more conversions. Whether you want to customize the entire look of your form or fields in WordPress, the styling plugin can do the hard job for you.
Our Layout & Styles add-on gives you the opportunity to tweak the appearance of your form to better match your site. You can easily create rows and columns, resize fields, change the font or color of your field labels, and much more.
Did we mention you don’t need to have coding skills? Say bye to manually editing your files with CSS code. With our styling plugin, you will save yourself frustrations and style conditional fields in WordPress in a matter of minutes!
Want to learn more about form styling? Make sure to visit the How To Style Your WordPress Forms (Easy Examples) and How to Customize WordPress Forms (Font Styling) articles to learn how to turn an ugly duckling into a beautiful swan without mastering CSS!
You’ve just learned how to hide and show form fields with conditional logic!
Conditional logic helps you build smart forms with interactive dynamic fields, so you only show users fields that are relevant to them. But the conditional logic functionality does not stop here!
You can also create conditional actions in WordPress based on form choices, including:
- conditional redirects
- customized success messages
- modified lists
- send a conditional email and subscriptions
- and much, much more!
Additionally, you can create WordPress forms conditional notifications or apply calculations to conditional fields to change the output value of your form fields.
 If you are searching for powerful WordPress forms which support conditional logic, you can’t go wrong with our Conditional Logic add-on.
So what do you say? Will you give this conditional plugin a try? Unlike our competitors, you can buy the Conditional Logic add-on individually, or it comes included in all our membership plans. With a 14-day money-back guarantee, you have nothing to lose!
Try Ninja Forms Today
Always free, with premium features available through our memberships.
Thanks for this extensive documentation Quay, I’ll try this out definitely. However, I wish there would be a simplier appoach to show multiple fileds of the same rather than configuring each and every form field as a conditional statement.
Just to show an example, I have a network of schools and the submit every year their list of graduates, sometimes this number is 40, 50. Currently using it this way would be an overhaul.
Can the conditional fields show different images?
Eric,
Sure! Use an HTML field for each image you want to display, and write conditional statements that will show/hide the appropriate HTML field per the user selection. Should be pretty simple!
Cheers,
Quay
Can you make a conditional form? For example:
If “yes” selected, go to another form than if you don’t select, go to next normal page
Carol,
Yes! Conditional statements can be applied to Redirect actions, which will accomplish exactly what you’re asking: https://ninjaforms.com/docs/redirect-action/
Cheers,
Quay
when field “xxx” is not empty than show field “yyy”
when field “xxx” is empty than show field “yyy”
is there a way to do this with textfields?
Otto,
Your example condition would always be true so “yyy” would always show since “xxx” would always be true in this instance.
sorry my question was a bit unclear…
I want to use a form with 10 single line textfields and the last 4 fields must only show up if the other are filled in.
So is there a condition to check if a field is empty or not?
Yes, there is an is_empty check you can use for conditionals.
How to create a custom form with multiple selects boxes, where every fields depends on each others?
Sorry, this is probably a dumb question, but here it comes anyway…
Using the example in your article: if the user selects 3 friends, fills out all the details but changes it to 2 friends, does that mean the filled out fields for friend ‘3’ are still there but just hidden? And if so, will those values still be sent with the form submission or are hidden fields ignored?
Not a dumb question at all! The fields for friend 3 would be hidden when they switch back to 2 friends. Fields that are conditionally hidden will not show a value in submissions.
Cheers,
Quay
Can we make a condition whereby when the Sumbit Form Button is clicked, the results are taken to the next form?
My first form doesnt include user details. SO after inputing the details I want in the first form, I want the results to be taken and printed on the second form page, where user will be presented with another form to input his personal details
Sure, just use a Redirect action on the first form!
What if you want to increase the limit to 10 or more? You need a repeater field option.
Creating an actual repeater field element would be more helpful
Definitely, a repeater field would be better. And conditional logic UI would better be in the field settings, not the form settings.
Is there a way to then hide the unused fields from appearing in the PDF file that is created when we use the PDF submissions plugin so that the output PDF doesn’t show empty/unused fields? I hate to have our internal users have to scroll past those sections when reviewing documents. Professionalism is in the details.
Please disregard, this was answered in another section (instead of {all_fields_table} I need to change it to {fields_table}).
I have a form with conditional logic fields so that the user can bypass certain questions if they give a particular answer.
Can I make all of the questions mandatory required fields as well as have the conditional rules??
Hi Kaye,
that is an excellent question! Required fields, if hidden, will not be treated as required. i.e. the form will still validate and submit. They will only cause the form to fail validation on submission if they are visible to the user.
Instead of marking the field required in the form, you can set it to be required using conditional logic. Doing it this way removes the possibility that the user will be blocked from making their option.
Hi,
I want to build a contact form with Ninja forms, with the email address field only as a dynamic field. There is a thank you page after this contact form page, where the email address has to show op. Together with some text. Is this possible to make in the Ninja plugin without editing the code?
Hello Sander,
You can add the form’s email address dynamically to the Success Message action using the merge tag icon. Please see, our Merge Tag documentation and 12 Powerful Merge Tag Examples for your WordPress Form Submissions for inspiration.
For additional assistance, please reach out to our support team.
Hi, can we copy or duplicate the conditional logic to use for other fedils?
This is great, however, I wish this could be set up with repeater groups, therefore we can create the name, email and phone field for guests and depending on the number of guests it’s the amount of field groups that will be shown.
I have a situation where user’s need to fill in some birthday card information but they can buy 2, 3, 10, 20. I can’t manually set up fields for each birthday card because I don’t know how many will they need.
Hello Carlos,
Please reach out to our customer support team, where we’d be happy to assist you with brainstorming additional solutions: https://ninjaforms.com/contact/.
Hi, I am using the Paypal Express plugin and Conditional Logic plugin and I want to be able to make the price change based on the city they say they are from. The city field is a select field, and I want the price for Lawrence to be $320, but Kansas City to be $380, etc. How can I make the price field change and be a field where the person filling out the form cannot edit that price? What kind of field does the price field need to be???
Is there a way to lock a number field so that they cannot change that price number manually?
Does the comparative value always need to be a hard-coded figure or can we use a variable here,
e.g. can we do
When value is Greater or equal to [$variable] then…
Hi Nick,
The comparative value will need to be hard-coded unless you are using a list field ( i.e., Select, Check, Radio ), in which case a list option will be provided as a choice for the comparator.
Can conditional forms be used to show an alert based on the built in US state field if a certain state is not selected? I’ve tried various different ways to get it to work but I’m not having success. The Alert shouldn’t show up when the select box is in it’s default state of “- Select State -” , I only want the Alert html field to show after a user makes a selection and doesn’t pick a certain state.
And I don’t want to have to include every invalid state in the logic, that would be a pain to enter with the interface as it currently is.
I’ve tried this, where the if condition is a combination of two does not have selected conditions:
When
State Field does not have selected “-select state-”
AND State field does not have selected “Texas”
do
html alert show field
if the condition is not met
html alert hide field
But that doesn’t seem to work
I’ve tried the OR version of that.
When
State Field Has Selected “-select state-”
OR State field Has Selected “Texas”
do
html alert hide field
if the condition is not met
html alert show field
How do I handle a default placeholder field like that?
I also attempted to make use of calculated values to get this to work.
Set the calc value for “- Select State – ” and “Texas” to 1, left the rest at 0.
But for some reason the calculated variable set to that field never changes from 0. So I cannot use that to show and hide the field based on the the value being >= 1.
And I also tried setting a hidden field as the control variable, but I cannot figure out a way to change that variable based on the value not being ” -Select State -” or “Texas”…
Hi Josh
Thanks for reaching out.
Since your issue may take some time to sort out, can you please reach out to us via our contact form for support.
Don’t forget to include a System Status report and an exported copy of the form having issues.
Thanks!
Mia