Ever wanted to pop a list field into your form and have the options run left-to-right rather than vertically? If so, you just landed in the right spot to learn how! Column styling for list fields has been a really popular request in our support channel, and it’s really not that hard to do. In fact, you don’t even have to leave the builder or own Layout & Styles!
Just as an FYI, we published a similar article a while back on how to organize your form fields into columns using the builder. The technique we’ll be using here is very similar, so if column styling for list fields makes you happy, be sure to check that out too! 🙂
Crafting Column Styling for List Fields
Just like placing form fields themselves into columns, there’s a quick and easy way to do this using nothing but your Ninja Forms builder. I’ll demonstrate using a Radio List. With that added to the form:
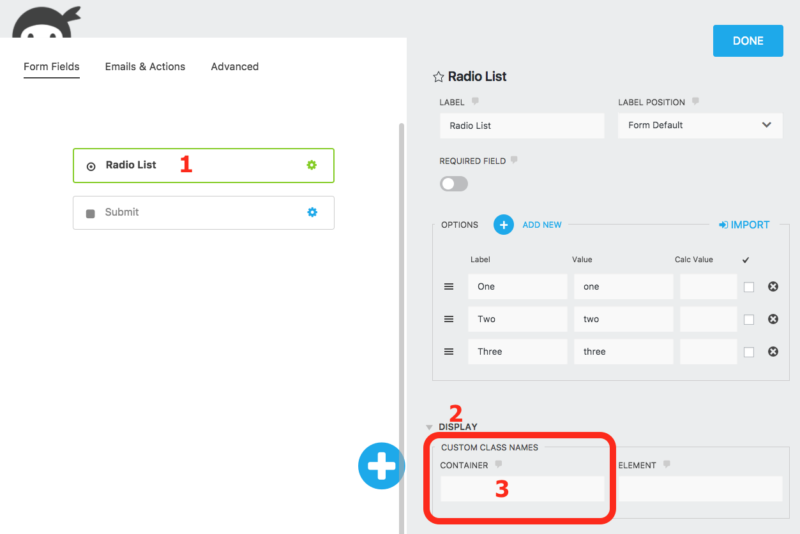
1) Locate the Custom Class Names Option of the List Field
Sounds complicated. It isn’t.
Make sure you have Developer Mode turned on in your plugin settings.
- Open the field settings window of the Radio List field.
- Look down toward the bottom of the field settings window for Display. Expand Display.
- Custom Class Names is the very first option. Specifically, you’re looking for the Container field here.

2) Choose Your Custom Class Name
While naming your custom class “Bob, Destroyer of Worlds” or something similar would be fun, these names have to be very specific to get the job done. Here’s a few to get you started:
- two-col-list
- three-col-list
- four-col-list
As you may have guessed, the name you want to use depends on how many columns you want. two-col-list if you want two columns, three-col-list if you want three, etc. Six is currently the maximum that this method will support.
3) Place Your Custom Class Name in the List Field
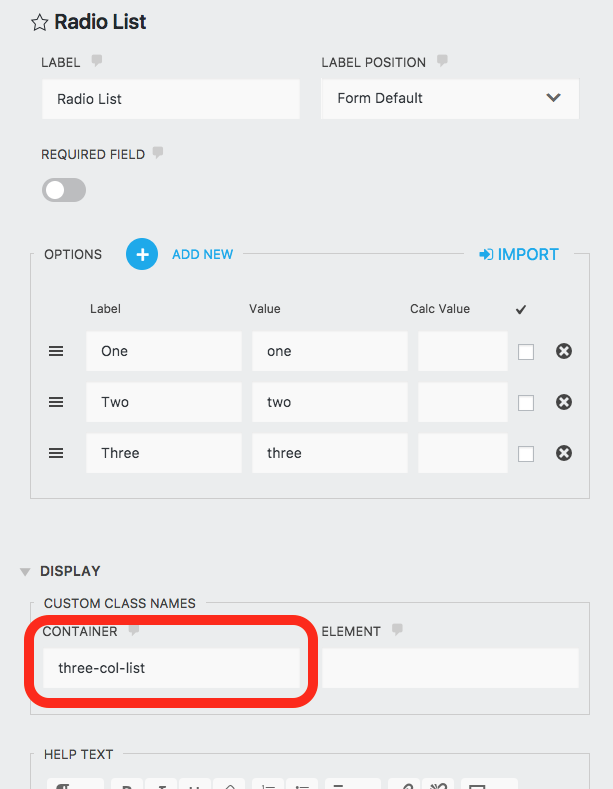
Here I’ve selected three-col-list for the default Radio field with three list options. Just make sure you’re putting this in the Container field 🙂

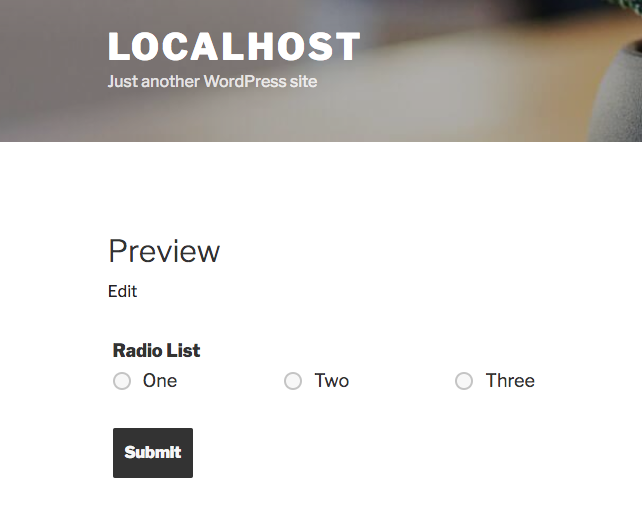
Here’s what our Radio List field looks like now:

Pretty painless and easy, right?
A Word About Compatibility
Different plugins and themes may modify your form’s styling. This is not only something we see quite frequently, it’s something we count on from a theme. Ninja Forms is designed to defer to the styling put in place by your theme. You’ve spent a lot of time and effort tracking down the perfect design for your website, and we want your forms to reflect your chosen aesthetic.
That’s fantastic when a theme’s CSS is well written. But it can cause headaches when styling rules have been written overly broad or just poorly in general. All this to say:
If this doesn’t work for you, there is CSS being implemented from another source, probably your theme, which is preventing this functionality from working properly. What can you do about it? Sadly that will require custom CSS or a support request to the owner of the offending plugin/theme.
What Else Would You Like to See?
We all spend a lot of time in the support channel listening to your requests and growing pains with Ninja Forms. We’d love to hear from you here, too! What other tricks can we show you how pull off with your WordPress forms? Let us know in the comments below!


Benjamin says:
Thanks for the tip! And how to make the same trick with fields?..
For example, how to put 3 fields (Name, Email, Phone) in one line?..
Thanks for help!
Quay Morgan says:
Benjamin,
Hey! True drag and drop, easy mode columns? Layout and Styles: https://ninjaforms.com/extensions/layout-styles/
You can also use custom class names similar to this method: https://ninjaforms.com/row-column-form-layouts/
Have fun!
Cheers,
Quay
Gazi says:
Wow! Nice tips. I wasted 2 days. You save my life man. Thanks a lot.
Fiona McCulloch says:
Here’s an example of how something like this might work (tweaking code found in your scss file)
https://codepen.io/cshanejennings/pen/rvWqmJ?editors=1000
Victor Smilgys says:
This works if you have 6 radio buttons or less, but when I try 7 or 8 and I type in seven-col-list and eight-col-list it doesn’t work. What is the code for an 8 column list?
Quay Morgan says:
Victor,
Six is the upper limit of these classes, unfortunately. I’ll bring this up to our development team and see if we can’t get it raised for you 🙂
Cheers,
Quay Morgan
Badqap says:
Hello, this css classes looks bad on mobile.
Quay Morgan says:
Hey! Sorry they don’t look great for you. This method simply introduces the classes, how styling is handled is left up to your theme. As a general rule, Ninja Forms defers almost all styling to the rules applied by your theme, including mobile presentation. Rationale there is that you’ve probably spent a lot of time picking the theme that you feel is perfect for your site, and we don’t want to enforce our own styling over that. The drawback to that is that when a theme’s CSS doesn’t handle something properly, it can skew your form’s presentation. I’m glad you were able to find a fix for your individual case though!
Cheers,
Quay
Sogoal says:
Very helpful! I have two columns, and an image (html) field is the very top one. But because of the image’s size (height), it’s bumping the rest of the form’s text down. Is there a way to have other fields wrap around an image?
Quay Morgan says:
Glad it helped! It’s hard to say without seeing the form, but you may be able to get it the layout sorted out via Layout & Styles, or definitely if you’re comfortable writing your own CSS. Sounds like there are margins/padding that could be adjusted to reduce that space.
If you’re using Layout & Styles and still struggling to get it right, we may be able to help if you wanted to submit a support request: https://ninjaforms.com/contact/
Cheers,
Quay
Carleen Barra says:
How do I just make ONE column? I want each checkbox on a different line. I can’t seem to find a way to do that. I tried one-col-list, but that doesn’t work.
Curtis Brownlee says:
Hi!
By default, Checkbox List fields and Radio Fields appear in one column, with one option per row. If you would like the options to appear on one row, you can use Helper Classes, such as “three-col-list” or “five-col-list” in order to have options appear on one row, side by side.
Helper Classes (https://ninjaforms.com/docs/styling-your-forms/)
I hope that this helps to guide you in the right direction.
If you have any questions or comments, please reach out to us at https://ninjaforms.com/contact and we’d be more than glad to assist you.
Best regards,
Curtis
WP Ninja
Gideon Affleck says:
Whats changed in Ninja forms when tips and tutorials don’t match current versions? I simply cannot set radio list to be horizontal. The options are not there like the tutorial said and I only purchased Ninja forms today.
Quay Morgan says:
Hey, sorry about that. Those settings are not visible by default in new installations anymore, but they’re still there. Just toggle this setting on: https://ninjaforms.com/docs/developer-mode/
I’ll update the article to reflect this. Thanks!
Andre says:
Hi, I’m looking for an NPS Score type field… I can somewhat re-create it with a radio list, but I’d like to see 10 buttons in a single row for a Net Promoter Score.
Any chance that that’s on the roadmap?
Mike Barker says:
“five-col-list” & “six-col-list” not working for me. 2-4 works just fine. any thoughts?