


You set up a registration form, shared the link, and now your inbox is filling up with duplicate entries from the same person. Or maybe the opposite problem: you have 50 spots for a workshop and no way to make the form stop accepting signups when they’re gone.
Both situations are more common than they should be, and both have a clean fix in Ninja Forms. The built-in Restrictions settings let you cap total submissions, block duplicate entries, and restrict form access to logged-in users. No add-ons required.
This walkthrough covers all three controls so you can apply whichever one (or combination) fits your situation.
What You’ll Need
To follow along, you’ll need Ninja Forms (free). All three Restrictions controls covered here are built into Ninja Forms core.
Cap the Total Number of Submissions Your Form Will Accept
If you’re running an event registration, a limited-capacity offer, or any form where there’s a hard ceiling on responses, the Submission Limit setting closes the form automatically when that ceiling is reached. You set the number once and forget about it.
Here’s how to set it up:
- Open your form in the Ninja Forms builder.
- Click the Advanced tab at the top of the builder (alongside Form Fields and Emails and Actions).
- Click into Restrictions to open the settings drawer on the right.
- Find the Submission Limit field and enter your maximum number. For a 50-person workshop, enter 50. Leave it blank if you want no limit.
- Find the Limit Reached Message field just below it and write the message visitors will see once the form closes. Something like: “Sorry, registration is now closed. All spots have been filled.”
- Click Done in the top right, then save your form.
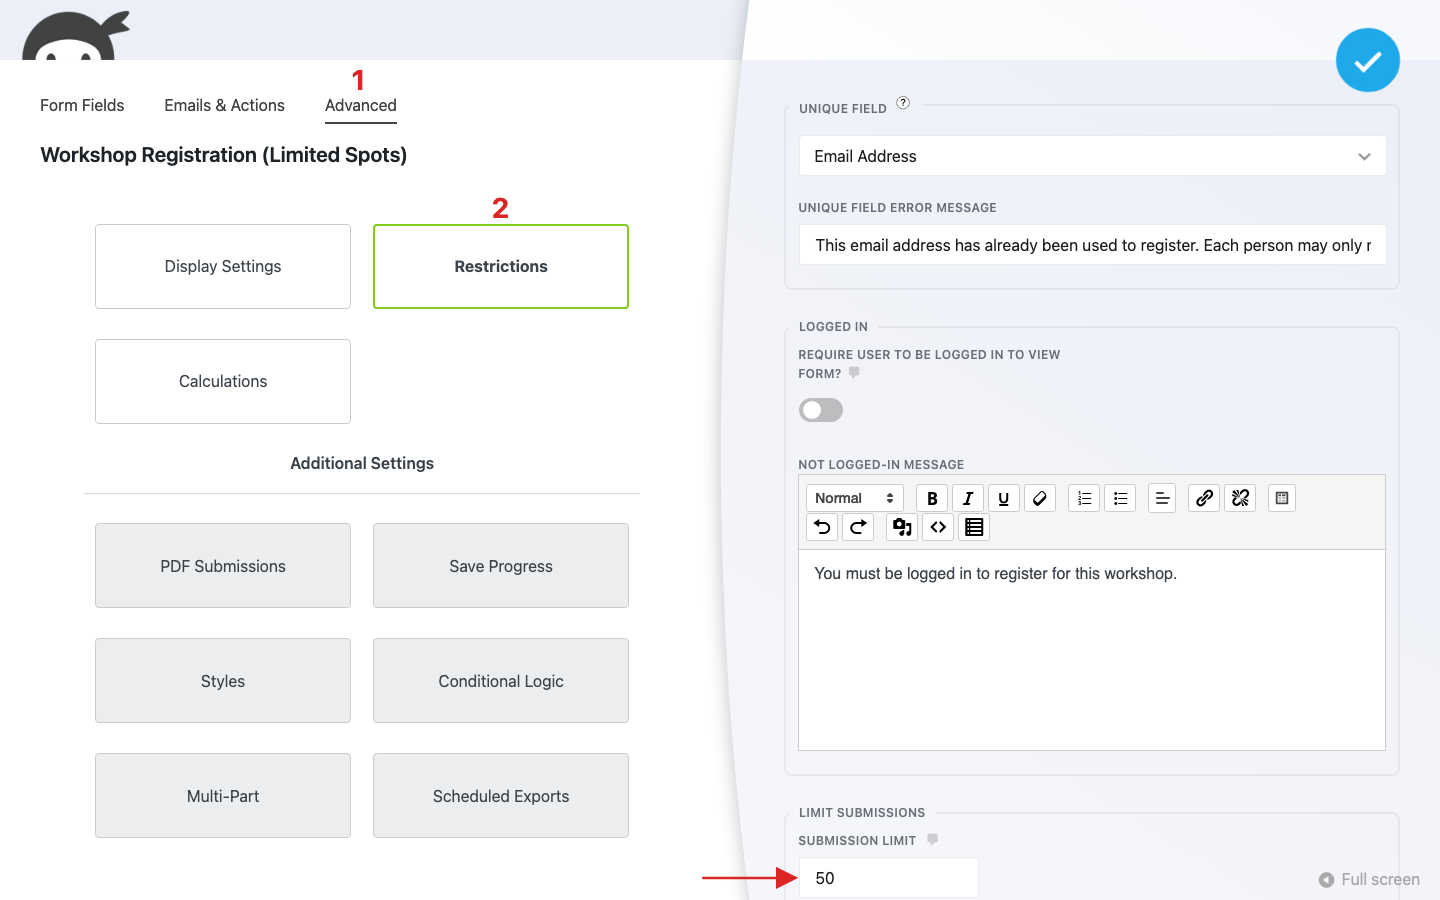
Once the limit is reached, the form is replaced entirely by your message. Visitors cannot see or interact with any fields. If you need to reopen spots later, deleting submissions frees up capacity automatically.
That covers the hard cap. But a cap alone doesn’t stop the same person from using up multiple spots before you hit it. That’s where the next approach comes in.
Prevent the Same Person from Submitting More Than Once
A submission limit stops the form when you hit capacity. It does nothing about someone submitting five times with five different names. The Unique Field setting handles that by checking each new submission against existing ones and blocking any duplicate value in the field you choose.
Email address is the most common choice because it’s both required and hard to fake at scale, but you can use any supported field type.
Here’s how to configure it:
- In the Restrictions drawer (Advanced tab → Restrictions, as shown above), find the Unique Field dropdown.
- Select the field that must be unique across submissions. For one-per-person enforcement, choose Email Address.
- In the Unique Field Error Message box, write what someone sees if they try to submit again. Example: “This email address has already been used to register. Each person may only register once.”
- Save your form.
When someone submits, Ninja Forms checks the database for any existing submission with the same value in that field. If it finds a match, the submission is blocked and the error message appears directly below the field. The form stays visible so the person can correct it if they made a typo.
A few things worth knowing about Unique Field:
- One field per form. You can designate only one Unique Field at a time.
- Phone fields are not supported. If you need to enforce uniqueness on a phone number, use a Single Line Text field with an input mask instead.
- The check is server-side. It cannot be bypassed by disabling JavaScript.
Between Submission Limit and Unique Field, most use cases are covered. But if your form is for members only, there’s a third control that can round things out.
Restrict the Form to Logged-In Users Only
Sometimes the right answer to “who can submit this form” is simple: only people with accounts on your site. The Logged In setting replaces the form with a message for any visitor who isn’t authenticated, before they even see the fields.
To enable it:
- In the Restrictions drawer (Advanced tab → Restrictions), find the Logged In toggle and switch it on.
- In the Not Logged-In Message field that appears, write what visitors should see. Example: “You must be logged in to register for this workshop.”
- Save your form.
Anonymous visitors will see your message instead of the form. Logged-in users see the form normally and can submit without any additional friction.
Note that this setting is optional for most registration use cases. If your form is public but you want submission limits and duplicate prevention, Submission Limit and Unique Field are all you need. Logged In is best suited for member portals, internal tools, or any situation where unauthenticated access is never appropriate.
Stacking All Three Together
These three settings are designed to coexist. You can enable all of them on the same form and they won’t conflict. A realistic configuration for a members-only workshop with 50 spots: set Submission Limit to 50, choose Email Address as the Unique Field, and turn on Logged In for member-only access.
The practical result: only members can see the form, each member can register once, and the form closes automatically when all 50 spots are claimed.
You’ve now seen three approaches to limiting who can submit and how many times. Start with whichever one fits your use case. If your situation calls for it, layer them freely.
Give Ninja Forms a try today!
Ninja Forms is free! Optional premium features available with any membership.

neil says:
Can I use calculated fields? A concatenation of email and first name?
Shaylee Hansen says:
Hello Neil,
The Unique Field does not allow for field concatenation.
What were you wanting to achieve with combining the email and first name together?
Steve Strother says:
Great articles. Very helpful. Thank you for publishing them.
QUESTION
Can look up tables be created in ninja forms?
Shaylee Hansen says:
Hello Steve,
If you are using Gutenberg I recommend looking into our Submission Table Block. The Submission data from a selected form will show as a table on the associated page. I hope that helps. For more information, please reach out to our support team.
Annie says:
Very helpful article, thank you.
My question: is there a way to limit submissions using a unique text field that compares the value submitted to a list/table/other data source and only allows submissions from those who are in the table?
What I’m trying to do is limit votes on a ballot to only those with a valid code, without restricting the form to members only. I can’t use email or phone as unique identifiers, as couples often have the same one listed for both parties on their memberships, so a unique code assigned to all participants seems the way to go, but I can’t figure out how to restrict the submissions that way.
kato says:
hi
i wanna limit the total phone text numbers of submissions
Shaylee Hansen says:
👋 Kato,
To set the Phone field as a Unique select ‘Single Line Text’ from the dropdown, and apply an Input Mask ( Restrictions > Input Mask > US Phone/Custom ) to the field 😁. To limit the number of character’s allowed in the Phone field open the Restrictions dropdown found within the Phone field and set the character limit.
FT says:
Hi, I would like to make a form with 3 simple inputs from the end-user: National ID#, phone, name.
The National ID# has to be unique for every form submission. It’s 9-12 numeric characters.
End-users for this form do not need to log in or register to submit.
Is this possible in the free version? Or is it only possible with paid add-ons?
Thank you
Shaylee Hansen says:
Yes, creating a form with the three inputs you mentioned, and one of those being unique, can be achieved with the free version of our plugin. To set a field as “unique” navigate to Advanced > Restrictions > Unique Field[https://ninjaforms.com/docs/unique-field-validation/]
Nicolas Peigner says:
Hi,
I would like to limit the number of subscription per slot (in a drop done menu). I have a drop-done menu with 5 slots and I have only 6 places avalaible per slot. Can I add a restriction to limit the number of suscriptions/slot? I can’t let 10 peoples suscribes if I only have 3 places availbles.
If yes, how can I follow the number of places available?
I tried with Advanced date picker but it doesn’t work.
Thanks for your help