Contact Form Design: How to Style Your WordPress Forms
You spent weeks getting your site to look just right, so why does your contact form design look like it came from somebody else’s website? Gray boxes, a plain little button, one long skinny column of fields… and is fixing that a plugin setting, a theme setting, or a job for a developer? Every search turns up a tutorial for button colors, another one for checkboxes, and nothing that shows you the whole picture.
Half of what you find tells you to open your theme files or set up a child theme, which is exactly the kind of thing you’d rather never touch. The other half ends on a sales page before you know whether any of it is free. And you still haven’t seen what “better” would even look like on your own form.
Yes, it’s annoying. But it’s also one of the easier things to fix on your whole site. Below you’ll see the same form before and after, what you can do for free today, and how to get a fully branded contact form without editing a single theme file.
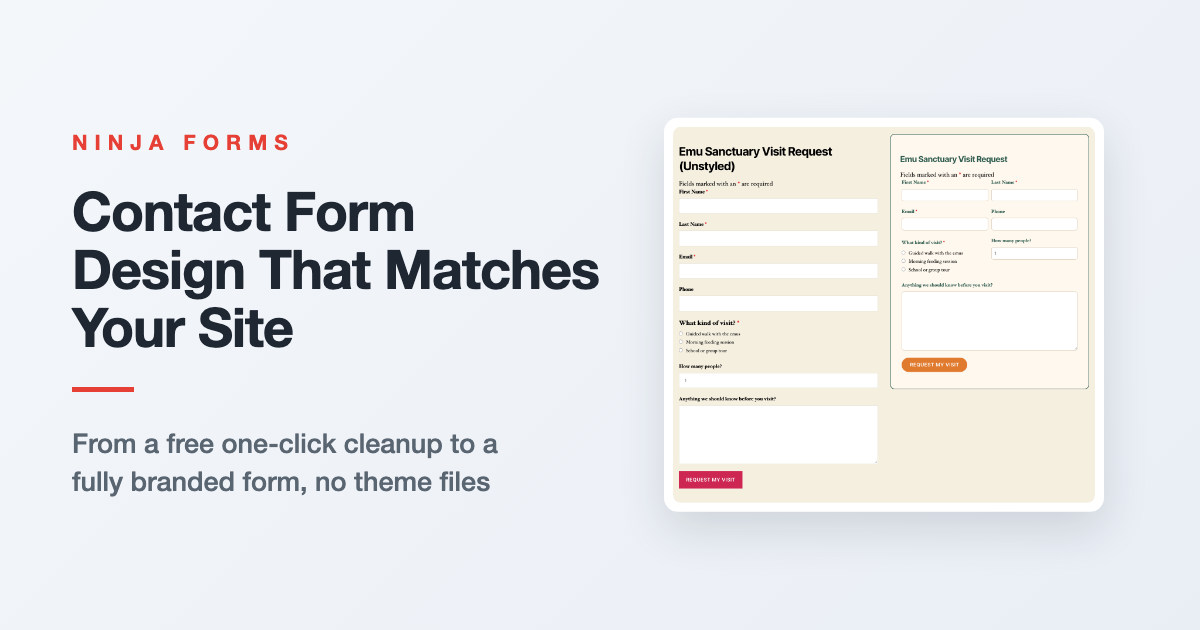
What you’ll need
- Ninja Forms (free)
- The Layout & Styles add-on, only for the branded look further down (standalone, or included with memberships)
Where does contact form design live in WordPress?
In your form plugin, not your theme. With Ninja Forms, how a form looks is set in the plugin’s own settings inside your WordPress admin, so you never have to open a theme file. Your theme still dresses the page around the form (mostly fonts and background color), which is why you’ll check the result on your real page at the end.
You have three ways to go, and you can stop at whichever one gets you the look you want:
- One free switch that gives every form on your site a cleaner default look.
- A free custom class plus a few lines of CSS, for when one field needs to stand out.
- The Layout & Styles add-on, for point-and-click colors, fonts, spacing, borders, and fields side by side.
Here’s what number three can do. Same emu sanctuary visit request form, same fields, before and after:
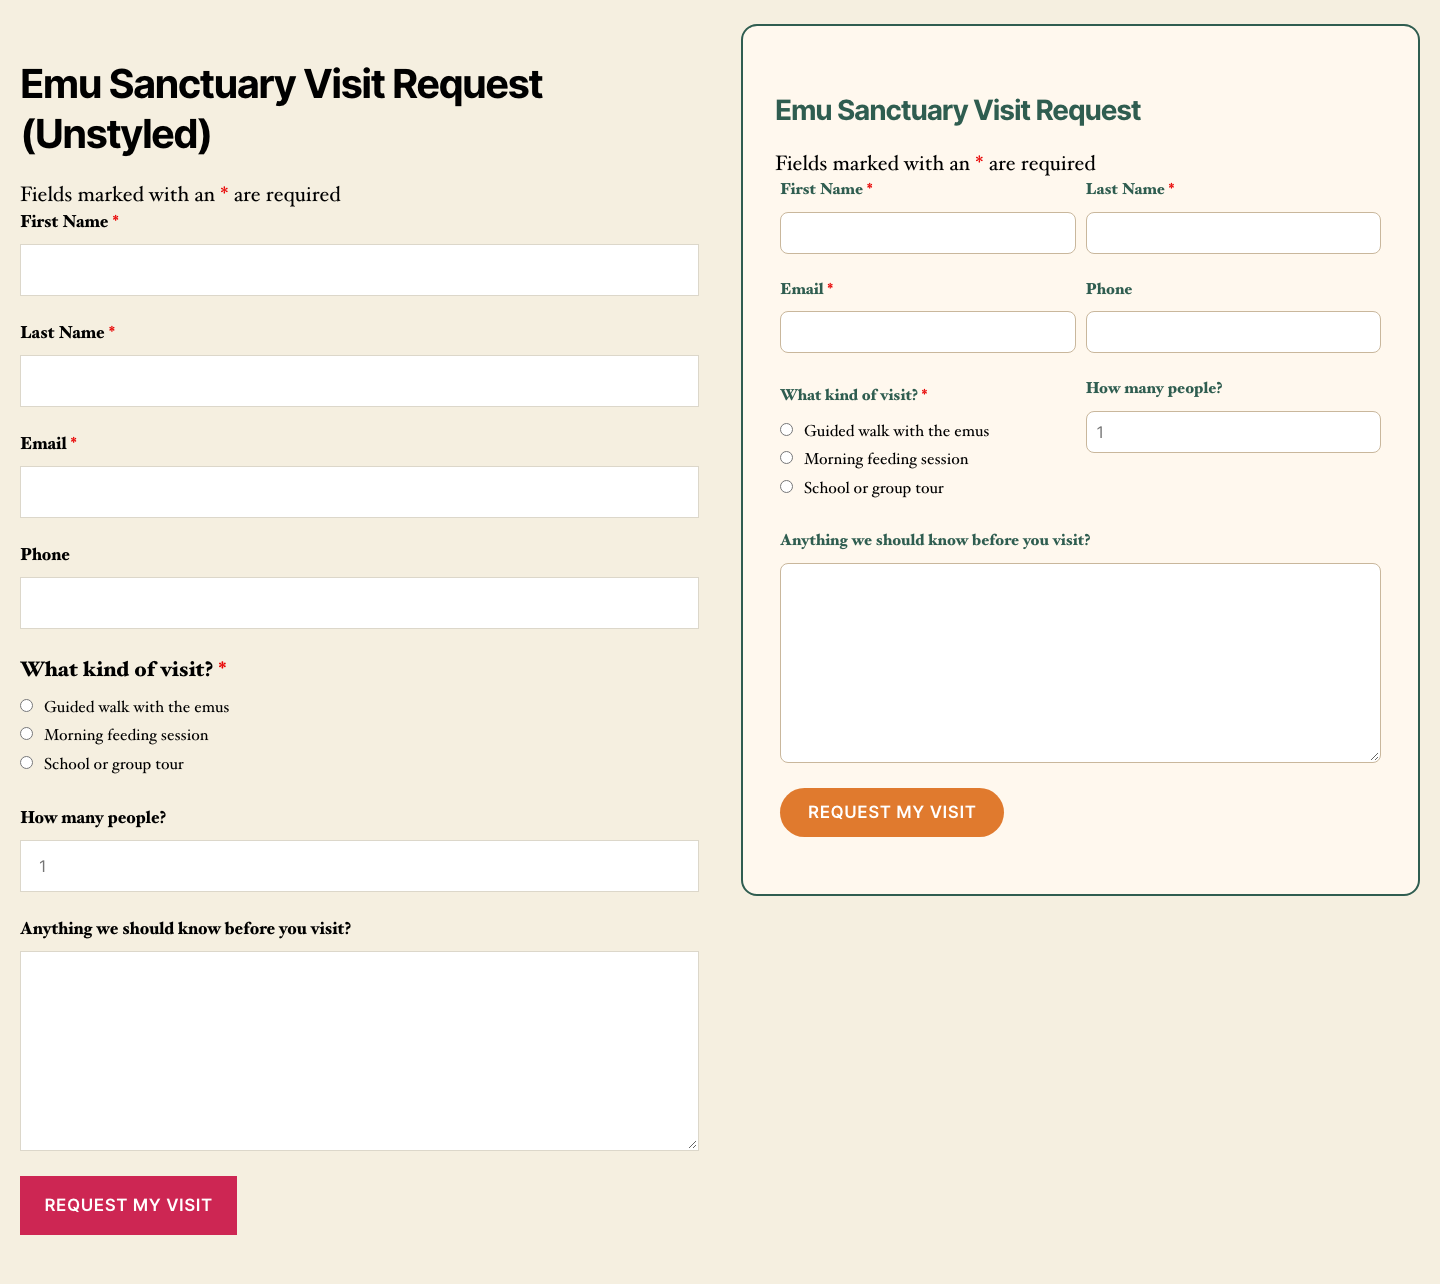
A cream container with a green border, green headings and labels, an orange button that pops, and first and last name sharing a row. Every bit of that was set inside the WordPress admin. Let’s start with the free stuff, though, because it might be all you need.
Clean up every form on your site with one free switch
Ninja Forms has a free setting called Opinionated Styles that gives every form on your site a tidier default look. It’s one dropdown, and it applies to all your forms at once.
- In your WordPress admin, go to Ninja Forms > Settings and scroll down to Advanced Settings.
- Find Opinionated Styles and choose Light, or Dark if your site has a dark background.
- Click Save Settings.
That’s all there is to it. With Light on, your fields pick up a soft gray fill and the Submit button turns dark. Because it’s a site-wide setting, every form gets the same look, so there’s no switching it on for one form and off for another.
Want one field to look different? Give it a custom class
Every Ninja Forms field can carry its own CSS class name, which lets you target just that field with a few lines of CSS. The CSS goes in WordPress’s own Additional CSS box, so you still don’t touch a theme file. It’s free, and it’s the right tool when one thing needs to stand out.
- Open your form and, on the Form Fields tab, click the field you want to change to open its field settings window.
- Expand the Display settings accordion and find Custom Class Names.
- Type a class name in Container to target the whole field, label included, or in Element to target just the input.
- Click Done, then Publish.
- Add a CSS rule for that class under Appearance > Customize > Additional CSS, or in your block theme’s Additional CSS in the Site Editor.
Not sure what CSS to write? No worries, we’ve done some of the homework for you. You can style checkbox and radio fields with one line of code, or browse our favorite styling tutorials for more one-off tweaks.
If you’d rather not write CSS at all, or you want the whole form to feel like your brand, the next section is for you.
Give Ninja Forms a try today!
Ninja Forms is free! Optional premium features available with any membership.
Get a fully branded look with the Layout & Styles add-on
Layout & Styles adds point-and-click style controls to Ninja Forms for colors, font sizes, padding, margins, borders, and widths, on the form and on every field. It also lets you put fields side by side. Most looks take no code at all, and when you do want a line of CSS, there’s a box for it right in the form builder.
If your form sits on a page that matters (a landing page, a client’s site, your homepage), this is the path we’d pick. A form that looks like part of your site feels like part of your business. The full list of settings lives in the styling documentation; below is the tour, built on the emu form from above.
Style the form’s container, title, and messages
Start with the big picture: the box your form sits in and the title on top.
- Open your form, click into the Advanced tab, and click Styles.
- Expand Container Styles and set a background color, a border, and some padding.
- Expand Title Styles and set the title’s color and font size.
- Expand Success Response Message Styles so your thank-you message matches the rest.
- Click Done, then Publish.
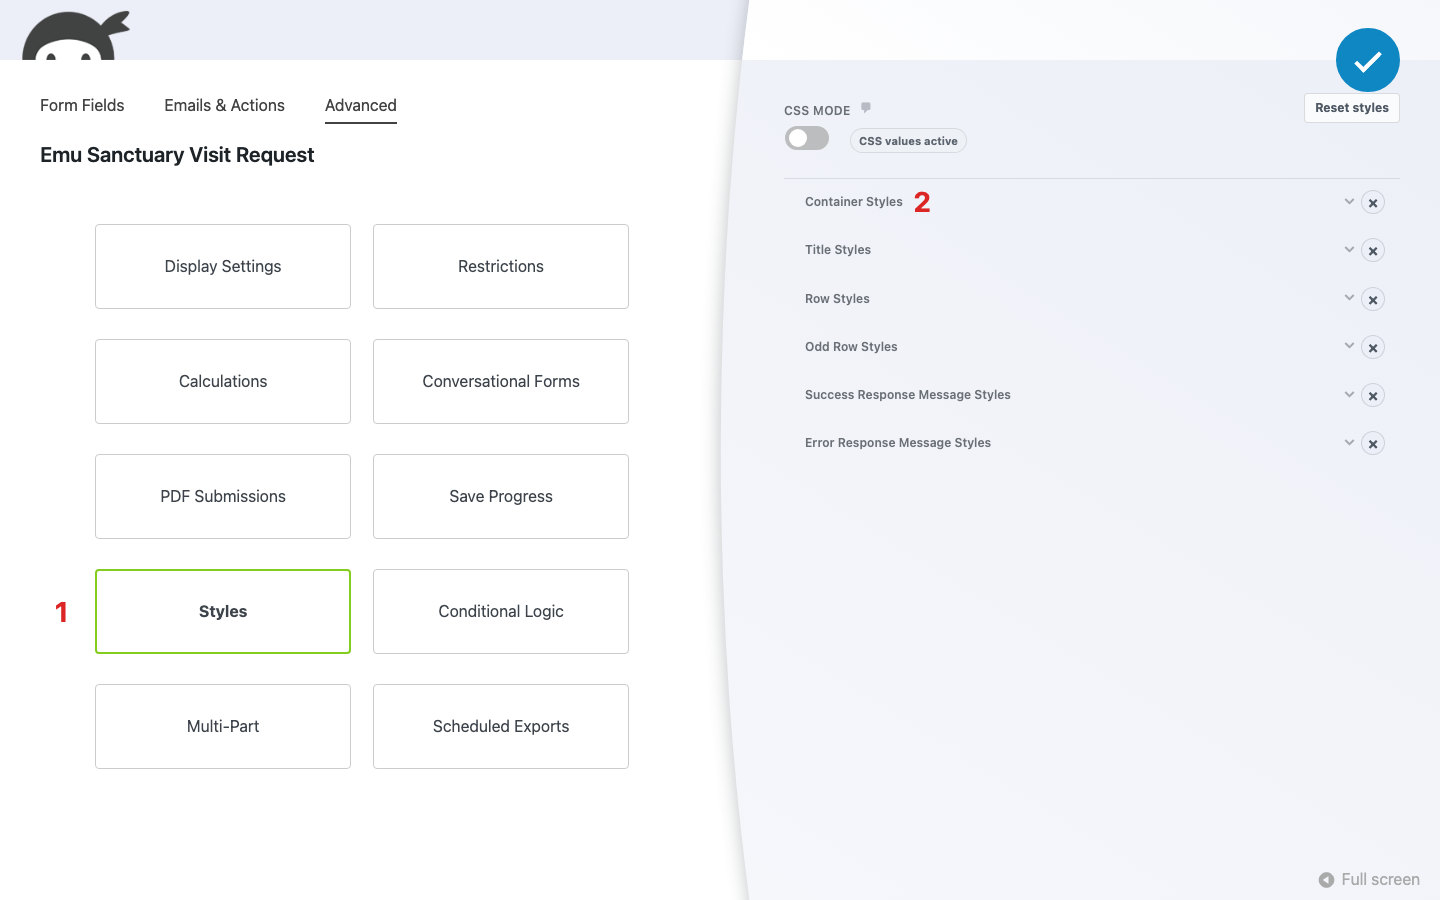
On the emu form, the container got a cream background, a 2px solid green border, and 32px of padding, and the title went green at 28px. Every group in there works the same way, with controls for color, font size, padding and margin, width, and border. Learn one and you’ve learned them all.
Style the labels, inputs, and Submit button
This is where the form starts looking like yours. Each field has its own Styles settings, and you’ll find the same controls you just used.
- Back on the Form Fields tab, click a field to open its field settings window.
- Expand the Styles settings accordion.
- Use Label Styles for the field’s label, Element Styles for the input box itself, and Wrap Styles for the space around the field.
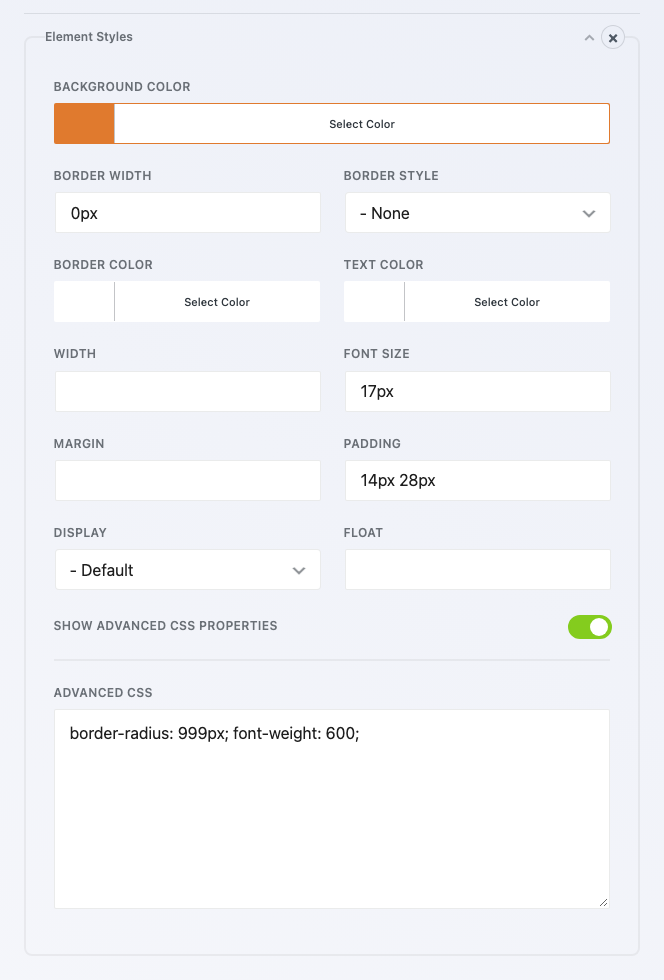
- Click the Submit field and set its Element Styles, then its Element Hover Styles for how the button looks when a visitor points at it.
- Click Done, then Publish.
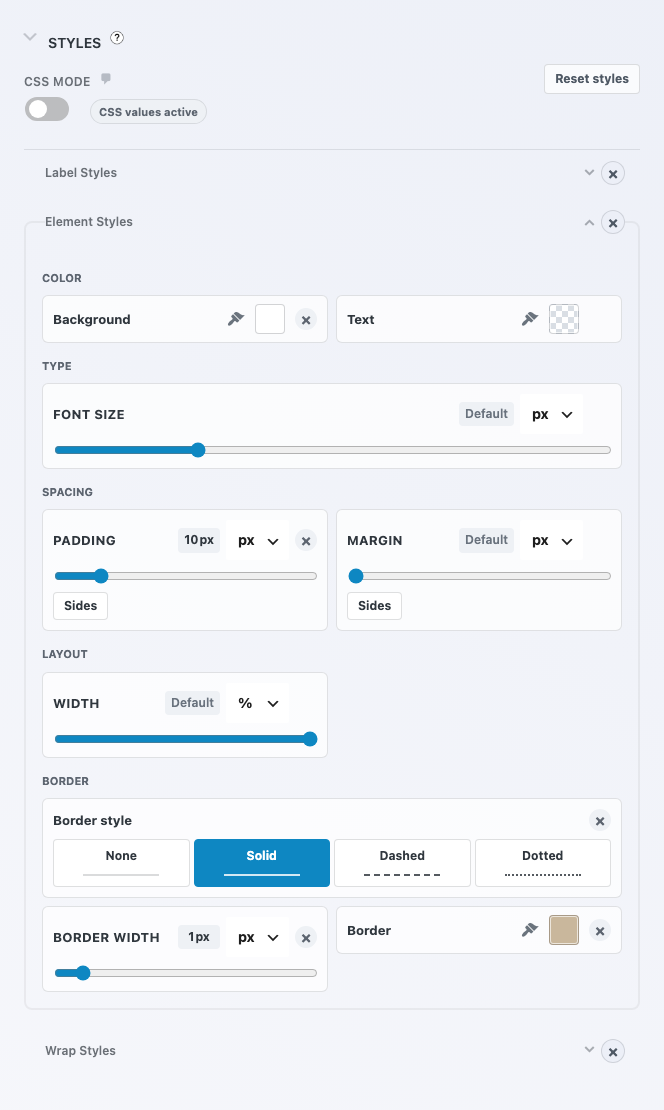
The emu form’s labels are green at 15px, the inputs are white with a 1px sand-colored border and 10px of padding, and the button is orange with white text. Want a deeper dive on label and text color? Here’s how to change the font color on your WordPress forms.
Round the corners with CSS mode
Not every look has a control of its own, and rounded corners are the one most people ask about. For those, every Styles group has a CSS mode toggle at the top that opens plain CSS boxes, right inside the builder.
The emu form’s rounded container, inputs, and pill-shaped button all came from CSS mode, with short rules like border-radius: 8px;. That’s typing a little CSS, sure, but it lives with your form and never goes near a theme file. For the full walkthrough, see how to add rounded corners to your form fields.
Put fields side by side
One long column makes even a short form feel like homework. With Layout & Styles active, the Form Fields tab lays your fields out in rows, and you drag a field next to another one to share the row.
The emu form pairs First Name with Last Name, Email with Phone, and the visit type with the group size. On a phone, those rows stack back into a single column on their own, so you don’t need a separate mobile layout.
Working with list fields or repeaters? We have separate guides for column styling for list fields and styling repeater fields.
Styling lots of forms? Set the look once
If every form on your site should share the same look, skip the form-by-form work. In your WordPress admin, go to Ninja Forms > Styling and set your defaults there, then click Save Settings.
The page has tabs for Form Styles, Default Field Styles, Field Type Styles, Error Styles, DatePicker Styles, and MultiPart Styles. Default Field Styles is the big time saver, since it covers every field at once.
Running multi-part forms? You can also style the Previous and Next buttons.
Check your form on the real page before you call it done
Preview Form at the top of the builder is great for a quick look. Judge the final result on the actual page where your form lives, though, because your theme still sets things like the page background and, sometimes, the label font.
On our test site, the emu form kept the theme’s serif font on its labels and sat on the theme’s beige page. That’s normal, and it’s why we pick form colors that sit well on the page around them. Check it on your phone too, since plenty of your visitors will see it there first.
Make your contact form look like it belongs on your site
Like we said at the top, a form that looks like it wandered in from another website is one of the easier things to fix. You can now clean up every form with one free switch, target a single field with a class, and give the whole form your colors, spacing, and layout without touching a theme file.
Opinionated Styles is a fine free start. But if the form sits on a page you care about, the branded look is worth it. Pick up the Layout & Styles add-on and make your contact form design match the rest of your site today.
Try Ninja Forms Today
Always free, with premium features available through our memberships.