Thinking about how to design a user-friendly WordPress form might seem a bit complex, but let me assure you, it doesn’t need to be. There are plenty of strategies out there, but today we’ll spotlight a neat trick: building a smart form that knows when to select / de-select field options based on user interactions dynamically.
This feature isn’t just cool; it adds a touch of personalization that can boost the user experience. So let’s dive in and learn how you can transform an overwhelming experience into an intuitive one with Ninja Forms’ Conditional Logic add-on.
How to select/de-select field options conditionally
You’ve built your form and are now ready to transform your user experience. Before you do, you’ll need to install the Ninja Forms’ Conditional Logic add-on. After that, you’ll head over to the Conditional logic to start building your dynamic form.
Step 1: Install and activate the Conditional Logic
If you don’t already have it installed and activated, the first step is to install and activate the Conditional Logic add-on from Ninja Forms. Once you have created your form, add the list field that you want to display conditionally.
Step 2: Enter the Conditional Logic Dojo
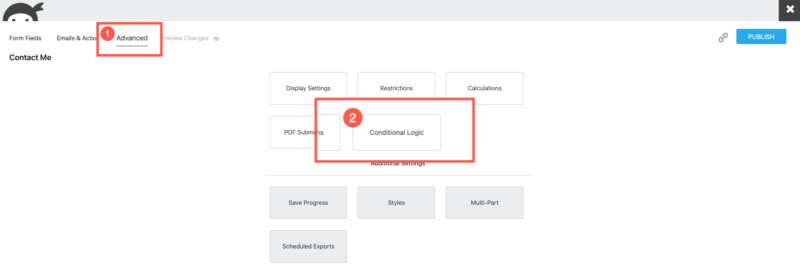
To add conditional logic to your form, click on the Advanced tab and select Conditional Logic.

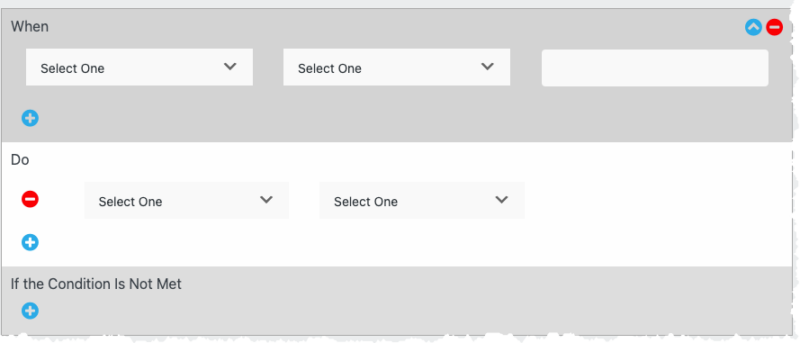
Once you have selected Conditional Logic, you will see two sections, When and a Do.
To get started, open up the first dropdown in the When section. You’ll find a comprehensive list of your form fields, allowing you to choose exactly when the condition will come into play.
Once you’ve made your selection, move on to the second dropdown. Pick the perfect comparator that fits your needs. Then, wrap it up by selecting the desired value from the third dropdown.
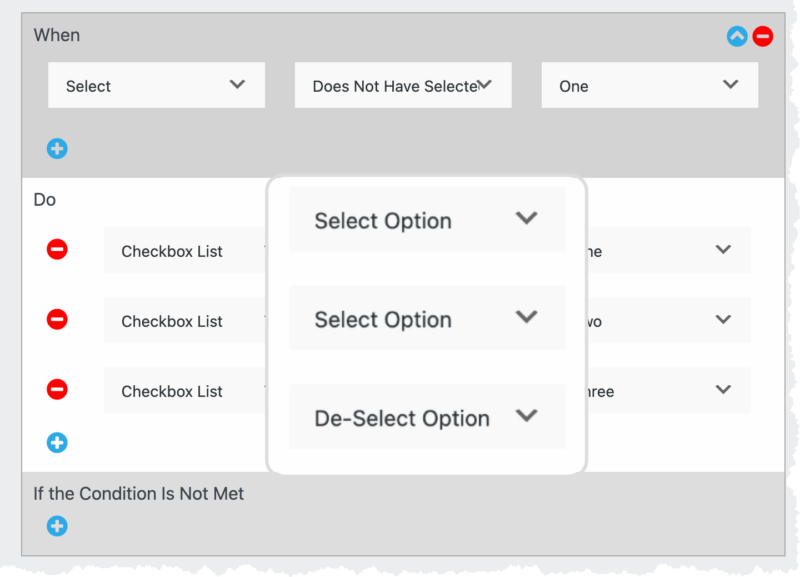
The DO section is where you’ll make some key choices. Here you will select your list field ( radio, select, multi-select, or checkbox ) and decide how the form field displays a select /de-select field option. It’s your chance to customize and fine-tune the behavior of your form fields.
Repeat the process for the rest of your list fields until happy, and that’s it. See, not so complicated after all.
Congratulations! You can select/de-select field options with Conditional Logic today.
Using Conditional Logic simplifies the task of conditionally selecting or de-selecting field options. By sticking to the steps above, you can design WordPress forms that are even more user-friendly. This tool revolutionizes the process, making the ability to select or de-select field options based on user input more intuitive and accessible than ever.
Three more ways you can use conditional logic
Want to learn more about how to use Conditional Logic? Here are three easy-to-follow articles I highly recommend:
- How to Use Conditional Logic in WordPress Forms
- How to Create Conditional Fields in WordPress
- 6 Uses of Conditional Logic in WordPress (Quick Guide)
If you’ve ever thought about how much time and stress you could save if only you had the right tools, that’s exactly what the Conditional Logic add-on from Ninja Forms comes in. It’s a real game changer for creating forms that are user-friendly and dynamic, easy to navigate, and fill out.
What’s cool is that you can set multiple conditions and dictate exactly what happens if they’re unmet. The result? You’re designing forms that are not just efficient but really effective.
The bottom line here is Ninja Forms’ Conditional Logic add-on is a tool that will transform how you design your forms. So, what are you waiting for? Jump on board and invest in this add-on. Get ready to start building forms that are more user-friendly, efficient, and tailored to your needs!


