How to Stop Form Spam in Ninja Forms: 7 Free Methods, Step by Step
Opening your submissions list to a wall of gibberish “leads,” casino links, and fake email addresses is one of the most demoralizing parts of running a website. Every fake entry costs you a few seconds of sorting, and the ones that slip through can bury a real inquiry, skew your lead data, or get your notification address flagged as spam by your own email provider.
Most advice on fixing this turns into a research project of its own. Visible CAPTCHA widgets frustrate real visitors and can quietly tank completion rates on forms that matter, but the “invisible” alternatives all sound similar from the outside, and picking one feels like it requires its own decision tree before you’ve blocked a single bot.
Here is the part that simplifies things: if you’re building forms with Ninja Forms, you don’t need to shop for a plugin or bolt on a separate spam service to get real protection. Ninja Forms ships seven distinct antispam methods in core, all free, with no add-on purchase required for any of them. Below is exactly how to turn on each one, in the order that makes sense to set up.
To follow along you’ll need Ninja Forms (free). Two of the seven methods below (Honeypot and the Anti-Spam field) need nothing beyond that. The three CAPTCHA options each require a free account with the CAPTCHA provider itself (hCaptcha, Google reCAPTCHA, or Cloudflare) and, importantly, a live or staging domain. None of the three CAPTCHA widgets will work on localhost, so test them on a real domain before you judge whether they’re working. Akismet requires the separate, free Akismet plugin, installed, activated, and keyed with a valid, verified API key.

You already have one method running: Honeypot
Honeypot is on by default, on every form, right now. There’s no setting to find and nothing to turn on: Ninja Forms injects a hidden field into every form automatically, and if a bot fills it in, the submission gets rejected.
Here’s how it works. The hidden field is styled with CSS so it’s invisible to a real visitor (visibility: hidden, not simply removed from the page), but a bot that auto-fills every input it finds on a page fills that field too. When a submission arrives with that hidden field non-empty, Ninja Forms blocks it and shows a “Honeypot Error” message.
There is no builder toggle for this, no accordion to open, and no setting to confirm. If you’re looking for a Honeypot switch inside your form, stop looking: it’s already working in the background.
Add a question only a human can answer: the Anti-Spam field
The Anti-Spam field is a custom question-and-answer challenge that you write yourself. Unlike a typical CAPTCHA, it isn’t auto-generated: you supply both the question and the exact expected answer, and Ninja Forms rejects any submission that gets the answer wrong. It needs no account, no API key, and no third-party service, which makes it the simplest option on this list if you want zero external dependencies.
To add it:
- Open your form with the Form Fields tab active.
- Click the blue (+) icon to open the Fields window.
- Under Miscellaneous Fields, click Anti-Spam.
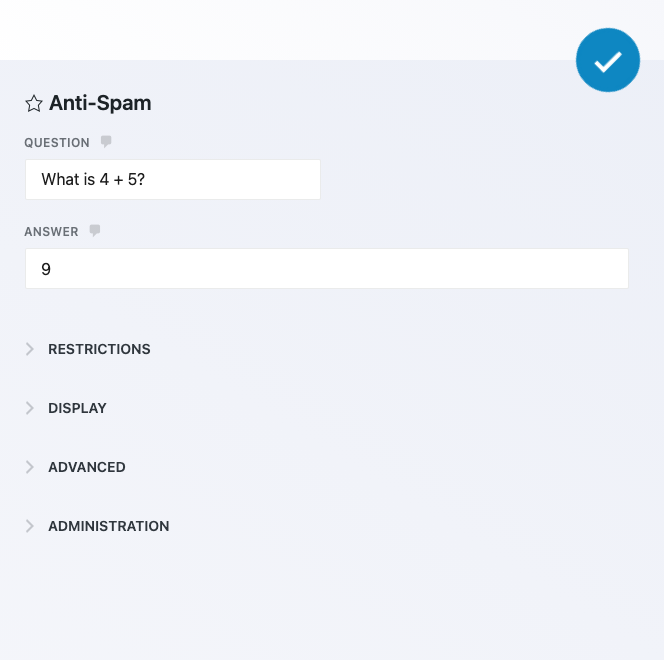
- Click the new field to open its settings window, then fill in your own Question (“What color is the sky?”) and the exact Answer you expect (“blue”).
- Publish your form.
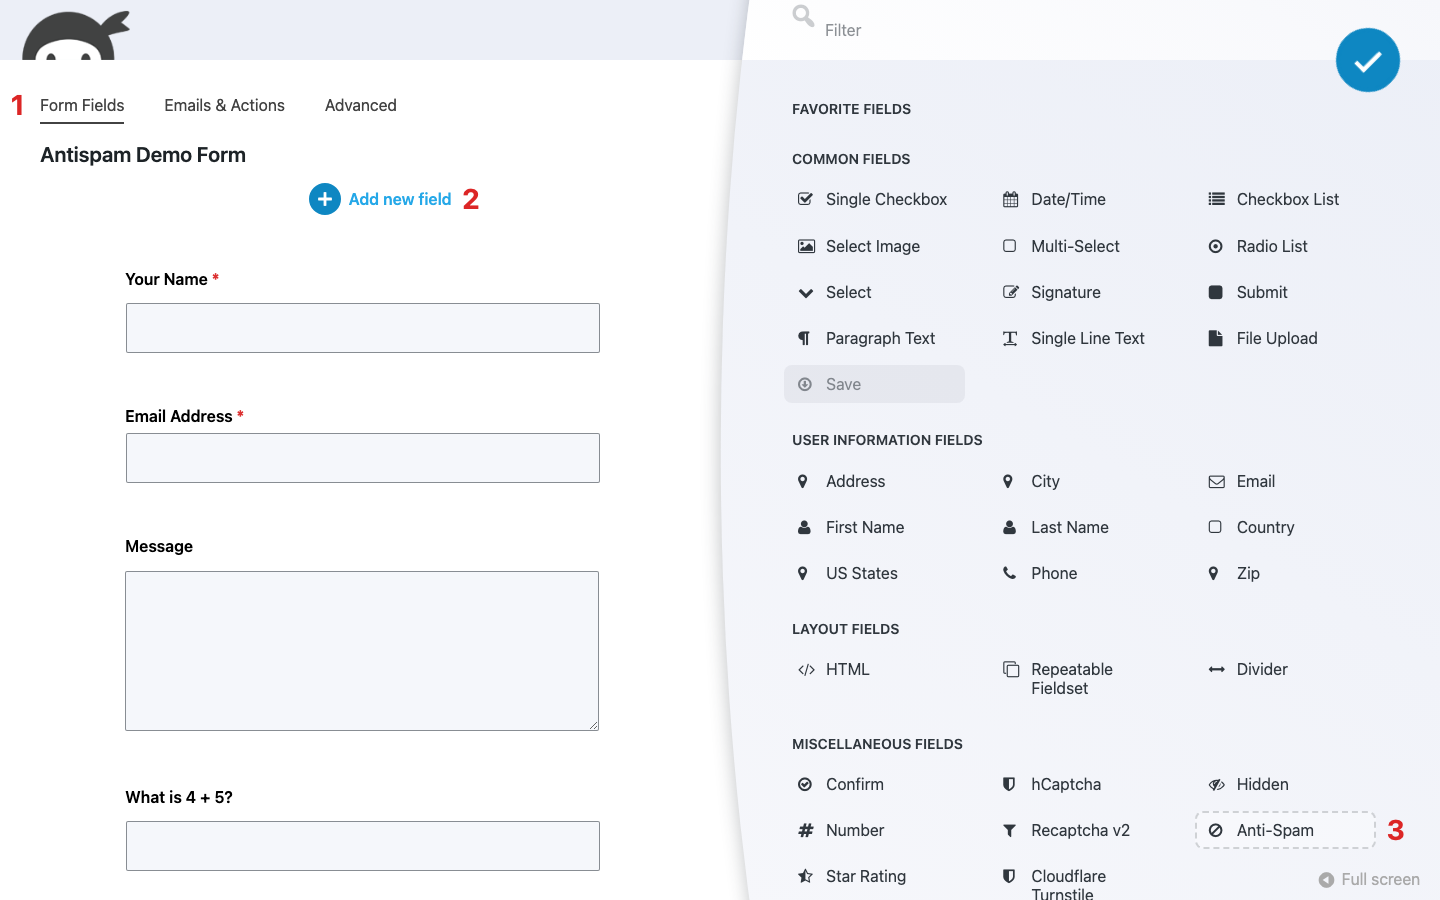
The Answer comparison is a plain, case-sensitive text match, so “Blue” and “blue” are treated as different answers. Any time you republish this form later, whether you’ve edited another field, duplicated the form, or imported it from a saved template, open the Anti-Spam field again and confirm the Answer is still filled in. It’s a small, easy-to-miss setting to leave blank by accident, and a blank Answer means the challenge silently stops blocking anyone.
Honeypot and the Anti-Spam field both run with nothing but Ninja Forms itself. If you want a layer that doesn’t ask visitors to answer anything, a CAPTCHA widget is the next step.
Give Ninja Forms a try today!
Ninja Forms is free! Optional premium features available with any membership.
Add hCaptcha to your Ninja Forms forms
hCaptcha is a privacy-first CAPTCHA that verifies visitors without profiling them for advertising, and it’s a natural fit if you want a widget that doesn’t ask much of real visitors. The free tier covers what the large majority of WordPress sites need. If you’re weighing hCaptcha against reCAPTCHA before committing, our guide to hCaptcha and how it compares to reCAPTCHA covers that decision in depth; the steps below get it running once you’ve chosen.
To set it up:
- At hcaptcha.com, create a free account and a new site to get a Site Key and Secret Key. Choose your widget mode and passing threshold in your hCaptcha account’s own site settings; that choice lives on hCaptcha’s side, not inside Ninja Forms.
- In WordPress admin, go to Ninja Forms > Settings > hCaptcha Settings, paste your Site Key and Secret Key, and save.
- Open your form, click into the Form Fields tab, click the blue (+) icon to open the Fields window, and under Miscellaneous Fields click hCaptcha.
- Publish your form, then preview or refresh the live page to see the widget render.
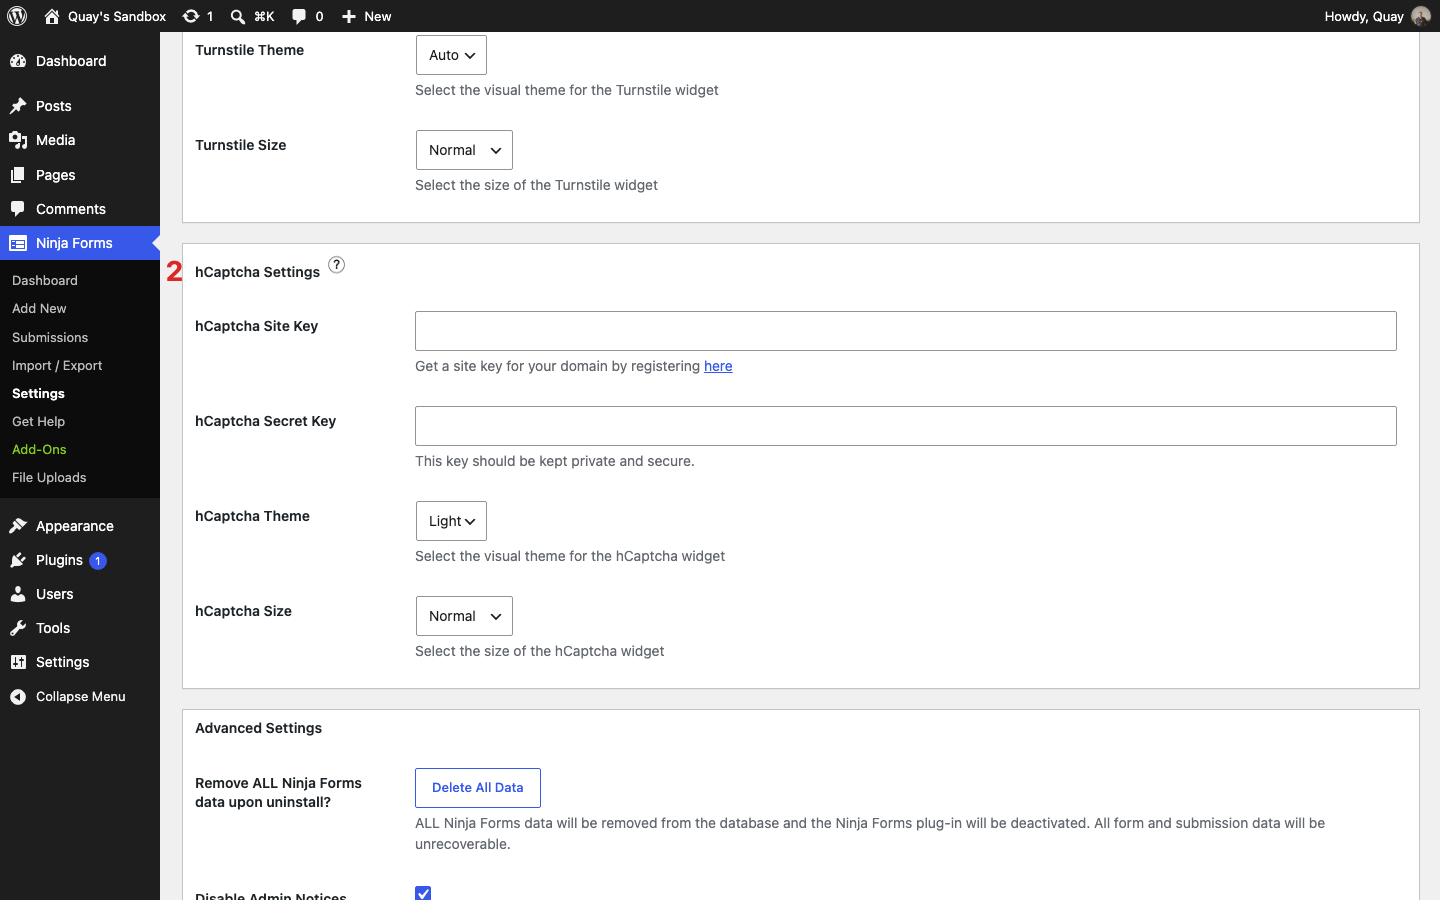
The field’s label is hidden by default, since the widget speaks for itself. Leave it that way: don’t mark it required, and don’t add a visible label unless you have a specific reason to.
Never combine more than one CAPTCHA method on the same form. Ninja Forms won’t stop you from adding an hCaptcha field alongside a reCAPTCHA or Turnstile field, but the widgets aren’t designed to run together. In our own testing, a form with both an hCaptcha field and a Recaptcha v2 field caused the two widgets to visibly cross-wire, with one field intermittently showing the other’s branding and error text. Pick one CAPTCHA method per form. Akismet, covered below, is the exception: it’s built to run alongside any single CAPTCHA method, not replace one.
Add Google reCAPTCHA v2 to your forms
reCAPTCHA v2 is Google’s familiar “I’m not a robot” checkbox, added to your form as a field. It also has an Invisible variant that skips the checkbox and only challenges visitors it’s unsure about.
To set it up:
- At Google’s reCAPTCHA admin console, register your site and choose reCAPTCHA v2, either the checkbox challenge or the Invisible variant.
- In WordPress admin, go to Ninja Forms > Settings > reCAPTCHA Settings, paste your Site Key and Secret Key, and save. (Pictured above in the hCaptcha section: this section sits in the same Settings tab as hCaptcha Settings and Turnstile Settings, and also holds the separate key pair for reCAPTCHA v3, covered next.)
- Open your form, Form Fields tab, blue (+) icon to open the Fields window, and under Miscellaneous Fields click Recaptcha v2. (Pictured above in the Anti-Spam field section.)
- If you registered for the Invisible variant, open the field’s settings and set its Visibility to Invisible.
- Publish your form.
Until you configure keys, the field renders as blank space, no visible error to the visitor. Once configured, it blocks submission until solved: an unsolved form returns “Please verify you’re human, then submit again.” and won’t submit, even though the field itself isn’t marked required. CAPTCHA fields gate submission on their own.
The same rule applies here as with hCaptcha: never combine more than one CAPTCHA method on the same form. Pairing a Recaptcha v2 field with an hCaptcha field on the same form is the specific combination that produces the cross-wired widget behavior described above. Use one CAPTCHA method per form, and add Akismet alongside it if you want a second layer.
reCAPTCHA v2 asks visitors to prove they’re human. If a checkbox, even an invisible one, is exactly what you’re trying to avoid, reCAPTCHA v3 runs Google’s same verification system without ever showing your visitors anything at all.
Add invisible reCAPTCHA v3 scoring
reCAPTCHA v3 works differently from v2 in one important way: it’s a form action, not a field, so it lives under Emails & Actions instead of Form Fields. It’s completely invisible. Ninja Forms injects a hidden check and Google scores the session in the background, from 0 (very likely a bot) to 1 (very likely human).
To set it up:
- At Google’s reCAPTCHA admin console, register for reCAPTCHA v3 (Score based) and get a Site Key and Secret Key.
- In Ninja Forms > Settings > reCAPTCHA Settings, paste your v3 Site Key and Secret Key into the v3 fields. This is the same section that holds the v2 keys, but v2 and v3 use separate key pairs.
- Open your form, click into the Emails & Actions tab, then click the blue (+) icon to open the Actions window.
- Under Core Actions, click reCAPTCHA v3.
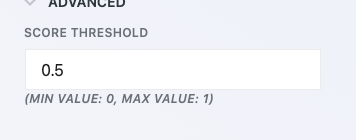
- In the action’s settings, rename it if you like, and expand the Advanced settings to find Score Threshold. Leave it at its default of 0.5 unless you have a specific reason to tune it.
- Publish your form.
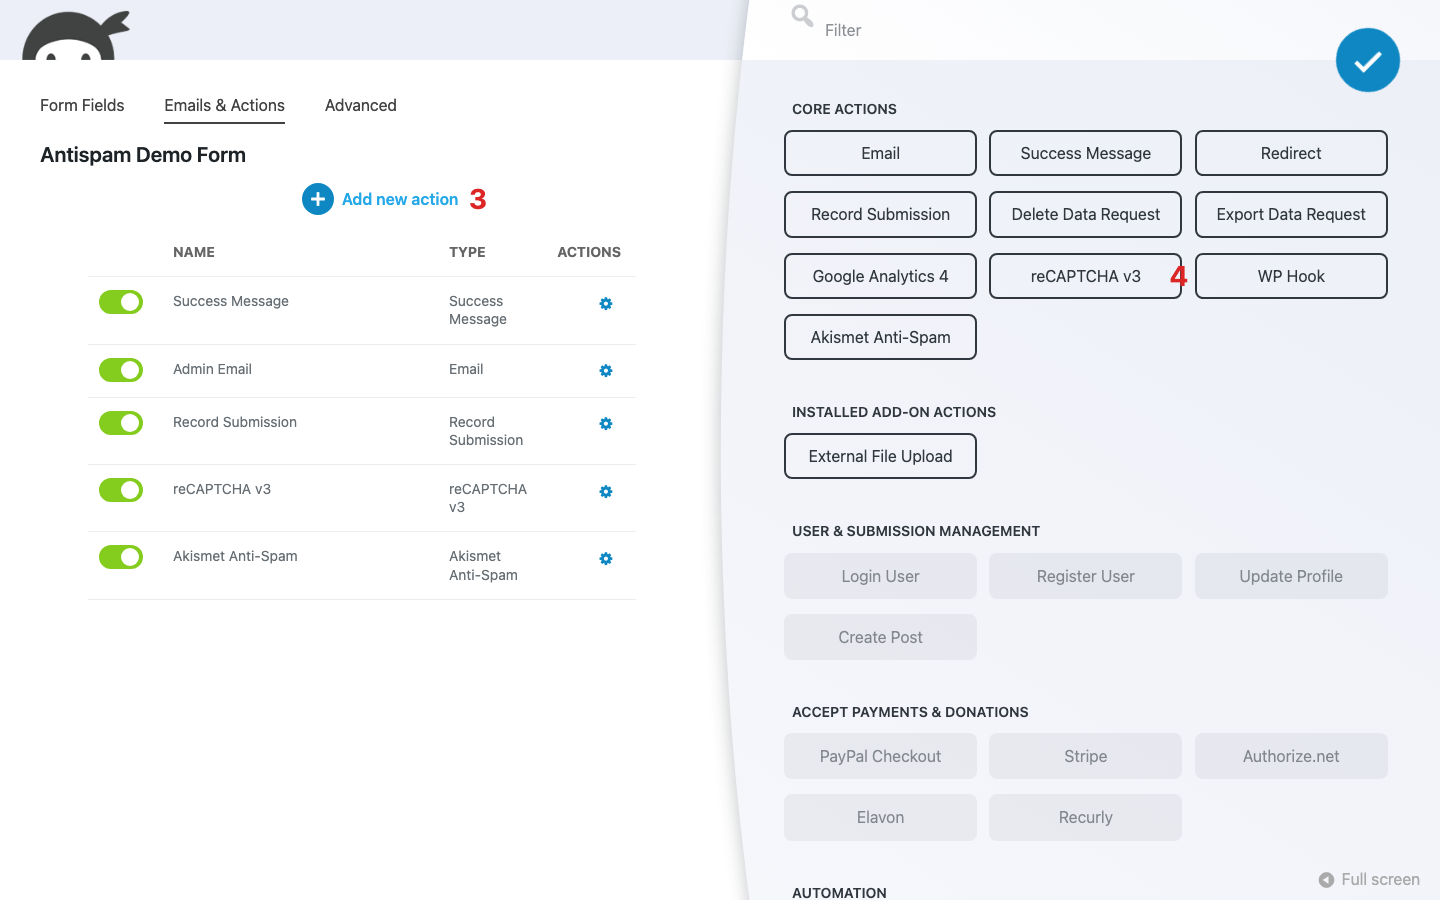
The reCAPTCHA v3 tile only appears in the Actions window once you’ve saved a Site Key and Secret Key in Settings; until then, it’s not there to click.
If you’re switching from the reCAPTCHA v2 field to the v3 action, remove the v2 field from your form first. Ninja Forms hides the standalone v2 field automatically once a v3 action goes active, but only if no v2 field is already saved on the form. If one’s already there, it’s left alone rather than risk breaking it, and you end up with two reCAPTCHA methods stacked on one form, which the combine rule above already told you not to do.
Never combine more than one CAPTCHA method on the same form, including this one. reCAPTCHA v3’s advantage is that it’s invisible; pairing it with a visible hCaptcha or reCAPTCHA v2 field defeats that advantage and isn’t a supported combination.
reCAPTCHA v3 keeps things invisible using Google’s system. If you’d rather not route visitor verification through Google at all, Cloudflare Turnstile is a privacy-first alternative that sets up the same way.
Add Cloudflare Turnstile to your forms
Cloudflare Turnstile is a CAPTCHA alternative from Cloudflare, added to your form as a field. One detail catches people off guard: the choice between Turnstile’s three widget modes (Managed, Non-interactive, and Invisible) is made on Cloudflare’s own dashboard when you create the site key, before you ever touch Ninja Forms. There’s no mode selector inside the Ninja Forms field settings, so make that choice first.
To set it up:
- In your Cloudflare dashboard, add a Turnstile widget. Enter your bare hostname (for example, mywebsite.com, with no https:// and no path) and choose your widget mode: Managed, Non-interactive, or Invisible. Cloudflare doesn’t allow mixing modes on one widget, so pick the one you want here. Get your Site Key and Secret Key.
- In WordPress admin, go to Ninja Forms > Settings > Turnstile Settings, paste your Site Key and Secret Key, and save. (Pictured above in the hCaptcha section: this section sits in the same Settings tab as hCaptcha Settings and reCAPTCHA Settings.)
- Open your form, Form Fields tab, blue (+) icon to open the Fields window, and under Miscellaneous Fields click Cloudflare Turnstile. (Pictured above in the Anti-Spam field section.)
- Optionally open the field’s settings, expand Display settings, and set Size and Theme to match your site.
- Publish your form.
Until you configure keys, the field renders as blank space on the front end, the same silent-absence pattern as an unkeyed reCAPTCHA v2 field.
The same combine rule applies to Turnstile: Cloudflare’s own documentation says not to combine Turnstile with other CAPTCHA solutions on the same form. Use one CAPTCHA method per form.
Any one of these three CAPTCHA methods stops bots. None of them stop a human sitting down and typing spam by hand. That’s the gap Akismet fills.
Catch human-typed spam with Akismet
Akismet is a form action, not a field. After a submission clears every other check, Akismet sends its content to Akismet’s spam-detection service, and rejects anything flagged before it’s ever saved or emailed to you. It’s designed to run alongside a CAPTCHA method, not instead of one: CAPTCHAs stop bots, and Akismet catches the human spammers typing junk in by hand that a CAPTCHA never sees.
Ninja Forms requires more than just having Akismet installed and active before the action becomes available. Three things have to be true at once: the Akismet plugin is installed and active, an API key has been entered on Akismet’s own settings page, and that key is currently verified as valid by Akismet’s servers. If any one of those isn’t true, the Akismet Anti-Spam action simply won’t appear in your form’s Actions window, so if you don’t see it, check your key first.
To set it up:
- Install and activate the free Akismet plugin, then enter and verify an API key on Akismet’s own settings page.
- Open your form, click into the Emails & Actions tab, then click the blue (+) icon to open the Actions window. (Pictured above in the reCAPTCHA v3 section.)
- Under Core Actions, click Akismet Anti-Spam. (Pictured above in the reCAPTCHA v3 section.)
- In the action’s settings, map its Name, Email, URL, and Message fields to the matching fields on your form using merge tags. Leave URL blank if your form has no URL-type field; it’s optional.
- Publish your form.
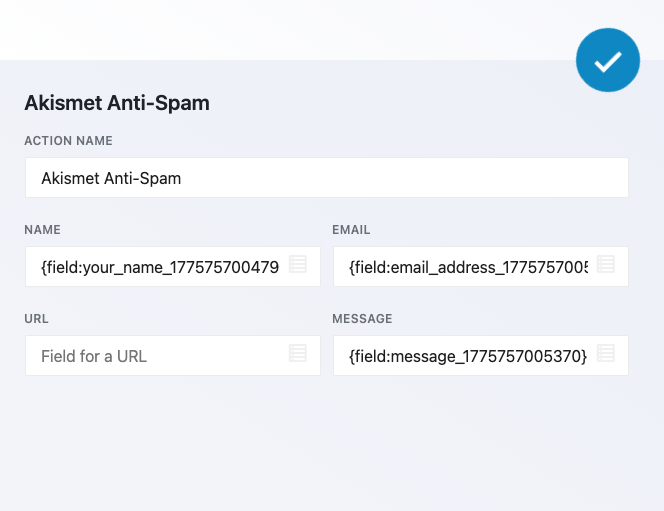
Map those merge tags to your real fields; they’re what Akismet actually evaluates. If a submission gets flagged, the sender sees a deliberately generic message, “There was an error trying to send your message. Please try again later,” rather than anything that reveals spam detection happened. If you’re ever troubleshooting a report of that exact message, this is why it’s there.
Akismet is the one method on this list built to run alongside a CAPTCHA rather than instead of one. Add it on top of whichever CAPTCHA method you chose above for a second layer against the spam a CAPTCHA alone won’t catch.
Putting your antispam layers together
Honeypot is already running on every form you publish, so you’re starting from a real baseline, not zero. Add the Anti-Spam field wherever you want a zero-dependency backup, layer in one CAPTCHA method (hCaptcha, reCAPTCHA v2 or v3, or Turnstile, never more than one at a time) for public-facing forms, and pair Akismet with that CAPTCHA if you’re still seeing spam typed in by hand. All seven methods live in Ninja Forms core, so building that stack out doesn’t require an extra plugin purchase or a new monthly bill.
Try Ninja Forms Today
Always free, with premium features available through our memberships.
Hello, I’m using Cloudflare Turnstile and integration into Ninja Forms would be great, thanks to consider supporting it!
Please add Cloudflare Turnstile integration.
Would be very nice to see Cloudflare Turnstile integration with the Ninja Forms plugin!
Please have an integration for Cloudflare Turnstile! Thank you 🙂
Hi. Add support for Cloudflare Turnstile please! ReCaptcha is getting more cumbersome to integrate.
I would really love it if Cloudflare turnstile was integrated! Currently having issues with Recaptcha v3 and elementor pro w/ Ninja Forms! Turnstile seems like it would be a great alternative since my site is already behind Cloudflare. Plus Turnstile is more privacy friendly as far as we know.
Thanks for your comment.
Your wish for Cloudflare Turnstile integration has been heard and added to our internal feature request system. Like every feature request, we’re evaluating the idea and if it would be possible in the current architecture. Hopefully our Engineering Team can add that in a future release.
Thanks
Mia
Please add Turnstile support
YES to Turnstile please
Cloudflare Turnstile >> YES absolutely and as fast as possible please!!
Please update to version 3.11 which includes our Cloudflare Turnstile integration! 🙂
We have a large number of clients using NF/reCAPTCHA who we will be converting to CF Turnstile soon due to Google’s decision to make it a paid service. I would love to have Turnstile support built into NF by default so we don’t have to code the validation check ourselves. I agree with the others leaving comments that this needs to be done sooner than later.
Please update to version 3.11 which includes our Cloudflare Turnstile integration! 🙂
Add CF Turnstile please it’s very convenient and have a large amount of users 😀
Hi
Please update to version 3.11 which includes our Cloudflare Turnstile integration! 🙂
Turnstile integration, please. Google Recaptcha is unreliable and now they will be charging, we want to move en masse to Turnstile.
Please update to version 3.11 which includes our Cloudflare Turnstile integration! 🙂
Please update to version 3.11 which includes our Cloudflare Turnstile integration!
Yes, google recaptcha will be charging soon so the addition of Turnstile is super important for NinjaForms
Please update to version 3.11 which includes our Cloudflare Turnstile integration! 🙂
Please make the Cloudflare Turnstile integration possible. We use Ninja Forms on most of our websites and would like to stay away from Google Recaptcha.
In the words of Sam and Dave, ‘hold on – I’m coming’ 😉
– Mia
Please update to version 3.11 which includes our Cloudflare Turnstile integration! 🙂