Are your emails boring? Lack style? Need some flair, some pizazz? Maybe just a section break or two and a little bit of organization? We can help! If your Ninja Forms email is shooting off to Jane in marketing to let her know a promising new lead has submitted, you might not need that email to look pretty. With a form packed full of user info though, some organizational structure sure would make Jane’s life easier. If it’s the lead you’re sending to, you want that email to look sharp and professional. Let’s look at the easy customization tools at your disposal for your Ninja Forms email!
Meet Summernote, Our Rich Text WYSIWYG Editor for WordPress Email
The Summernote WYSIWYG (what you see is what you get) editor is integrated into Ninja Forms to provide you with a diverse set of text editing options for every email you send. Summernote is a really neat, really customizable open-source rich text editor designed to flex into a great variety of uses.
We’ve taken the best parts for customizing email and laid them out for you in your Ninja Forms email actions. Summernote appears as the Email Message in each email action:
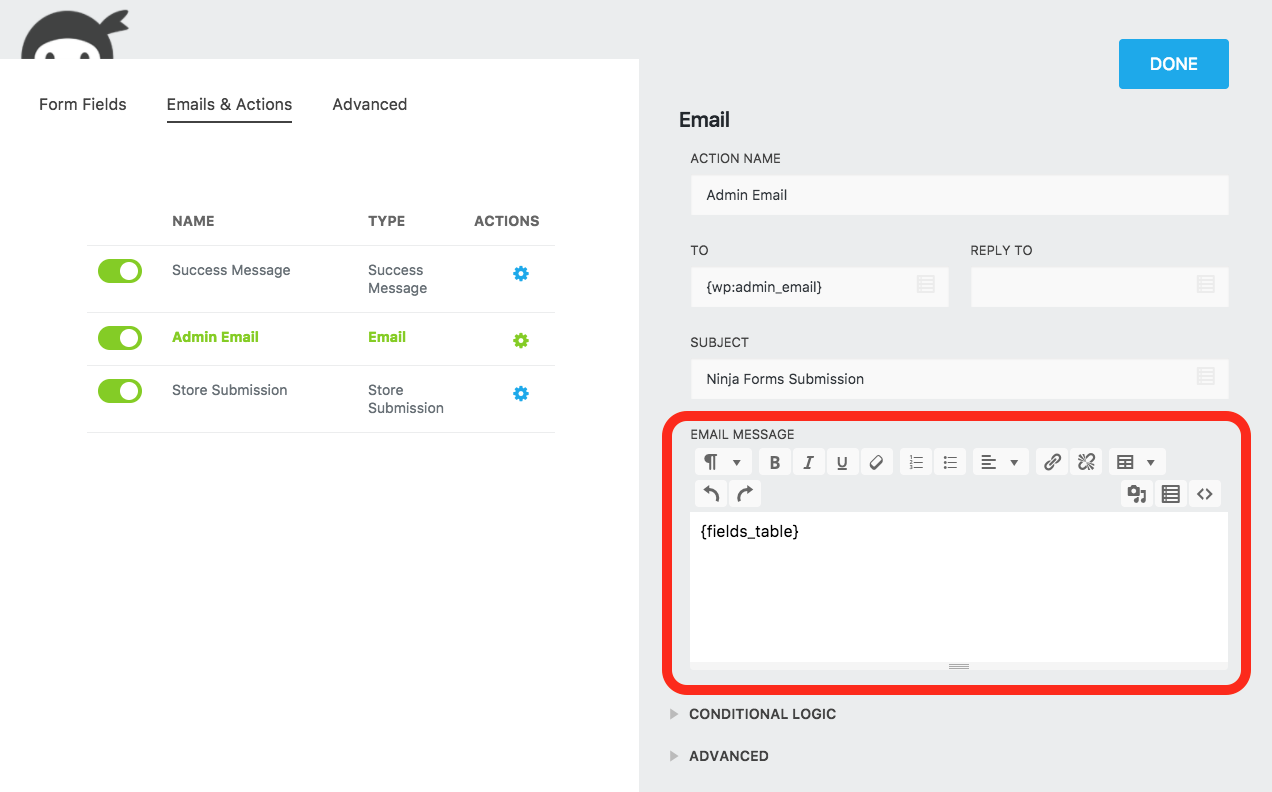
Below we’ll break down your options and show you a few tricks you might not know you could do!
A Tour of the Editor
Let’s break down the editor before we dive into an example of actually using the features. If you’ve posted much of anything online, you’re probably familiar with a good bit of it already. Let’s section it out and introduce familiar and new alike!
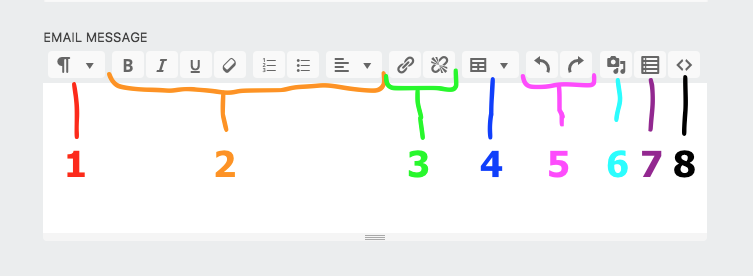
1. This gives you a handy dandy dropdown to auto-add different HTML like paragraph text, block quotes, and headers. Just highlight a segment of text and select the option of your choice. Easily create headings and subheadings for different section of the email here.
2. These are your standard rich text editor options: bold, italic, underline, numbered lists, bullet point lists, and left/center/right alignment.
3. Want to link out from your email to other places on the web? Insert hyperlinks (and delete them) here!
4. Want to insert a table into the email but don’t know the HTML or don’t want to spend the time writing it? Just click this little icon and choose how many rows and columns you need 🙂
5. Undo/redo
6. Add images, video, gifs etc from your Media Library directly into the email message.
7. This is our own Merge Tag Selector. Merge tags allow you to map field data directly from the form into the email. For example, the merge tag {field:firstname} will replace itself with whatever text the user entered into the First Name field of your form. Merge tags are split into 4 categories:
- Fields. Use this option to show a merge tag for every individual field on your form.
- WordPress. Merge tags for system data like Post ID, URL, Author, User ID, and others.
- Form. Form-wide merge tags to either include all fields, only fields with submitted data, and submisison sequence number.
- Other. Like it says, other 🙂
8. HTML editor. Use this to directly format with HTML and inline CSS (to the extent that Summernote supports)
Now that we’ve covered what’s there, let’s put together an example!
Customizing Ninja Forms Email
We’ll use the Event Registration template that comes default with Ninja Forms as brief example:
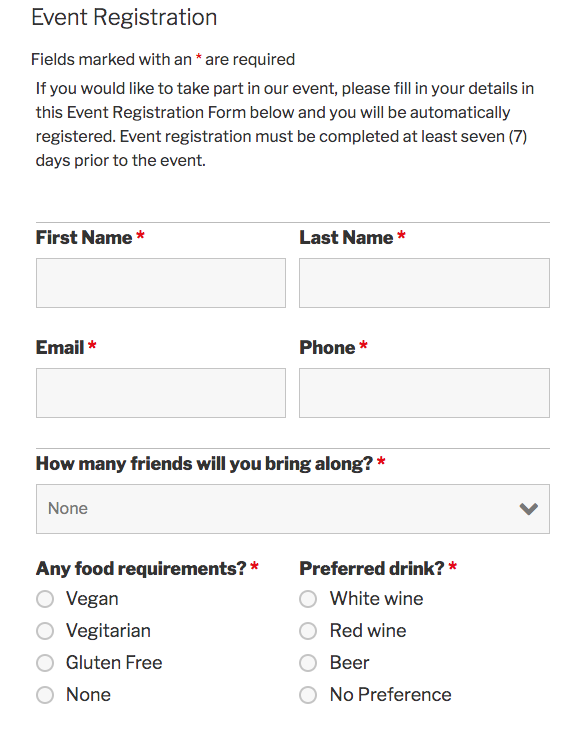
- event intro
- guest info
- guest preferences
Let’s format the email so that it’s organized in a similar fashion. Users don’t need to see the event intro repeated in a confirmation email, so we can change that text to something unique. We can then present the rest of the info in sections with a line break, just like the form.
Making a Header
It’s simple as pie. As you can see below, creating a header and styling some text below it is just a few clicks in the making.
Including Field Data in the Form
The merge tag feature (icon #7 in the picture above) scans your form and presents you with available fields to add. Let’s add the fields that have user info in them for them to review. Just click the merge tag icon and select the fields from the list one by one!
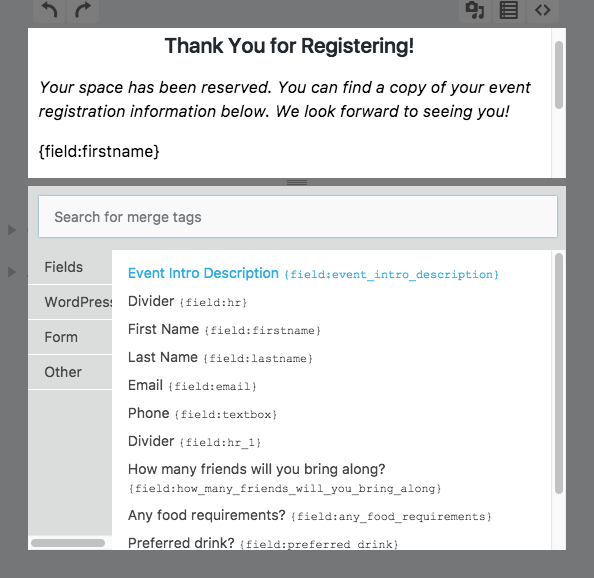
Now we have our fields in place in the email message. Now let’s add section breaks.
Adding a Section Break
Icon #8 in our reference picture opens up a text editor that we can write HTML into directly. We’ll place the HTML rule for a line break beneath our header message, and in between our guest info and our guest preferences. Like so:
And now we have section breaks!
What Do You Want to Do?
The sky is the limit with the Summernote rich text editor for styling your Ninja Forms email. The above example is a simple case to demonstrate what’s available. Many of you will want more, and the capability is there. Now that you know the basics, hopefully styling will be painless and friendly for you. If not, what are you trying to do? Let us know your pain points and we’ll see what we can do to improve on this in the future!



Collins Agbonghama says:
We use and love Ninja Forms.
We’ve been using a customized email template similar to what you just explained for our clients sites.
Long live Ninja Forms.
Najib Raad says:
Is it possibly to only show fields in the sent email if they were filled out/checked by the user? For example – if there is some checkbox options, is it possible to add these fields to the email and only display in the sent email if they were originally checked in the form by the user?
Quay Morgan says:
Yes! Use the {fields_table} merge tag. That will include only fields that contain data, versus the {all_fields_table} tag that will include everything.
Cheers,
Quay
Damian says:
Is it possible to auto generate all the fields in the email as if I was using {forms_table} but with a simple
Field Name
Field Value
Field Name
Field Value
layout rather than a 2 column table layout?
Thanks,
Damian
Curtis Brownlee says:
Hello,
Thank you for contacting us. I hope that you are doing well.
Unfortunately, there is not currently a method to have the “{fields_table}” merge tag display in 1 column. In order to establish the layout you mentioned, you would need to edit the Email Action of your form, enter the field name, and insert the field merge tags for each form field.
I hope that this helps to guide you in the right direction.
If you encounter any issues or have followup questions, please reach out to us at https://ninjaforms.com/contact/ in order to get a timely response. There, we offer support free support directly to our Ninja Forms users with significantly more privacy and a faster response time.
Best regards,
Curtis
WP Ninja
pureprecepts says:
How can I style a Nija form without buying “Layout and Styles”?
Quay Morgan says:
Check this out: https://ninjaforms.com/blog/add-custom-css-to-wordpress-forms/
Jason Hsu says:
I have two fields:
1) state: dropdown
2) address_type: radio button
How do I output a dropdown’s label rather than value?
{field:address_type:label} worked but not {field:state:label}
I can’t change the field values because I need the raw values for the webook, but I need the send the label over emails.
Your documentation just says enable Dev mode and nothing else.
Lucien Howlett says:
Hi
Can you edit or change forms once published and can you change a form header if you duplicate an older one?
Quay Morgan says:
Sure! Just open any form in your Ninja Forms builder to edit it after it’s been published/saved. The form title can be changed under Advanced > Display Settings in the form once you have it open.
Stefan says:
Can I paste custom html in the WYSIWYG-editor?
Quay Morgan says:
Should be able to! Just click the <> to bring up that part of the editor. There are limits to the type of HTML and inline CSS that can be added here that reflect limitations within Summernote. Definitely something you can experiment with though!
Zola Qotoyi says:
I have multiple sections on my form and when I submit a form the section titles do not appear on the submittion as well as on the PDF. I also have dividers they also do not appear.
Zola Qotoyi says:
How do I change a PDF name that has been submitted from ninja_forms-submission.pdf to something different?
Zola Qotoyi says:
Nevermind. I managed to change the name.
Zola Qotoyi says:
My labels are not showing on the submitted forms.
Chris says:
In an email, can {fields_table} be configured to display with alternating row colors?
Nicolas says:
I would like to add informations in the e-mail based on checkbox choices : my form contains checkboxes so my visitors can select the documents they want (Available trough a download link that I send by e-mail). In the automatic e-mail, I would like to send the links to the selected documents only. Is it possible? Thanks
Quay Morgan says:
Yes! you’ll want to use different email actions, each with a different combination of download links, and send only the one that fits the user’s selection in the form using the Conditional Logic add-on: https://ninjaforms.com/extensions/conditional-logic/
Riika says:
Is there anyway to format the {fields_table} to line break a really long label name? I have a label that is 103 characters and when it’s in table form it makes the first column super wide and the second column very narrow. It would be nice if each column could be set to like 50% width and have text line break.
Kathy Zant says:
Hi Riika! By adding a table to your email, you can easily add a 50% width to each cell of your table. You can do this by adding some CSS to your table cells like so.
If you need more help in doing so, reach out to our amazing Ninja Forms support team here: https://ninjaforms.com/contact/
Don Dulin says:
Is there a way to format the outgoing email so that every other field is shaded. Example:
Name – shaded row
address – non shaded row
city – shaded row
state – non-shaded row
… I hope you follow my pattern above. I have a customer complaining that the (21 row) form is not easy to read. Thanks!
Jon Ruprecht says:
Is there a way to have the email line break from doing multiple check box entry. It comes out like:
Mental:
kong-or-lick-mat-with-peanut-butter,bubble-time-dogs-have-fun-playing-with-the-bubbles
Client is wanting it to be on separate lines.
Elise says:
I have a long form with many fields. Is it possible to use the {fields_table} tag while excluding one field?
If not, is there a way to select the specific fields to be included, but only if they have data?
Giorgio Ventura says:
hell
Where should I put the email of whoever receives the reservations?
Shaylee Hansen says:
Hello Giorgio,
First, add another Email action to your form by clicking + Add New Action. After that add the email address from your form via merge tag to the ‘To’ field. https://ninjaforms.com/blog/create-an-event-registration-form-in-wordpress/
Victoria says:
When I use the Paragraph Text with Rich Editor enabled, then put that Paragraph Text field into the email to my, the Rich Text is stripped. How can I add this field to the email and NOT strip the formatting?
ip television says:
This post will help the internet visitors for setting up new blog or even a weblog from start to end.