Powerfully Easy Email Marketing
Connect to Constant Contact and power your business from one platform. Email and text without the guesswork using any list or interest group.
Risk-Free 14 Day Guarantee
You'll love it or we'll refund you fully. No questions asked.
Adding Constant Contact subscribers from your WordPress forms should not require code, third-party connectors, or a developer. The Ninja Forms Constant Contact add-on connects your WordPress site to Constant Contact in one click and turns any form into a signup form.
With the Constant Contact add-on, you can:
Key Features
One-Click OAuth Connection
Authorize from your WordPress dashboard in a single step. No API keys to copy and paste.
Subscribe to Any List
Choose the Constant Contact List subscribers are added to, right inside the form builder.
Interest Groups Support
Map submissions to specific Interest Groups within a List for automatic subscriber segmentation.
Field Mapping
Map form fields to First Name, Last Name, and Email in Constant Contact directly in the builder.
Built-In Opt-In Field
A dedicated consent checkbox skips the subscription action automatically when left unchecked. No Conditional Logic needed.
Full Form Customization
Unlimited notifications, custom success messages, redirects, and visual styling with Layout & Styles.
Key Features of Constant Contact
One-click OAuth connection
Connecting your WordPress site to Constant Contact takes a single authorization step. Go to Ninja Forms settings, click the authorization link, log in to Constant Contact, and click Allow. Your access token is added automatically. No API keys to copy, no configuration files to edit.
Subscribe to Constant Contact Lists
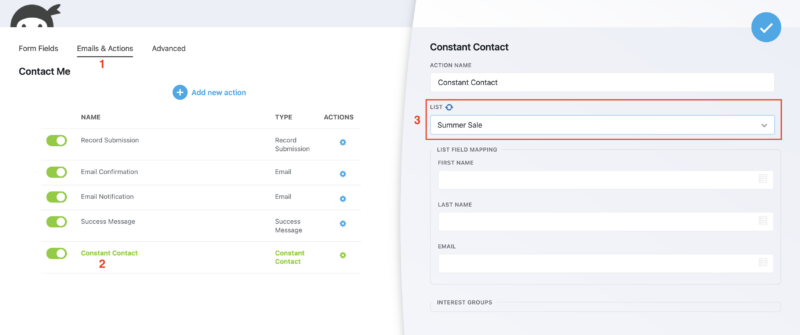
Every form submission can automatically add that visitor to a Constant Contact List you choose. After adding the Constant Contact action to a form, select the List from a dropdown right inside the form builder. No switching between tools to configure it.
Interest Groups support
Constant Contact Lists can contain Interest Groups, and you can map form submissions to a specific Interest Group within a List. This is how you build segmented subscriber data from the moment someone fills out your form. Visitors self-select their interests; you get a cleanly organized List on the Constant Contact side.
Field mapping for First Name, Last Name, and Email
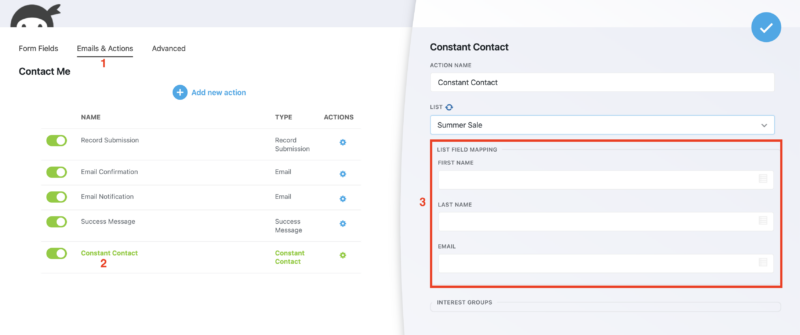
Map your form fields to the matching Constant Contact contact fields directly in the form builder. Constant Contact supports mapping First Name, Last Name, and Email. Assign each form field to its corresponding Constant Contact field, and submissions pass that data straight to your contact record.
Built-in Opt-in field for consent
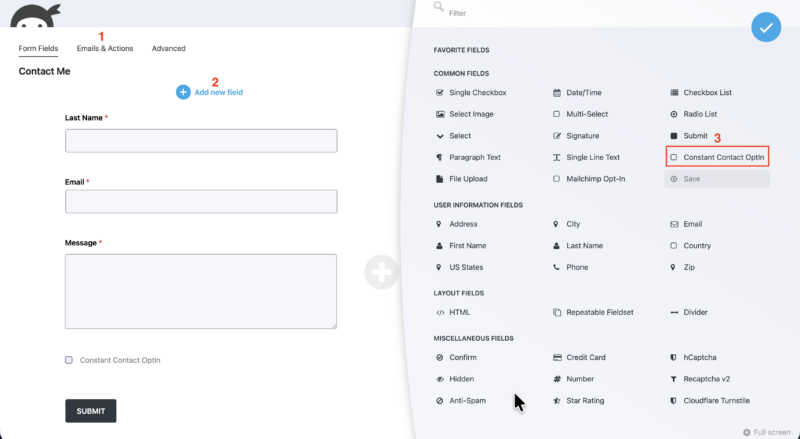
A dedicated Constant Contact Opt-in checkbox field is available directly in the Ninja Forms field library. Add it to your form, and when a visitor leaves it unchecked, the Constant Contact subscription action is skipped entirely. No Conditional Logic rule required. This makes GDPR-compliant consent straightforward to implement on any signup form.
Conditional Logic integration for list segmentation
Pair the Constant Contact add-on with the Ninja Forms Conditional Logic add-on to route subscribers to different Lists based on what they answer in your form. A visitor who selects “I’m interested in product updates” can be added to one List; someone who selects “general news” goes to another. Subscriber segmentation without writing a line of code.
Works with any existing form
You do not need to build a dedicated Constant Contact signup form from scratch. Add the Constant Contact action to any form already on your site. A contact form, a quote request form, a registration form: any of them can subscribe the submitter to a Constant Contact List. One action, added to any form, in minutes.
Full form customization included
Because subscriber collection runs through Ninja Forms, you get every form customization option built in. Set up multiple email notifications, write a custom success message, redirect visitors to a thank-you page after submission, and style the form visually with Layout & Styles. Your Constant Contact forms look and behave exactly the way you want.
Your forms and your contacts, connected
Send submissions straight to Constant Contact, mapped to the right list with interest-group tags, and let the built-in opt-in field handle consent. Add it to your cart and connect your forms today.
Backed by priority email support and a 14-day money-back guarantee.
How to Add a Constant Contact Form to WordPress
Getting your first Constant Contact form live on WordPress takes four steps with no code involved.
- Install and activate the Constant Contact add-on from your Ninja Forms account.
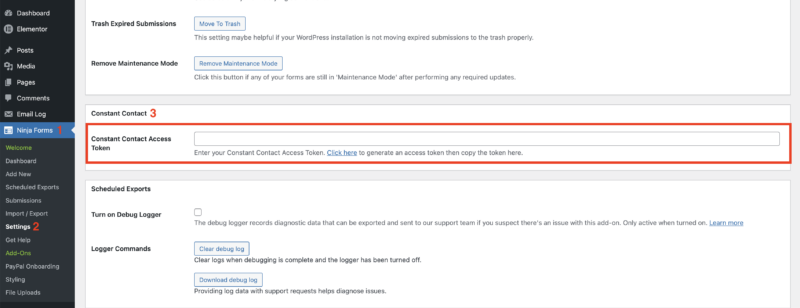
- Authorize the connection in Ninja Forms > Settings > Constant Contact. Click the authorization link, log in to Constant Contact, and approve access. Your access token is saved automatically.
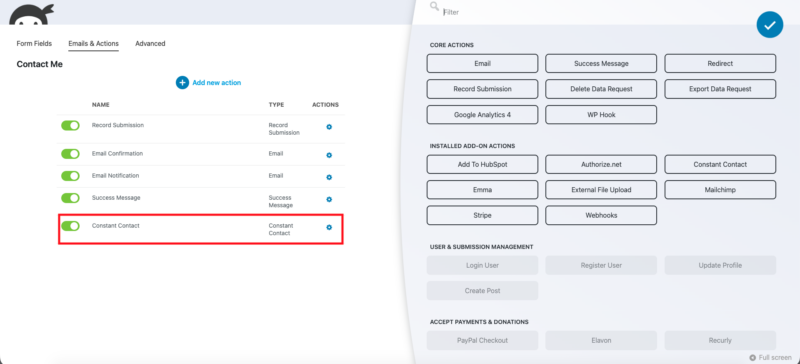
- Add the Constant Contact action to any form. Open your form in the builder, go to Emails & Actions, click Add New Action, and select Constant Contact.
- Choose your List, map your fields, and save. Select the Constant Contact List, optionally pick an Interest Group, map First Name, Last Name, and Email, then publish the form.
Every visitor who submits that form is added to your Constant Contact List. If you add the Opt-in field, only visitors who check it get subscribed.
Segment Subscribers Without Code
Most WordPress form plugins that connect to Constant Contact let you subscribe visitors to a single List. That is it. The Ninja Forms Constant Contact add-on gives you two levels of subscriber segmentation that require no coding.
The first is Interest Groups. Constant Contact lets you create sub-groupings within a List, and the add-on lets you assign form submissions to a specific Interest Group. Visitors who fill out a form indicating they are interested in a particular topic get tagged at the Interest Group level automatically.
The second is Conditional Logic routing. Combined with the Conditional Logic add-on, you can build rules that subscribe visitors to entirely different Lists based on their form answers. A simple dropdown or radio button in the form becomes a subscriber-routing mechanism. No developer work required.
Common Use Cases
- Grow your email list from any page on your site: Add the Constant Contact action to your contact form, footer form, or any existing Ninja Forms form to collect subscribers without building a separate signup form.
- Collect opt-in consent for GDPR compliance: Add the built-in Opt-in field to any form. Visitors who do not check it are never added to your List, keeping your consent records clean and compliant.
- Segment subscribers by interest: Use Interest Groups to automatically categorize subscribers based on what they indicate in your form. Start with a pre-built contact form template or build your own with segmentation fields.
- Route subscribers to different Lists based on responses: Combine with Conditional Logic to send visitors who select different answers to different Constant Contact Lists, creating targeted subscriber groups from a single form.
- Turn registrations into subscribers: Add the Constant Contact action to an event registration or webinar sign-up form to build your List while collecting attendee details in the same submission.
- Style your signup form to match your brand: Use Layout & Styles to control fonts, colors, field spacing, and layout so your Constant Contact form fits seamlessly into your site design.
Every sign-up becomes a contact you keep
Event registrations, volunteer interest, and membership forms all feed your Constant Contact list automatically, one submission, one contact, no manual import. Add it to your cart and keep everyone you sign up.
Priority email support and a 14-day money-back guarantee included.
Frequently Asked Questions
-
Install the Ninja Forms Constant Contact add-on, then authorize the connection in Ninja Forms Settings with a single click. From there, open any form in the builder, add the Constant Contact action from the Emails & Actions tab, choose your List, map your fields, and save. The form now subscribes submitters to Constant Contact on every submission.
-
Ninja Forms integrates directly with Constant Contact through a dedicated add-on. You can add the Constant Contact action to any form you build in Ninja Forms, choose a List, map Interest Groups, and add an opt-in consent field. No third-party connector or custom code is required.
-
Add the Constant Contact action to any Ninja Forms form via the Emails & Actions tab. Select the List you want subscribers added to, map the Email, First Name, and Last Name fields, and save the form. Every submission that includes consent will add the visitor to your chosen Constant Contact List automatically.
-
Yes. The Constant Contact add-on supports Interest Groups, so you can map form submissions to a specific sub-group within a List. For routing subscribers to entirely different Lists based on their answers, combine the add-on with Ninja Forms Conditional Logic to create rule-based subscriber routing without writing any code.
-
No. The Constant Contact action can be added to any existing Ninja Forms form on your site. A contact form, a quote request form, or an event registration form can all subscribe visitors to a Constant Contact List at the same time they submit the form. No need to build a separate signup form.
-
The built-in Opt-in field adds a consent checkbox to your form. When a visitor leaves it unchecked, the Constant Contact subscription action is skipped automatically. You do not need a Conditional Logic rule to control this behavior. This simplifies consent collection and keeps your subscriber list limited to visitors who explicitly opted in.
-
No. The Constant Contact add-on uses OAuth authorization. Go to Ninja Forms Settings, click the authorization link, log in to your Constant Contact account, and approve access. Your access token is saved automatically. There is no API key to copy or paste manually.
-
Licenses are subscription based and will auto-renew each year unless cancelled. If cancelled, you may still use your extensions but will no longer receive important updates or support once the license expires.