Create Eye-Catching Newsletters
A complete, direct connection to Campaign Monitor through any of your WordPress forms. The power of creative newsletters that deliver big time engagement.
Risk-Free 14 Day Guarantee
You'll love it or we'll refund you fully. No questions asked.
The Campaign Monitor WordPress integration you need is already built into Ninja Forms. Add any form to your site, connect it to your Campaign Monitor subscriber list, and start growing your audience without writing a line of code.
With the Campaign Monitor add-on, you can:
Key Features
Connect in Minutes
Install the add-on, add your API Key and Client ID, and your WordPress forms are live on Campaign Monitor.
Choose Your Subscriber List
Point each form at any Campaign Monitor subscriber list and switch or refresh lists anytime from form settings.
Map Any Field
Send name, custom fields, and any subscriber data to Campaign Monitor, not just email addresses.
Built-In Opt-In Field
A dedicated opt-in field type handles subscriber consent with no conditional logic setup required.
Key Features of the Campaign Monitor Add-On
Simple 3-step setup
You do not need a developer to get started. Install the add-on, grab your API Key and Client ID from your Campaign Monitor account, and paste them into Ninja Forms settings. That is it. Your WordPress forms are connected to Campaign Monitor in minutes, not hours.
Connect to any subscriber list
Choose exactly which Campaign Monitor subscriber list receives each form’s submissions. Need to change it? Switch lists anytime from the form action settings. You can also refresh the available lists on demand so newly created lists in your Campaign Monitor account appear immediately, no page reload required.
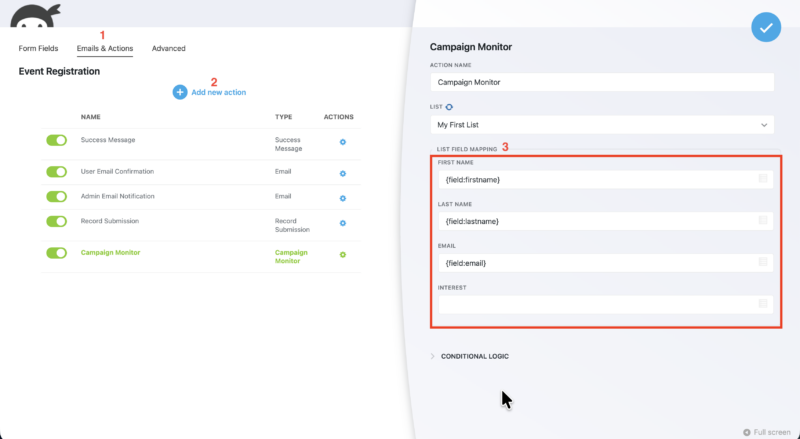
Field mapping for complete subscriber data
Your forms capture more than just an email address, and so does your Campaign Monitor subscriber list. Map any form field to any subscriber field in Campaign Monitor, including name, custom fields, and any other data your list supports. Every submission sends exactly the information your list is configured to receive.
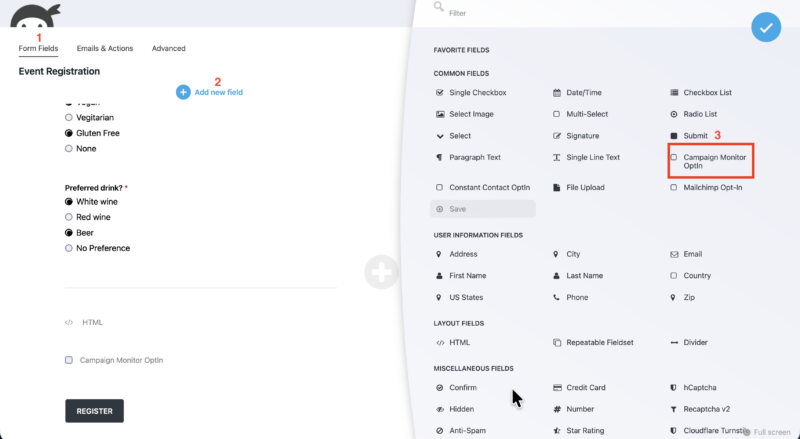
Campaign Monitor opt-in field
A dedicated opt-in field type gives subscribers an explicit choice. When a user checks the opt-in field, the Campaign Monitor action runs and adds them to your list. When they leave it unchecked, the action is skipped entirely. No conditional logic rules to configure, no workarounds required. Add the field to your form and consent capture works out of the box.
Forms that feed Campaign Monitor directly
Connect any form to Campaign Monitor in minutes, map the fields, pick the subscriber list, and handle opt-in consent without leaving the builder. Add it to your cart and start feeding your lists from your forms.
Backed by priority email support and a 14-day money-back guarantee.
How to Connect Campaign Monitor to WordPress
Connecting Campaign Monitor to WordPress takes three steps inside Ninja Forms. Here is what the process looks like:
- Install and activate the add-on. Download the Campaign Monitor add-on from your Ninja Forms account and activate it on your WordPress Plugins page.
- Get your API credentials. Log into Campaign Monitor, go to Manage Account, then API Keys. Copy your API Key and your Client ID.
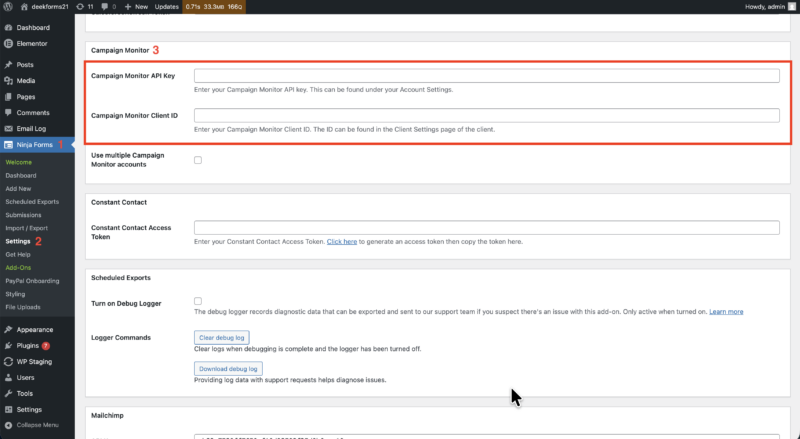
- Paste your credentials into Ninja Forms. In WordPress, navigate to Ninja Forms > Settings and locate the Campaign Monitor section. Paste in both credentials and save.
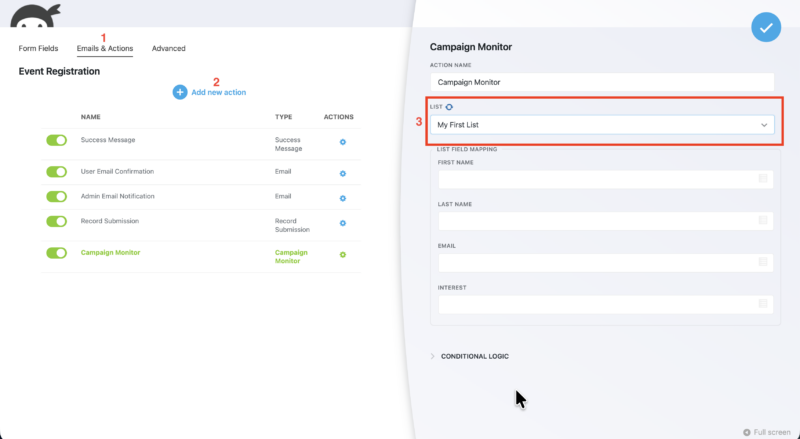
Once connected, open any form, go to the Emails & Actions tab, and add a new Campaign Monitor action. Select your subscriber list, set up field mapping, and publish. Submissions start syncing to your Campaign Monitor list immediately.
Common Use Cases
- Grow your newsletter list from any page on your site: Place a subscribe form in your sidebar, footer, or embedded in blog posts. Every submission goes straight to your Campaign Monitor subscriber list.
- Capture leads without a separate plugin stack: Use a contact or inquiry form that simultaneously sends you a notification and adds the submitter to a Campaign Monitor list, all in one action.
- Collect complete subscriber profiles: Map fields like first name, last name, company, or any custom field your Campaign Monitor list supports so every new subscriber arrives with full data, not just an email address.
- Add opt-in consent to any existing form: Drop the Campaign Monitor opt-in field into a registration, checkout, or event form to capture list consent without building a dedicated subscribe form.
- Segment subscribers by list at the form level: Run separate forms for different campaigns or audiences and point each one to a different Campaign Monitor subscriber list with no overlap.
Connect every client’s forms to their lists
Wire each client’s forms to their own Campaign Monitor account and list, set it once per project, and reuse it on the next site. Add it to your cart and standardize it across every client build.
Priority email support and a 14-day money-back guarantee included.
Frequently Asked Questions
-
No. Setup takes three steps: install the add-on, copy your API Key and Client ID from your Campaign Monitor account, and paste them into Ninja Forms settings. No code or developer experience required.
-
You choose the subscriber list for each form individually inside the form's action settings. You can switch lists at any time, and a refresh button lets you pull in newly created lists from your Campaign Monitor account without leaving WordPress.
-
Yes. The field mapping feature lets you connect any form field to any Campaign Monitor subscriber field, including first name, last name, and any custom fields your subscriber list supports. Every submission sends complete subscriber data.
-
The opt-in field is a dedicated field type that gives users an explicit choice. When checked, the form adds the submitter to your Campaign Monitor list. When unchecked, the Campaign Monitor action is skipped entirely. No conditional logic setup is required.
-
Each form action targets one subscriber list. To send subscribers to different lists, create separate forms and point each one at the appropriate Campaign Monitor list. You can also use Ninja Forms conditional logic to trigger different actions based on user input.
-
Yes. The Campaign Monitor add-on is available as part of any Ninja Forms membership plan, or as a standalone single-add-on purchase. Your license covers the number of WordPress sites your plan allows.
-
Licenses are subscription based and will auto-renew each year unless cancelled. If cancelled, you may still use your extensions but will no longer receive important updates or support once the license expires.