Send Leads to Zoho CRM
Connect your WordPress forms to Zoho CRM and create contacts, leads, deals, and more without writing a line of code.
Risk-Free 14 Day Guarantee
You'll love it or we'll refund you fully. No questions asked.
Getting WordPress form data into Zoho CRM shouldn’t require custom API work or settling for Zoho Forms’ limitations. The Ninja Forms Zoho CRM add-on connects your WordPress forms directly to your CRM, no code required, so every lead and contact captured on your site lands exactly where your sales team needs it.
Whether you’re replacing a manual entry process or looking for a more capable form builder than Zoho Forms, this is the WordPress-native Zoho CRM integration built for the way your team actually works.
With the Zoho CRM add-on, you can:
Key Features
Push to Six CRM Modules
Create Contacts, Leads, Accounts, Potentials, Notes, and Tasks directly from form submissions.
Auto-Link Related Records
New Contacts automatically link to their Account, Potential, Task, and Note from the same submission.
Visual Field Mapper
Map form fields to any standard or custom Zoho CRM field with a full-screen drag-and-drop UI. No code.
Custom Field Support
Map to picklists, date fields, boolean fields, and multi-select custom fields with automatic formatting.
Trigger Zoho Workflows
Form submissions automatically activate your Zoho workflow rules and approval processes.
Multi-Region & OAuth 2.0
EU, Australian, Chinese, and Indian endpoints supported. Secure OAuth 2.0 connection, no API keys.
Key Features of the Zoho CRM Add-On
Six Zoho CRM modules supported
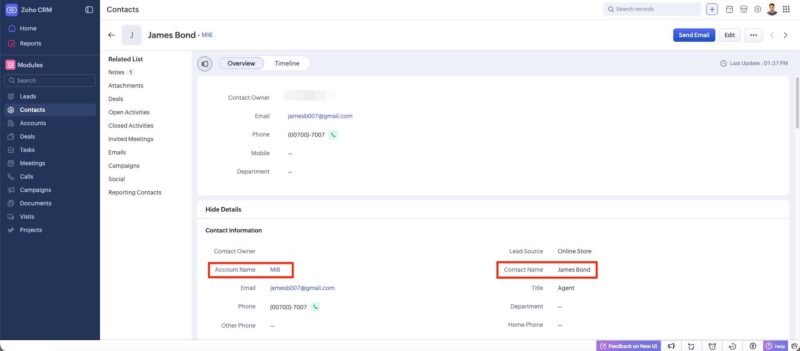
The add-on supports all six of the core Zoho CRM modules your team works in every day: Contacts, Leads, Accounts, Potentials (Deals), Notes, and Tasks. One form submission can create records across multiple modules simultaneously, so you never have to choose which part of your pipeline gets the data.
Zoho users navigate by module, not by generic “records,” and the add-on is built to match that mental model. Map your contact form to Contacts, your demo request form to Leads, your project intake form to Potentials. Each module maps independently with its own field configuration.
Auto-linking of related records
When a single form submission creates multiple records, the add-on automatically links them together in Zoho CRM. Create a Contact and Ninja Forms connects it to the Account, Potential, Task, and Note from the same submission. Create a Lead and it links to its associated Note and Task.
This is a meaningful workflow accelerator. Users of native Zoho Forms don’t get this automatic cross-record linking from a single web form submission. Your sales reps open a new Contact and find a complete picture: the deal, the task, the note, all already connected.
Visual field mapper
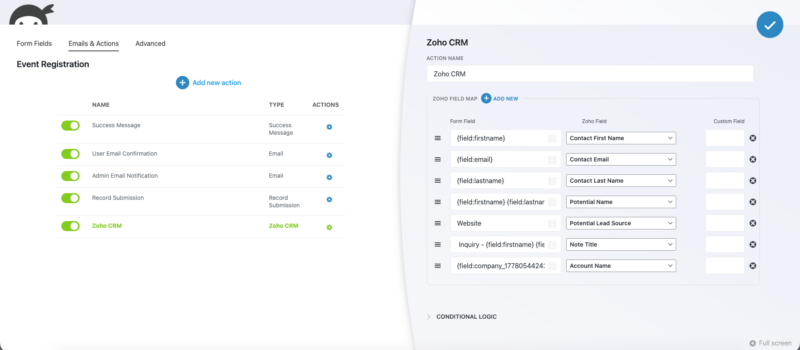
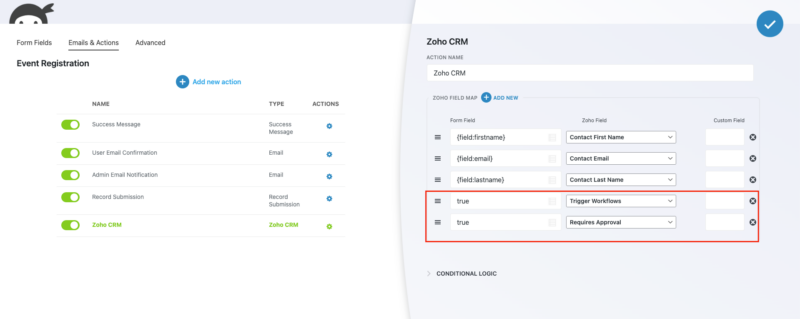
A dedicated “Add to Zoho CRM” action in the Ninja Forms builder gives you a full-screen field mapper UI. Drag form fields to their matching Zoho CRM fields, or set constant values for fields that should always carry the same data, like setting Lead Source to “Web Form” on every submission.
There’s no code involved. Map any form field to any Zoho field, standard or custom, directly inside the form builder. If you want to see exactly which fields are available for a given module, a built-in command lists them without leaving WordPress.
Custom field support
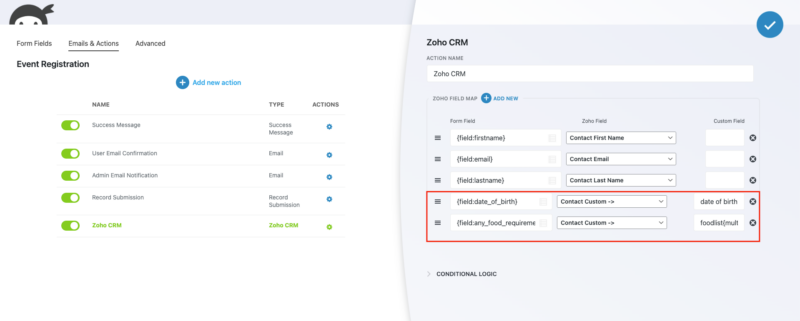
If your Zoho CRM instance uses custom fields, you can map to those too. The add-on supports all the field types you’re likely using: picklists, date fields, boolean fields, and multi-select fields. Each type handles formatting automatically so values land in Zoho the way the CRM expects them.
Date fields accept standard date formats or relative intervals like “2 days” or “3 weeks” from submission. Boolean fields get proper true/false values. Picklist values match your predefined options exactly. Your custom data model doesn’t require any workarounds.
Workflow rule triggering
Form submissions automatically trigger your Zoho CRM workflow rules and approval processes. With Zoho’s current API, workflow triggers are activated by default, so there’s nothing extra to configure on the Zoho side. If your sales process includes approval requirements before a record advances, you can configure those per form.
This means your existing Zoho automation keeps running. Lead assignment rules, follow-up task creation, email notifications to sales reps: all of it fires when a form is submitted, just as it would from any other lead source.
Multi-region support
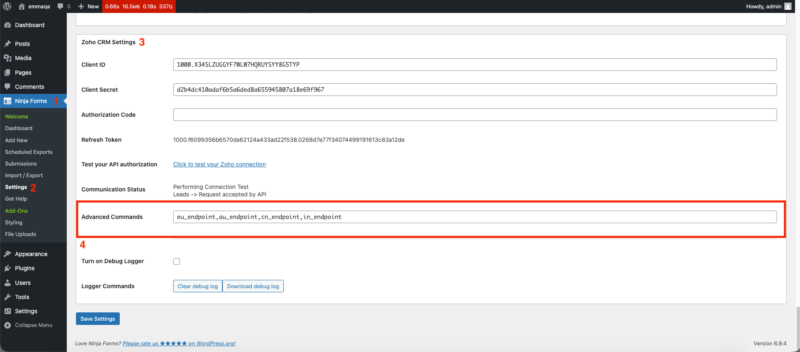
Zoho CRM operates regional data centers, and the add-on supports all of them. EU, Australian, Chinese, and Indian Zoho accounts connect using their respective regional endpoints with a simple configuration command. You don’t need a workaround or a separate integration to use this add-on if your organization’s Zoho instance isn’t on the US endpoint.
OAuth 2.0 authentication
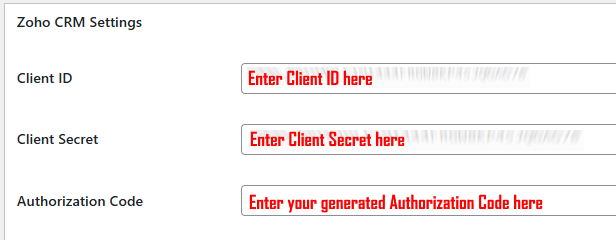
The add-on connects to Zoho CRM using OAuth 2.0, the modern standard for API authentication. You create a Self Client application in Zoho’s Developer Console, generate your credentials there, and enter them in WordPress. No legacy API keys, no third-party token services, no key rotation on a schedule.
OAuth 2.0 also means you’re not sharing your Zoho account password with any integration layer. The connection is scoped, revocable, and managed entirely between your WordPress site and Zoho’s own authorization infrastructure.
Stop Copying Form Data into Zoho CRM by Hand
TThe Zoho CRM add-on is available as a standalone purchase or included with the Ninja Forms Pro and Elite memberships. Choose your plan and start sending WordPress form submissions directly into your CRM.
Priority email support and 14-day money-back guarantee included.
A Better Way to Capture Leads from WordPress if You’re Already on Zoho CRM
If your team is already using Zoho CRM and you’ve been using Zoho Forms to capture web leads, Ninja Forms gives you a more capable option on the WordPress side without changing anything in your CRM.
Here’s where Ninja Forms gives you more than Zoho Forms for WordPress-based lead capture:
- Conditional logic: Show or hide form fields based on what a user selects. Build multi-path forms that adapt in real time, something Zoho Forms doesn’t offer at the same level of control inside WordPress.
- File uploads: Accept uploaded documents, images, or files directly in your WordPress forms and store them in your media library or a connected service.
- Visual form builder: Design forms that match your site’s look and feel. Full control over layout, styling, and field arrangement, integrated with your WordPress theme.
- Unlimited email notifications: Send confirmation emails to users, route notifications to multiple team members, and customize every message.
- Custom success messages and redirects: Control exactly what happens after a form submits, from a thank-you message to a redirect to a confirmation page.
- All Zoho CRM modules: Push data into Contacts, Leads, Accounts, Potentials, Notes, and Tasks, the same modules your Zoho Forms submissions reach, with the same auto-linking behavior.
You keep the Zoho CRM workflow you’ve built. You get a form builder designed for WordPress.
How to Integrate Zoho CRM with WordPress Using Ninja Forms
Setup takes a few minutes and doesn’t require a developer. Here’s how the connection works:
- Install and activate the Ninja Forms Zoho CRM add-on from your account dashboard.
- Create a Self Client app in Zoho’s Developer Console to generate your Client ID, Client Secret, and Authorization Code.
- Enter your credentials in the Ninja Forms Zoho CRM settings in WordPress.
- Open any form in the Ninja Forms builder and add the “Add to Zoho CRM” action.
- Select your module (Contacts, Leads, Accounts, Potentials, Notes, or Tasks) and use the visual field mapper to connect your form fields to CRM fields.
- Publish your form. Submissions go directly into Zoho CRM from that point forward.
If your organization uses an EU, Australian, Chinese, or Indian Zoho endpoint, add the appropriate regional command during setup. Everything else works the same way regardless of region.
Common Use Cases
- Replace your Zoho Forms web-to-lead setup: Use Ninja Forms on your WordPress site to capture leads with more control over layout and logic, while still pushing data into the same Zoho CRM Lead and Contact modules. Start with a pre-built contact form template or build your own.
- Automate sales pipeline entry: Map a product inquiry form to the Potentials module. Every submission creates a Deal in your pipeline with the stage, amount, and source already populated, no manual entry for your sales team.
- Capture event or webinar registrations as Leads: Route event sign-up form data to the Leads module and trigger Zoho assignment rules so the right rep gets notified immediately.
- Add notes and tasks automatically at inquiry: When a prospect submits a form, create a Note with the message content and a Task for the assigned rep, linked to the Contact or Lead record, all from one submission.
- Sync account information updates: Let existing customers submit update forms that write directly to the Accounts module, keeping company records current without manual CRM edits.
- International lead capture with regional compliance: Organizations operating in the EU, Australia, China, or India can capture leads into their region-specific Zoho data center without routing data through US endpoints.
Your WordPress Forms, Your Zoho CRM, Connected
The Zoho CRM add-on is available as a standalone purchase or included with the Ninja Forms Pro and Elite memberships. Pick your plan and put your lead capture on autopilot.
Priority email support and 14-day money-back guarantee included.
Frequently Asked Questions
-
Install the Ninja Forms Zoho CRM add-on, then create a Self Client application in Zoho's Developer Console to get your OAuth 2.0 credentials. Enter those credentials in the Ninja Forms settings, open any form in the builder, add the "Add to Zoho CRM" action, select your module, and map your form fields to CRM fields using the visual field mapper. No code required. Submissions push to Zoho CRM immediately after you publish the form.
-
The add-on supports six Zoho CRM modules: Contacts, Leads, Accounts, Potentials (Deals), Notes, and Tasks. A single form submission can create records in multiple modules at once, and related records are automatically linked in Zoho CRM. For example, a new Contact is automatically connected to its Account, Potential, Task, and Note from the same submission.
-
Yes. If you're already using Zoho CRM and have been using Zoho Forms for web-to-lead capture, Ninja Forms is a more capable WordPress-native alternative. You get conditional logic, file uploads, a visual drag-and-drop form builder, unlimited email notifications, and full control over styling, while still pushing data into the same Zoho CRM modules your team already works in. Your Zoho CRM setup doesn't change; you just get a better form builder on the WordPress side.
-
Yes. The add-on supports all custom fields you've created in Zoho CRM, including picklists, date fields, boolean fields, and multi-select fields. Each field type is handled with automatic formatting so values arrive in Zoho the way the CRM expects them. You map custom fields the same way as standard fields, directly in the visual field mapper without code.
-
Yes. EU, Australian, Chinese, and Indian Zoho accounts are all supported. Each regional data center has a corresponding endpoint command you enter in the add-on's Advanced Commands field during setup. The form builder, field mapping, and module support all work identically regardless of which regional endpoint your organization uses.
-
Yes. Form submissions automatically trigger your existing Zoho CRM workflow rules and approval processes. With Zoho's current API, workflow triggers are active by default, so there's nothing extra to configure on the Zoho side. If your process includes approval requirements, those can be configured per form in the action settings.
-
The add-on uses OAuth 2.0 authentication. You create a Self Client app in Zoho's Developer Console and use the generated Client ID, Client Secret, and Authorization Code to connect. There are no legacy API keys and no third-party token services involved. The connection is scoped and revocable from your Zoho account at any time.