If you are like me, you have been on the hunt for an easy-to-implement WordPress form solution for Insightly. Maybe you have tried Insightly’s form builder only to realize you have no idea where to add the form code to your WordPress website.
Perhaps you have invested time into another WordPress form solution only to find out that they require the use of a third-party integration like Zapier.
Or, maybe you have been biding your time until you find the ideal WordPress form solution that easily integrates with Insightly. Sparing you from having to learn yet another software tool, If so, you have come to the right place.
We offer a simple, reliable, way to connect your WordPress forms to Insightly with the Insightly add-on for Ninja Forms. In this article, you will learn how to connect Insightly to WordPress. Then after that, I will teach you how to segment leads using conditional logic.
So let’s get started!
How to connect Insightly CRM to your WordPress form
You need three things before you can begin: an Insightly account, the free Ninja Forms plugin, and the Insightly CRM add-on. Once you are registered with Insightly and the plugins are installed and activated, move on to the next step, syncing your WordPress forms with Insightly.
Step 1: Sync Insightly to Ninja Forms
First, log in to your Insightly account, and, locate your Insightly API key. You can find the key by clicking on Profile, then User Settings.
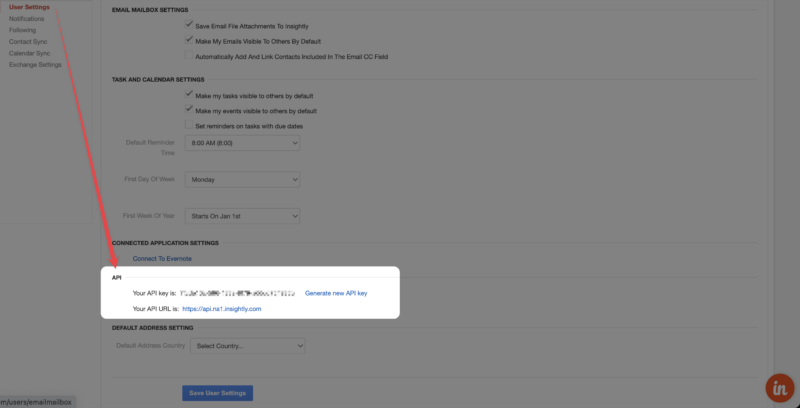
Copy the key ( COMMAND + C / CNTRL + C ) and head over to Ninja Forms > Settings > Insightly Settings and paste the key into the Insightly API key field.
Next, save the Insightly settings by clicking the blue Save Settings button. After that, test your API key by clicking the blue Click to test your API connection link. If the connection is successful, the Communication Status will display the following message:
Attempt to create a new contact at: Wed, 01 Jun 2022 00:45:57 GMT was: Successful.
If you have trouble establishing a connection, review the Insightly CRM documentation for a step-by-step guide on how to connect your WordPress forms to Insightly.
Step 2: Build and customize your WordPress form
Now that you are connected to Insightly you will either need to build your form from scratch or use one of our WordPress form templates ( Ninja Forms > Add New ) like Contact Us to get you started.
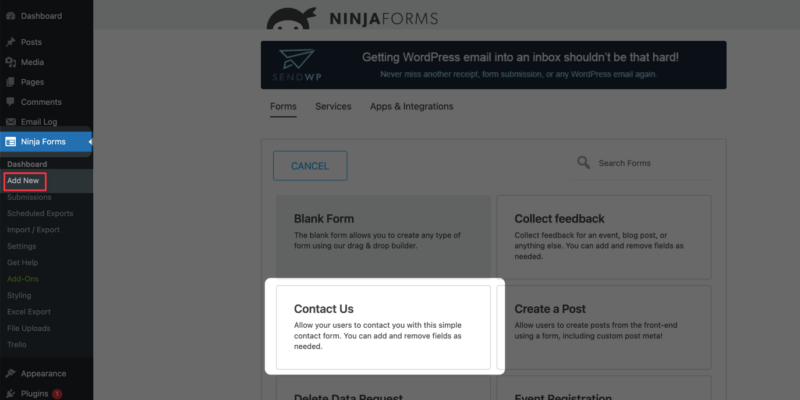
After you have generated your form, you are now ready to transfer data to the Insightly CRM. Click on the Emails & Actions tab to add the Insightly action to your form.
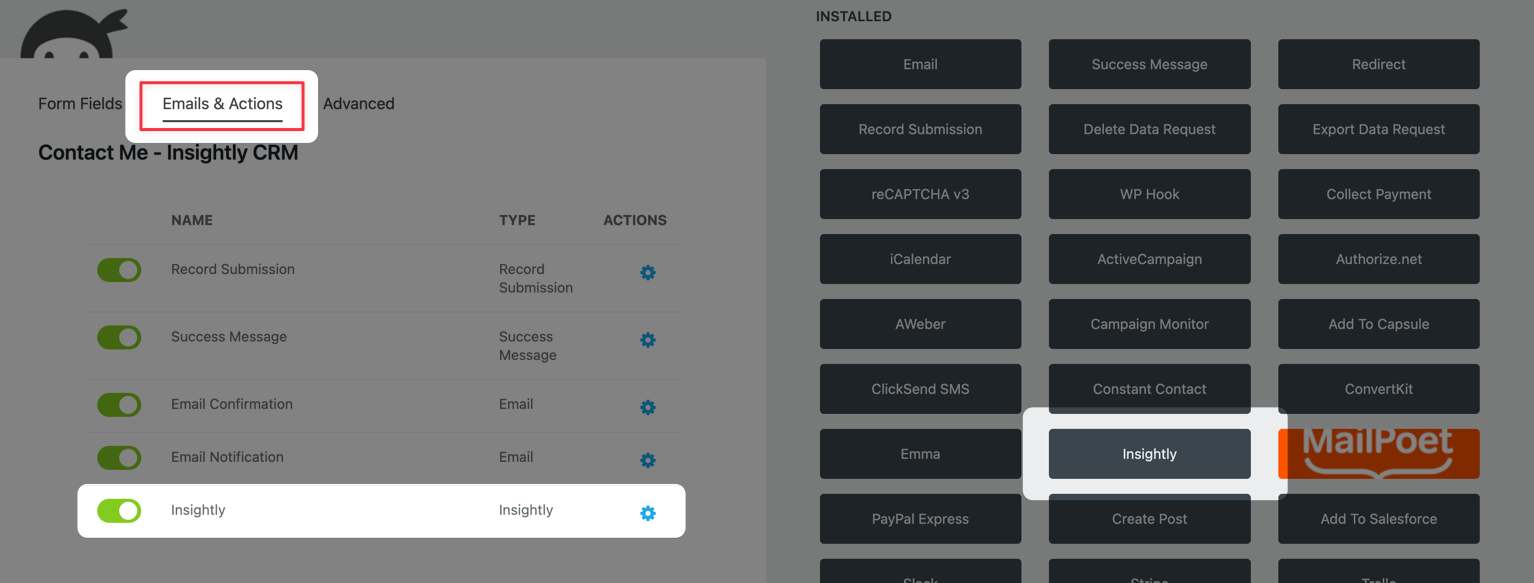
Click on the blue/+ sign at the bottom right and select Insightly. With this step complete you are now ready to map your WordPress form fields to Insightly.
3. Map your WordPress form fields to Insightly
To begin open up the Insightly action by clicking the gear icon. Next, click the blue/+ icon next to Add New to reveal three columns: Form Field, Insightly Field, and Insight Entry Type.
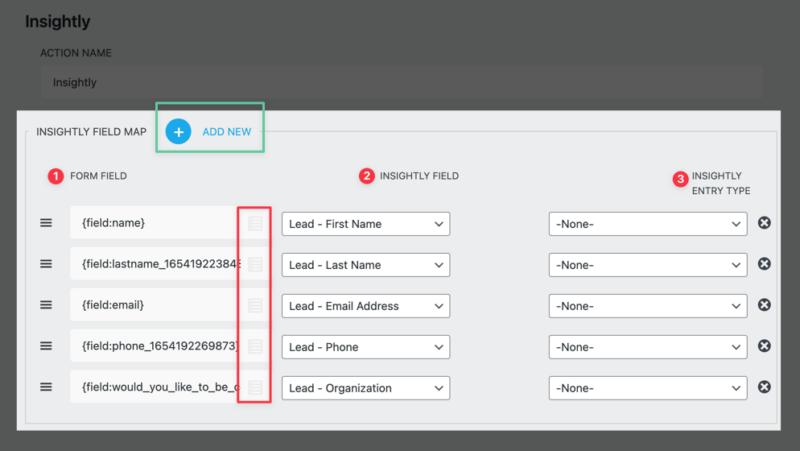
In the first column ( Form Field ), match your WordPress form fields to the Form Field group by clicking the merge-tag icon.
In the second column ( Insightly Field ), choose the Insightly CRM module you want your form submission to be identified with. Insightly offers six modules that include Contacts, Leads, Organizations, Opportunities, Projects, and Tasks. At this point, you can consider the field mapping complete.
The third column ( Entry Type ) is considered optional unless your form includes an Email, Website, Phone Number, Address, or Social field. Then you will want to be sure to include an Entry Type. Otherwise, the designation is unnecessary.
The example above is pretty basic, but depending on your needs you can create a form that sets up everything from a company name, to a contact number, to a mailing address. Really, anything to fit your CRM needs. After you’ve set everything up, run a test and you are good to go.
Troubleshooting
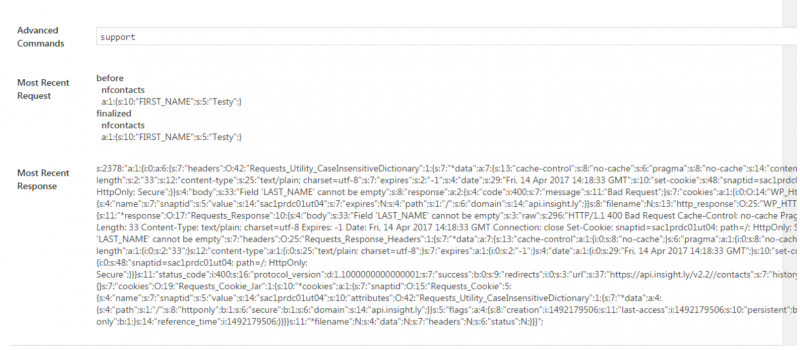
Add support into the Advanced Commands field if you are experiencing the following issues:
Retest the form, and then copy and paste the Most Recent Request ( JSON ) response into your Ninja Forms support request. Adding the JSON response will help our support team in identifying and resolving the issue faster.
How to conditionally segment Insightly leads for lead management
Now that you know how to connect your WordPress forms to Insightly. Let’s take your newfound knowledge one step further and turn those newly captures leads into their own unique customer journey. With the help of conditional logic, you will be able to add sales leads into different Insightly modules in just a few easy steps.
Step 1. Create the form
Install and activate the Conditional Logic add-on then move on to building your form. If you already created your form great! All you need to do now is add a few additional fields that will be referenced in steps 2 and 3. So keep reading! If you haven’t created your form yet read, Step 2: Build and customize your WordPress form.
Generally, you can include as many or as few fields in your WordPress form as you want. But, for today I’m going to ask you to add the following:
- First Name ( First Name / Single Line Text )
- Last Name ( Last Name / Single Line Text )
- Organization ( Single Line Text )
- Email Address ( Email )
- Phone Number ( Phone Number / Single Linke Text )
- Would you like to be contacted ( Radio or Single Check Field )
Step 2. Add your Insightly actions
Click on Email and Actions to begin adding the Insightly actions to your form. Click the blue/+ at the bottom right and add three Insightly actions. Once the actions are added rename them to Leads, Contacts, and Organization.
Open up the “Insightly – Leads” action and begin mapping the Form Fields to the Insightly Fields counterpart, Lead.
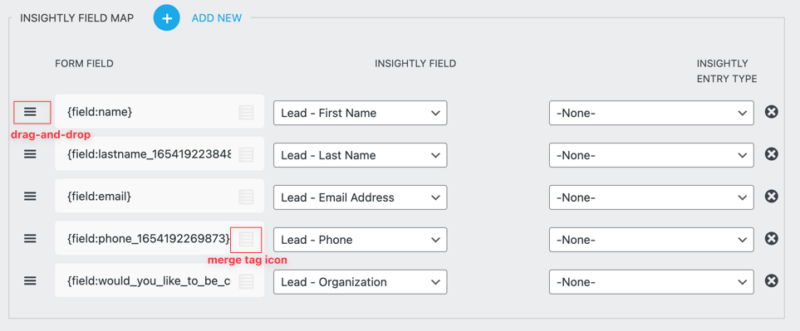
Repeat the process for the “Insightly – Contacts” action mapping the Form Fields to the Insightly Fields counterpart, Contacts. Include all fields except for organization.
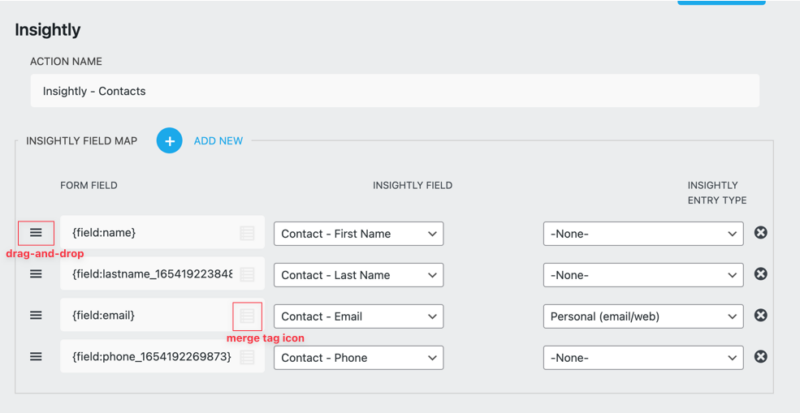
Again repeat the process for the “Insightly – Organization” action, but this time includes just one field. The organization field. Now that your Insightly actions have been mapped, it is time to apply the conditional logic in step three.
Step 3. Apply the conditional logic
Every person who fills out the form is going to be considered a “lead” so we can ignore the Insightly lead action, and focus on just the Organizations and Contacts actions
Under each action, you will see the Conditional Logic dropdown. For an in-depth overview of the ins and out of conditional logic check out our documentation. Open the Conditional Logic dropdown under the Organization action and select the Would You Like To Be Contacted field and set it to Yes.
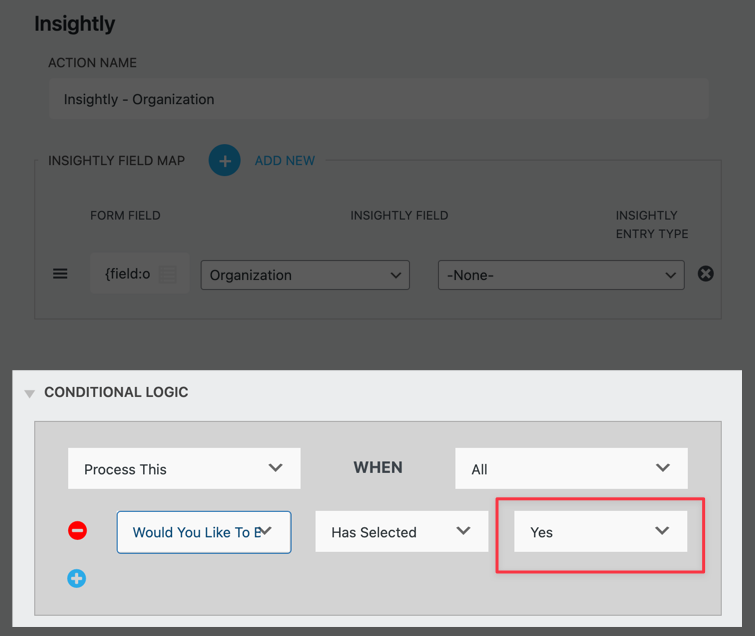
Now when the user consents to be contacted, their organization will appear within the Organization module of the Insightly CRM. All without any extra effort on your part.
Repeat the process for the Contacts action but set the field option to No instead of yes. Your prospect’s information will now be saved as a contact instead of as a lead.
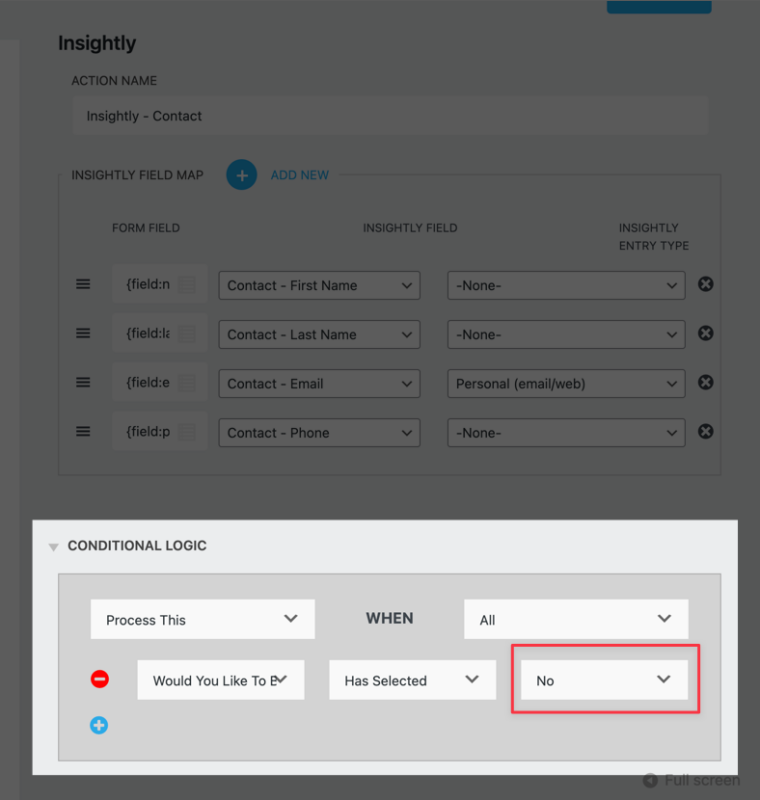
Congrats! You did it. All you need to do now is PUBLISH ( save ) your form, and run a test submission to make sure everything is working as expected.
Impressed? Connecting Insightly to WordPress is Insanely easy!
Today you learned how easy is to connect WordPress Forms with Insightly. So why don’t you give it a try?
You can get the Insightly CRM add-on free with the Agency Membership. If a membership plan isn’t your thing, don’t worry you can purchase Insightly as a stand-alone add-on instead. All of our stand-alone add-ons, including Insightly, can be purchased in a single-site, five-site, or twenty-site license and include priority support. With a 14-day money-back guarantee what do you have to lose?
Leave your time free for other jobs that will help take your business farther. Don’t let your website be the weak link in your lead generation strategy.


