What Is hCaptcha and How Does It Compare to reCAPTCHA?
If your site serves visitors in the EU, or you simply think a CAPTCHA service should respect your guest’s privacy over maximizing data collection, hCaptcha is the best alternative to reCAPTCHA on your WordPress forms. It is independently GDPR-compliant out of the box, operates on a privacy-first model by design, and asks nothing of your visitors beyond proving they are human. Ninja Forms supports it natively. This walkthrough adds it to your forms in four steps. No add-on required.
What you’ll need
To follow along with the setup section, you’ll need Ninja Forms (free) and a free hCaptcha account at dashboard.hcaptcha.com. hCaptcha is a core field type in Ninja Forms. No add-on or membership purchase required.

What is hCaptcha?
hCaptcha is a privacy-first CAPTCHA service, designed around limiting data collection rather than feeding it into an advertising ecosystem. For WordPress site owners, the practical difference is GDPR compliance: hCaptcha is independently GDPR-compliant out of the box, while Google reCAPTCHA isn’t.
If you serve EU visitors or just value maximizing your guests’ online privacy on business or personal grounds, that distinction is the single most compelling reason to choose hCaptcha over Google. Learn more about hCaptcha if you’re interested in the rationale behind their model.
hCaptcha vs reCAPTCHA: which should you use?
Choose hCaptcha if you serve EU visitors, want GDPR compliance without a consent banner dependency, or simply want the more privacy-respecting option. Choose reCAPTCHA only if your site is already deeply tied into Google services and none of those apply. The differences play out in two concrete ways on a WordPress site.
First, reCAPTCHA on an EU-facing site typically requires explicit visitor consent before it can legally load, because Google sets tracking cookies. hCaptcha doesn’t add that consent dependency. Second, reCAPTCHA v3 silently fails in privacy-focused browsers (Brave, Tor) and strict incognito mode, breaking form submission for those visitors. hCaptcha works regardless of browser. For any WordPress site dealing with EU traffic, privacy-aware visitors, or compliance scrutiny, those are real reasons to make the swap.
Give Ninja Forms a try today!
Ninja Forms is free! Optional premium features available with any membership.
How to add hCaptcha to your WordPress forms
If you’ve got Ninja Forms, hCaptcha is already there waiting for you. It’s a core field type, not an add-on. Setup takes four steps.
Step 1: Create an hCaptcha account and get your API keys
- Go to dashboard.hcaptcha.com/signup and create a free account.
- After signing in, your Secret Key is displayed on the main dashboard. Copy it and keep it somewhere handy for Step 2.
- Click Sites in the left sidebar, then + New Site.
- Enter your WordPress domain (for example,
yoursite.com) and select your preferred widget mode. (requires a live site; you can’t register a locally hosted site) - Your Site Key is generated. Copy it.
Step 2: Add your keys to Ninja Forms Settings
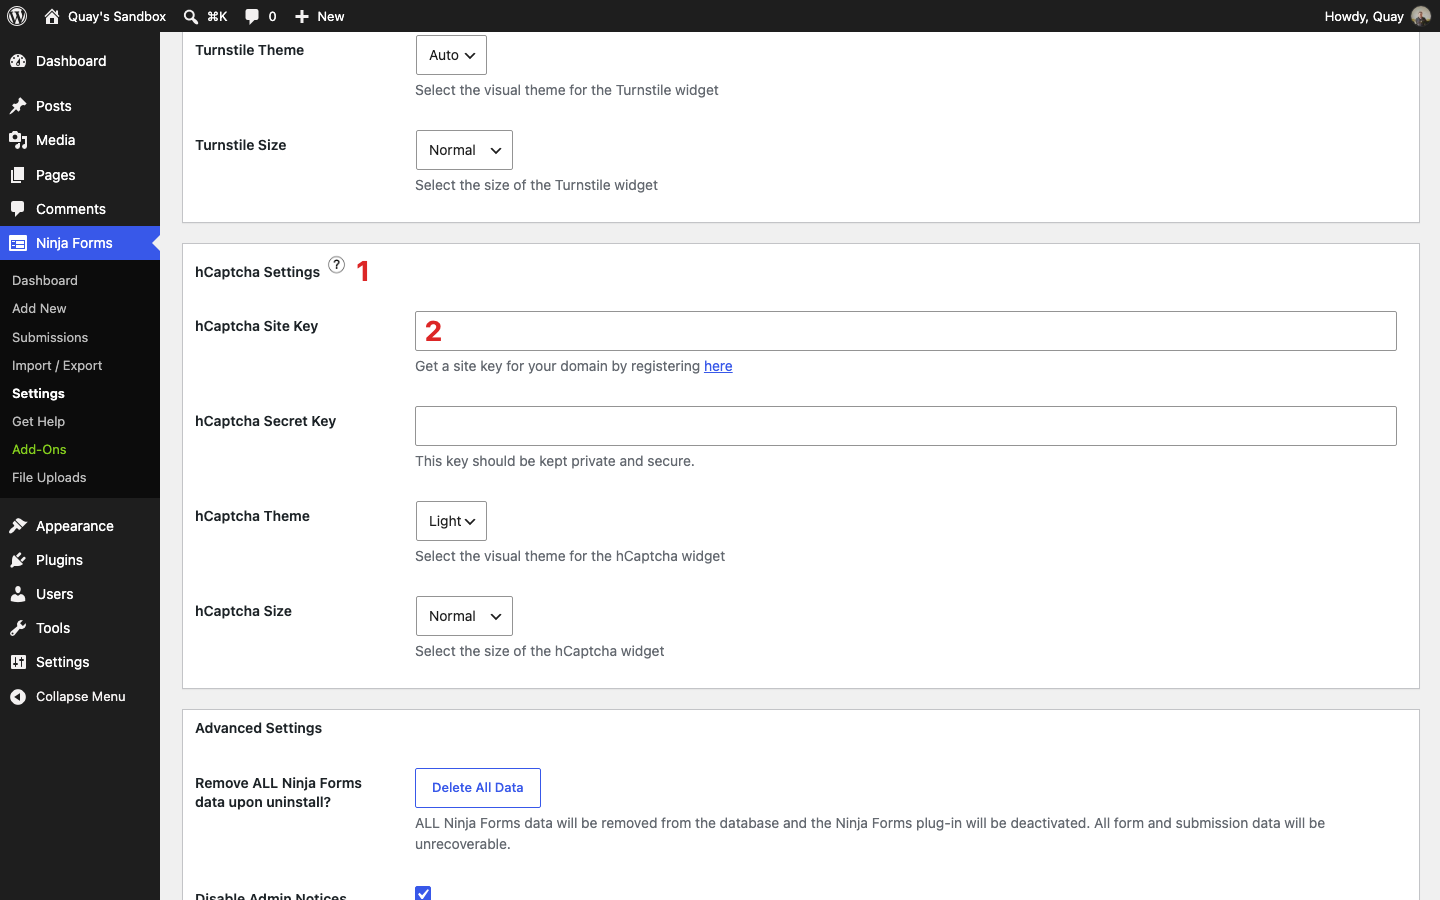
- In your WordPress admin, navigate to Ninja Forms > Settings > hCaptcha Settings.
- Paste your hCaptcha Site Key into the Site Key field.
- Paste your hCaptcha Secret Key into the Secret Key field.
- Save settings.
Step 3: Add the hCaptcha field to your form
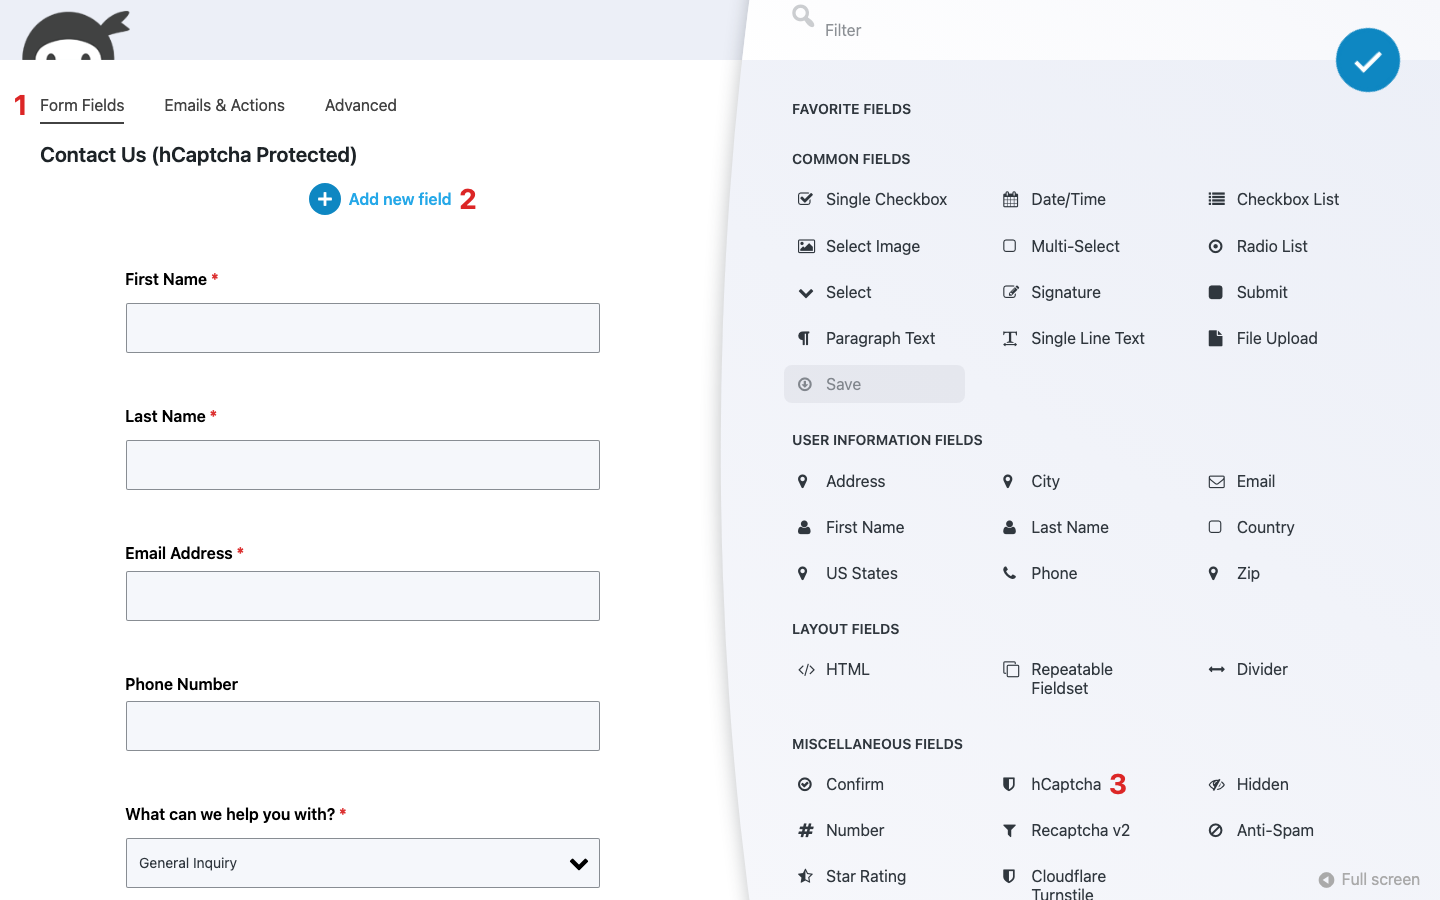
- Open any form in the Ninja Forms builder.
- Click the blue (+) icon to open the Fields window.
- Scroll to the Miscellaneous Fields section and find the hCaptcha field (it has a shield icon).
- Drag and drop hCaptcha onto your form.
- Click Publish (or Save) to save the form.
Step 4: Verify it works
- View the form on the front end of your site (refresh after publishing).
- The hCaptcha widget should appear where you placed the field.
- Complete the challenge and submit the form. You should see your success message.
- Try submitting without completing the challenge. You should see: “Please verify you’re human, then submit again.”
If you see “hCaptcha secret key is not configured” instead of the widget, go back to Ninja Forms > Settings > hCaptcha Settings and confirm your Secret Key is saved.
Once the widget renders and both paths (successful challenge, failed challenge) behave as expected, you’re done.
Can you run hCaptcha alongside other spam protection?
Yes, with one rule: run only one CAPTCHA per form. Ninja Forms includes three CAPTCHA options in core (hCaptcha, Google reCAPTCHA v2 and v3, and Cloudflare Turnstile), and running two CAPTCHAs on the same form causes conflicts.
What you can stack with hCaptcha is the honeypot (already active on every Ninja Forms form by default, no configuration needed) and Akismet. Both complement hCaptcha without interfering with it. Together, they give you multiple layers of protection: behavioral bot detection (honeypot), content analysis (Akismet), and human verification (hCaptcha).
If your site already runs Cloudflare, Cloudflare Turnstile is also a privacy-friendly option worth considering. It’s often invisible to end users, which reduces friction, though it’s not quite as explicitly privacy-maximalist as hCaptcha in its documentation and certifications.
You’ve now got hCaptcha running on your Ninja Forms, layered with the protections that stack cleanly alongside it. Your visitors get a cleaner verification experience, your site’s data handling story gets simpler, and the bots stay out.
Try Ninja Forms Today
Always free, with premium features available through our memberships.