Wondering how to customize an email notification message in WordPress to enhance your communication with visitors? Establishing a genuine and personalized connection with your website visitors is essential for cultivating meaningful interactions.
In our blog post, we’ll begin by demonstrating the process of setting up an email notification because this is essential know-how. Next, we will walk you through the setup of adding a personalized touch to your email notification message. And as an added bonus, we’ll also share some extra tips related to email sending. Let’s get started!
Table of contents
- How to set up an email notification/confirmation with Ninja Forms (send email)
- Customize email message in WordPress with Summernote WYSIWYG editor
- Customize an email notification message (Examples)
- Ninja Forms not sending email? Here is an easy fix!
1. How to set up an email notification in WordPress
Properly setting up email notifications is an essential aspect of optimizing communication between your website and its users. Luckily, it is very easy to send an email with Ninja Forms.
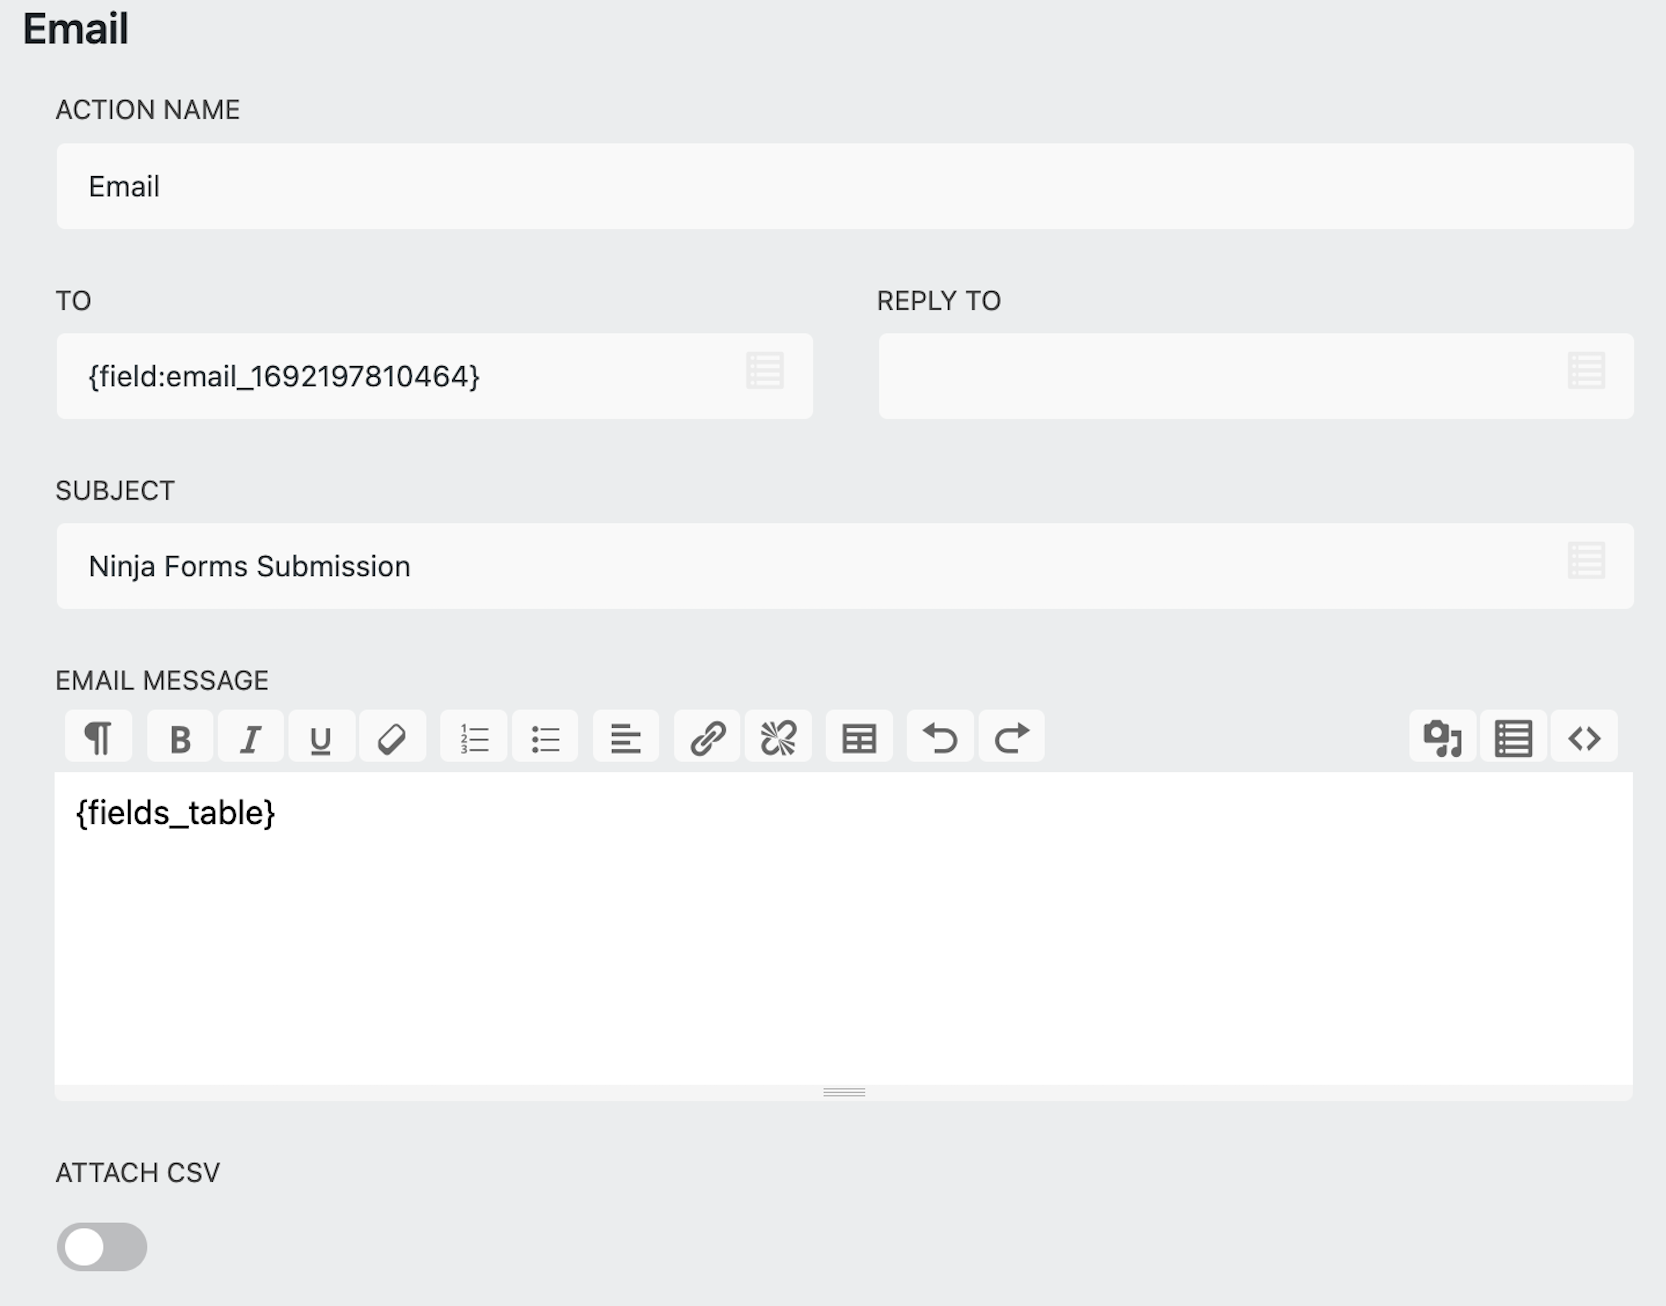
Once you are in your Ninja Forms builder, head over to the Emails & Actions tab. Click Add new action button and select Email.

In fact, you can copy email action as many times you like. Just click on the gear icon, and select the icon for copy. This will duplicate he Email action.
Now let’s configure your email notification. We’ll guide you through each important field, explaining what they do and why they matter. This way, you’ll have a clear understanding of how to make your notifications work just the way you want.

Action Name
By default, the name of the action is Email but you can rename this action to whatever you like. If you are sending email to the form submitter, you can use Email Notification name. If you are sending a confirmation email to yourself or someone in the company, you can rename it to Email confirmation.
To Field
If you want to receive an email confirmation of the submitted from, you can manually type the email address you want this email confirmation go to. Using a comma separator, you can also add additional email addresses if you don’t want to create duplicated email actions. Try to avoid using the {wp:admin_email} as it is common spam filters can inappropriately cause you not to receive the email.
If you are sending an email notification to the form submitter, use the merge tag icon to pull the the Email Field from the form. The Email Field has to exist on the form, otherwise, you won’t be able to send the email to the form submitter.

Reply To Field
This field should have the email address where you want the form submitter to reply to on the received email notification. If you leave this field empty, the email address used for replying will be the default WordPress admin email. This means if the form submitter clicks reply from this email notification, it will be replying to the admin email.
However, it often happens that some emails are not being successfully sent to the admin’s email addresses, so we recommend using email address other than admin email to ensure better deliverability.
Subject
This is the subject line of the email. Your subject line should clearly state what is in the email. It should be short and descriptive. You should also limit the punctuation and offer personalization including the recipient’s name. It has been proven personalization inceases open rates for most users.
The good news is Ninja Forms lets you personalize your subject line using the merge tag button. For example if you have First Name field on your form, you can use merge tag button to pull the first name of the form submitter to the subject line.
Email Message
This is the holy grail of sending an email. Here, you can add the summary of submission data, add your copy, attach images, and even style your message. That’s precisely why we’ve dedicated a full section to customizing email message. There, we will show you some practical examples, so keep reading!
Attach CSV
When you toggle on this setting, you can attach a copy of form submission in the email message in the CSV format. If you prefer sending a copy of submissions in the PDF format, you can explore the features of the PDF Form Submissions add-on.
That’s it! We’ve just walk you through the settings to successfully set up an email notification. If you would like to explore more advanced email settings, you can check our documentation page. Now let’s take a look at how to customize an email notification message below.
2. Customize email message in WordPress with Summernote WYSIWYG editor
By default, your Email message contains the merge tag {fields_table}. Using this merge tag, your email notification will show only the submission data for the form fields that contain data.

If you would like your email message to show submission data for all the form fields, even those that don’t have the data submitted to them including the HTML field, you can use the merge tag {all_fields_table}.
But besides including your form submission data in the email, you can also customize email message with Summernote WYSIWYG editor for WordPress email.
This text editor is integrated into Ninja Forms to provide you with a diverse set of text editing options for every email you send. You can use multiple features to make the desired changes.

Another option you have is to paste custom HTML in the WYSIWYG editor. Click on the symbol < > and you can paste custom HTML and write your own CSS rules.

We want to ensure you are well-prepared to customize your email message. That’s why we’ve put together a quick video of the editor’ features to make sure you feel comfortable creating your very own personalized emails in WordPress.
3. Customize an email notification message (Examples)
Email notification message is your canvas for your creativity, offering you many possiblities for customization. Whether you want to set up an order receipt, a quote summary, or a simple thank you email with important links or documents, Ninja Forms, coupled with the editor, grants you the freedom to achieve just that.
While there are so many different ways to customize email message, we will create two examples of email notification message. In the first one, we will customize email message to create an order receipt. In the second one, we will customize email to show you how to allow gated content with Ninja Forms.
Create an order receipt in WordPress
If you are building a quote form or payment form and want to send an email notification with summary to the form submitter, creating an order receipt is a great way to follow up with them. You can choose to customize the email message and include only the fields you consider to be necessary.
For example, if the customer made an order on your WordPress website, using the merge tag icon, you can pull the specific information into the email message. If you have a calculation on your form, you can even display the order total in your email as calculations is a free supported feature from Ninja Forms. You can also add additional text, and include the important links such as frequently asked questions or links to information about refund policy, etc.

Offer gated content in your email
Did you know you can allow gated content using Ninja Forms? In our video below, we demonstrate how you can customize your email message for a user who subscribed for a newsletter in exchange for an ebook.

Want to learn more about gated content? Check our article Allow Gated Content in Your WordPress Form. There, you’ll learn how to offer a lead magnet to your visitors once they fill out the form. We’ll also show you how to offer different gated content to different users based on their selection on the form.
4. Ninja Forms not sending email? Here is an easy fix!
In default WordPress, Ninja Forms does not send emails itself, but rather it passes email action data to your host. Your host or SMTP plugin is ultimately responsible for sending that data out in the form of an email if you set up your email notification correctly.
You can use a plugin such as WP Mail Logging to see what data is being sent out through wp_mail. If the email shows up in the WP Mail Logging plugin’s log then Ninja Forms has successfully handed off the email to the wp_mail function and has no more control over its deliverability and it is recommended reaching out to your host.
As an alternative to working with your host, you may consider using a specialized transactional email solution to take over the responsibility of sending email from your host. We have developed a service SendWP that helps you gett WordPress email delivered into the inbox maintaining a 99.5% deliverability rate.
However, if you would like to dig deeper to traoubleshoot your WordPress email, we offer multiple resources that may also be of use to you: Troubleshooting Ninja Forms Email, The Definitive Guide to WordPress Email, Email troubleshooting documentation.
Boost user engagement with an Email Notification message!
Email notification is probably one of the most important form actions you can set up on your WordPress form. Can you imagine filling out and online form and get no follow-up email? Probably, not. No one would like to be left in the dark.
Setting up your email notification and customizing email notification message holds the key to cultivating a stronger bond with your website visitors. This process takes your shared connection to a whole new level in nurturing customer connections, and driving engagement.
If you’re eager to elevate your connections further, think about incorporating conditional logic into your email actions. This involves sending emails based on specific conditions or personalizing success messages according to users’ form choices. This approach can lead you on a path to more meaningful engagement and exceptional customization!


