Automate Your Marketing
Looking for powerful, intelligent marketing automation that's not a hassle to use? You're looking for ActiveCampaign! Connect your WordPress forms and add contacts to any list.
Risk-Free 14 Day Guarantee
You'll love it or we'll refund you fully. No questions asked.
If you already use ActiveCampaign to manage your contacts and automations, the Ninja Forms ActiveCampaign add-on connects your WordPress forms directly to your ActiveCampaign account. Every form submission adds a contact to the list you choose, applies the tags you set, and pushes field data into the right contact fields automatically.
This is not the same as ActiveCampaign’s own WordPress plugin. ActiveCampaign’s native plugin embeds AC-hosted forms on your site. The Ninja Forms integration does something different: it lets you build fully custom WordPress-native forms and send submission data into ActiveCampaign. Your form design, your fields, your layout, and your contact data lands exactly where you need it in AC.
With the Ninja Forms ActiveCampaign add-on, you can:
Key Features
Subscribe to a List
Add form submitters directly to the ActiveCampaign list you choose.
Map Any Field
Connect form fields to built-in and custom ActiveCampaign contact fields.
Assign Tags
Apply tags on submission to segment contacts and trigger automations.
Double Opt-In
Route new contacts through ActiveCampaign's opt-in confirmation flow.
Simple API Setup
Authenticate with just your API URL and API Key from AC developer settings.
Per-Form Accounts
Connect separate ActiveCampaign accounts on a per-form basis with Dev Mode.
Key Features of the ActiveCampaign Add-On
Subscribe contacts to an ActiveCampaign list on submission
Choose which ActiveCampaign list receives new contacts from each form. When someone submits the form, they are added to that list immediately. No manual imports, no CSV exports, no delay. Each form you build can target a different list, so a newsletter signup goes to one list and a product inquiry goes to another.

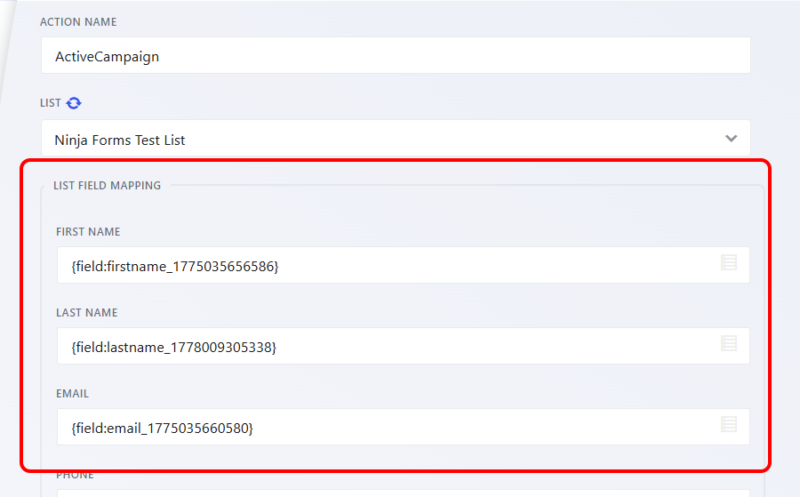
Field mapping to ActiveCampaign contact fields
Map any field in your Ninja Forms form to any contact field in ActiveCampaign. Built-in AC fields (First Name, Last Name, Email, Phone, Organization Name) are available by default. Any custom fields you have defined in your ActiveCampaign account also appear in the mapping interface. Click the merge tag icon next to each field to set the mapping, and that data flows into the right contact record on every submission.
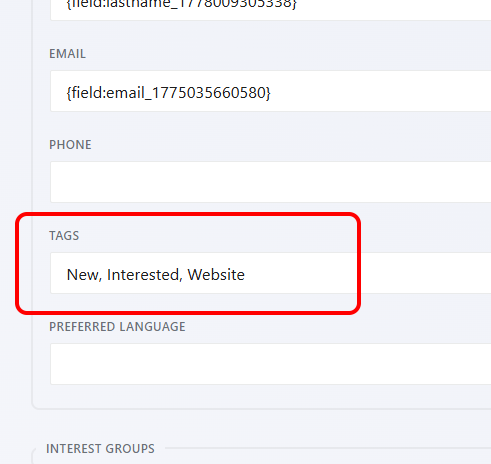
Tag assignment for contact segmentation
Apply one or more ActiveCampaign tags to every contact who submits a given form. Enter tags in a comma-separated list in the form’s action settings, and they are applied automatically at the moment of submission. Use tags to trigger automations in ActiveCampaign, segment your audience, or identify which form sourced each lead.
Double opt-in support
If your ActiveCampaign account uses double opt-in confirmation, the Ninja Forms integration supports it. New contacts submitted through the form are routed through ActiveCampaign’s opt-in confirmation flow rather than being added directly. This keeps your list compliant and your contact quality high without any extra configuration on the WordPress side.
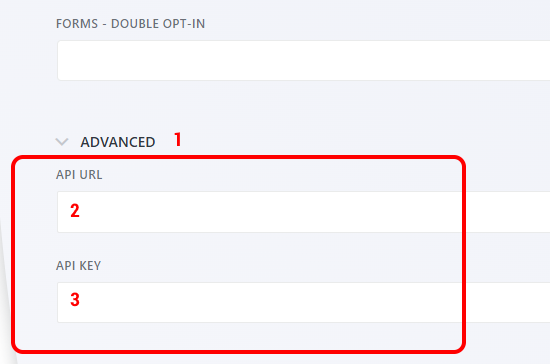
Per-form API credentials (Dev Mode)
Need to connect different forms to different ActiveCampaign accounts? Enable Dev Mode in Ninja Forms advanced settings and you can enter separate API credentials at the individual form level. One form can feed one client’s AC account while another form feeds a completely different account. This is built for agencies managing multiple clients and developers working across several ActiveCampaign environments.
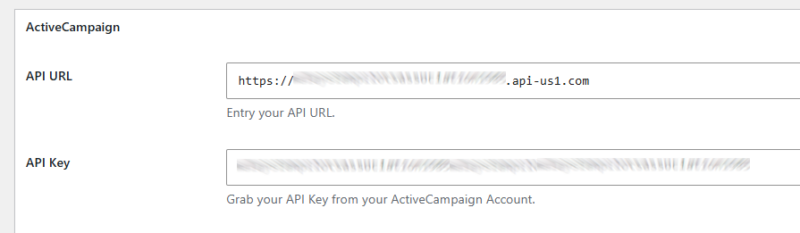
Simple API authentication
Connecting to ActiveCampaign takes two pieces of information: your API URL and your API Key. Both are available in your ActiveCampaign account under Settings, then Developer. Paste them into the ActiveCampaign section of your Ninja Forms settings, and the connection is live. No OAuth flows, no app registration, no webhooks to configure manually.
Form submissions that start automations
Add contacts to ActiveCampaign the moment a form fires, mapped to custom fields and tagged to trigger the right sequence, with no manual import. Add it to your cart and connect your forms to your automations.
Backed by priority email support and a 14-day money-back guarantee.
How the ActiveCampaign WordPress Integration Works
The setup follows a straightforward three-step flow. First, you authenticate by entering your API URL and API Key in Ninja Forms global settings. Second, you add an ActiveCampaign action to any form and select the list that should receive contacts. Third, you map your form fields to the corresponding ActiveCampaign contact fields and set any tags you want applied.
From that point forward, every form submission triggers the integration automatically. The contact is added to the list, tags are applied, and field data populates the right contact record in ActiveCampaign. If you have automations set up in ActiveCampaign to fire when a contact is added to a list or tagged, those run as normal.
Ninja Forms vs. ActiveCampaign’s Native WordPress Plugin
ActiveCampaign’s own WordPress plugin embeds AC-hosted forms directly on your site. Those forms are built and controlled inside ActiveCampaign. The Ninja Forms integration works the opposite way: you build the form entirely in WordPress using Ninja Forms, with your own fields, your own layout, and your own conditional logic. On submission, that data is pushed into ActiveCampaign.
The practical difference is control. With Ninja Forms, your form is a native WordPress element that matches your site’s design, uses your own field labels, and can include conditional fields, multi-step layouts, and file uploads. You are not constrained by what ActiveCampaign’s form builder offers. The integration handles the handoff to AC so your contacts, lists, and automations all stay current without any manual work.
Common Use Cases
- Grow an email list from your WordPress site: Place a Ninja Forms signup form anywhere on your site and have every submission add the contact to an ActiveCampaign list. Start with a pre-built newsletter signup template or build your own.
- Qualify and segment leads automatically: Map form fields like industry, role, or budget to custom ActiveCampaign contact fields and apply tags based on what the contact selects. Contacts land in AC fully segmented and ready for the right automation.
- Route contacts from multiple forms to separate lists: Run a contact form, a content download form, and an event registration form on the same site, each connected to a different ActiveCampaign list with different tags applied.
- Run compliant opt-in campaigns: Use double opt-in support to ensure new subscribers confirm before they are added, keeping your list healthy and your sending reputation strong.
- Manage multiple ActiveCampaign accounts from one WordPress install: With Dev Mode enabled, agencies and developers can connect different forms to different AC accounts without switching between separate WordPress installs.
- Collect detailed contact data beyond just an email address: Map phone numbers, company names, and any custom fields from your form directly into the matching ActiveCampaign contact fields so your team has everything they need the moment a contact is added.
Every sign-up starts the right sequence
Tag each contact at submission, route them to the right list, and let your welcome or nurture sequence take over, so the follow-up starts the moment the form is filled out. Add it to your cart and put your follow-up on autopilot.
Priority email support and a 14-day money-back guarantee included.
Frequently Asked Questions
-
Install the Ninja Forms ActiveCampaign add-on, then go to Ninja Forms Settings and enter your ActiveCampaign API URL and API Key. Both are available in your ActiveCampaign account under Settings, then Developer. Once connected, add an ActiveCampaign action to any form, choose a list, and map your fields.
-
Yes. The Ninja Forms ActiveCampaign add-on lets you build custom WordPress forms and send every submission into your ActiveCampaign account. Contacts are added to the list you choose, tags are applied, and field data maps to the correct contact fields automatically.
-
ActiveCampaign's native WordPress plugin embeds AC-hosted forms on your site. The Ninja Forms integration works differently: you build a fully custom WordPress-native form with your own fields and layout, and on submission that data is pushed into ActiveCampaign. You get complete control over the form while ActiveCampaign handles the contact management side.
-
Yes. Any custom contact fields you have defined in your ActiveCampaign account appear in the field mapping interface alongside the built-in fields (First Name, Last Name, Email, Phone, Organization Name). Click the merge tag icon next to each field to set the mapping.
-
Yes. If your ActiveCampaign account uses double opt-in confirmation, you can enable this in the form's action settings. New contacts submitted through the form are routed through ActiveCampaign's opt-in confirmation flow before they are added to your list.
-
Yes, using Dev Mode. Enable Dev Mode in Ninja Forms advanced settings and you can enter separate API credentials at the individual form level. This lets agencies and developers connect different forms to different ActiveCampaign accounts from a single WordPress install.
-
In the ActiveCampaign action settings for your form, enter the tags you want applied in a comma-separated list. Those tags are assigned to every contact added through that form automatically on submission, making it straightforward to trigger automations or segment your audience.
-
Licenses are subscription based and will auto-renew each year unless cancelled. If cancelled, you may still use your extensions but will no longer receive important updates or support once the license expires.