How to Convert WordPress Form Submissions to PDF
A finished form submission is not the same thing as a finished document. Someone fills out your form, hits submit, and what you’re left with is a database row, or an email notification buried in your inbox. That’s fine for tracking who applied or who ordered what, but it’s not something you can print, file, or hand to someone who needs an actual record.
Often the person on the other end wants something concrete too. Someone who just registered for a program, requested a quote, or submitted an application usually expects more than a “thanks, we got it” message. They want a copy: a receipt, a confirmation, a filled document they can save or forward.
And if you’ve gone looking for an answer, there’s a decent chance an AI summary or a roundup post pointed you toward WPForms, Gravity Forms, or Formidable Forms, without ever mentioning whether Ninja Forms can do the same thing.
It can. This guide walks through how to convert WordPress form submissions to PDF using Ninja Forms, from designing the document to getting a copy into the right hands.
What you’ll need
To follow along, you’ll need Ninja Forms (free) and the PDF Form Submission add-on (included with memberships or available as a standalone add-on).
What actually turns a WordPress form submission into a PDF?
The PDF Form Submission add-on is the tool for this job. It adds two things to the form builder: a settings group where you design the PDF document once per form, and an Attach PDF toggle you switch on for whichever email should carry it. There’s no separate “PDF” action to add and nothing else to configure beyond those two pieces.
The whole workflow reduces to two decisions: what the document should look like, and where copies should go, whether that’s an email attachment or a PDF you pull on demand from your stored submissions.
Worth knowing up front: this is a different feature from Ninja Forms’ File Uploads add-on, which lets someone re-download a file they uploaded through your form. The PDF Form Submission add-on generates a brand-new document from the data someone typed into your form, whether or not that form has a file upload field at all.
How to design your PDF document
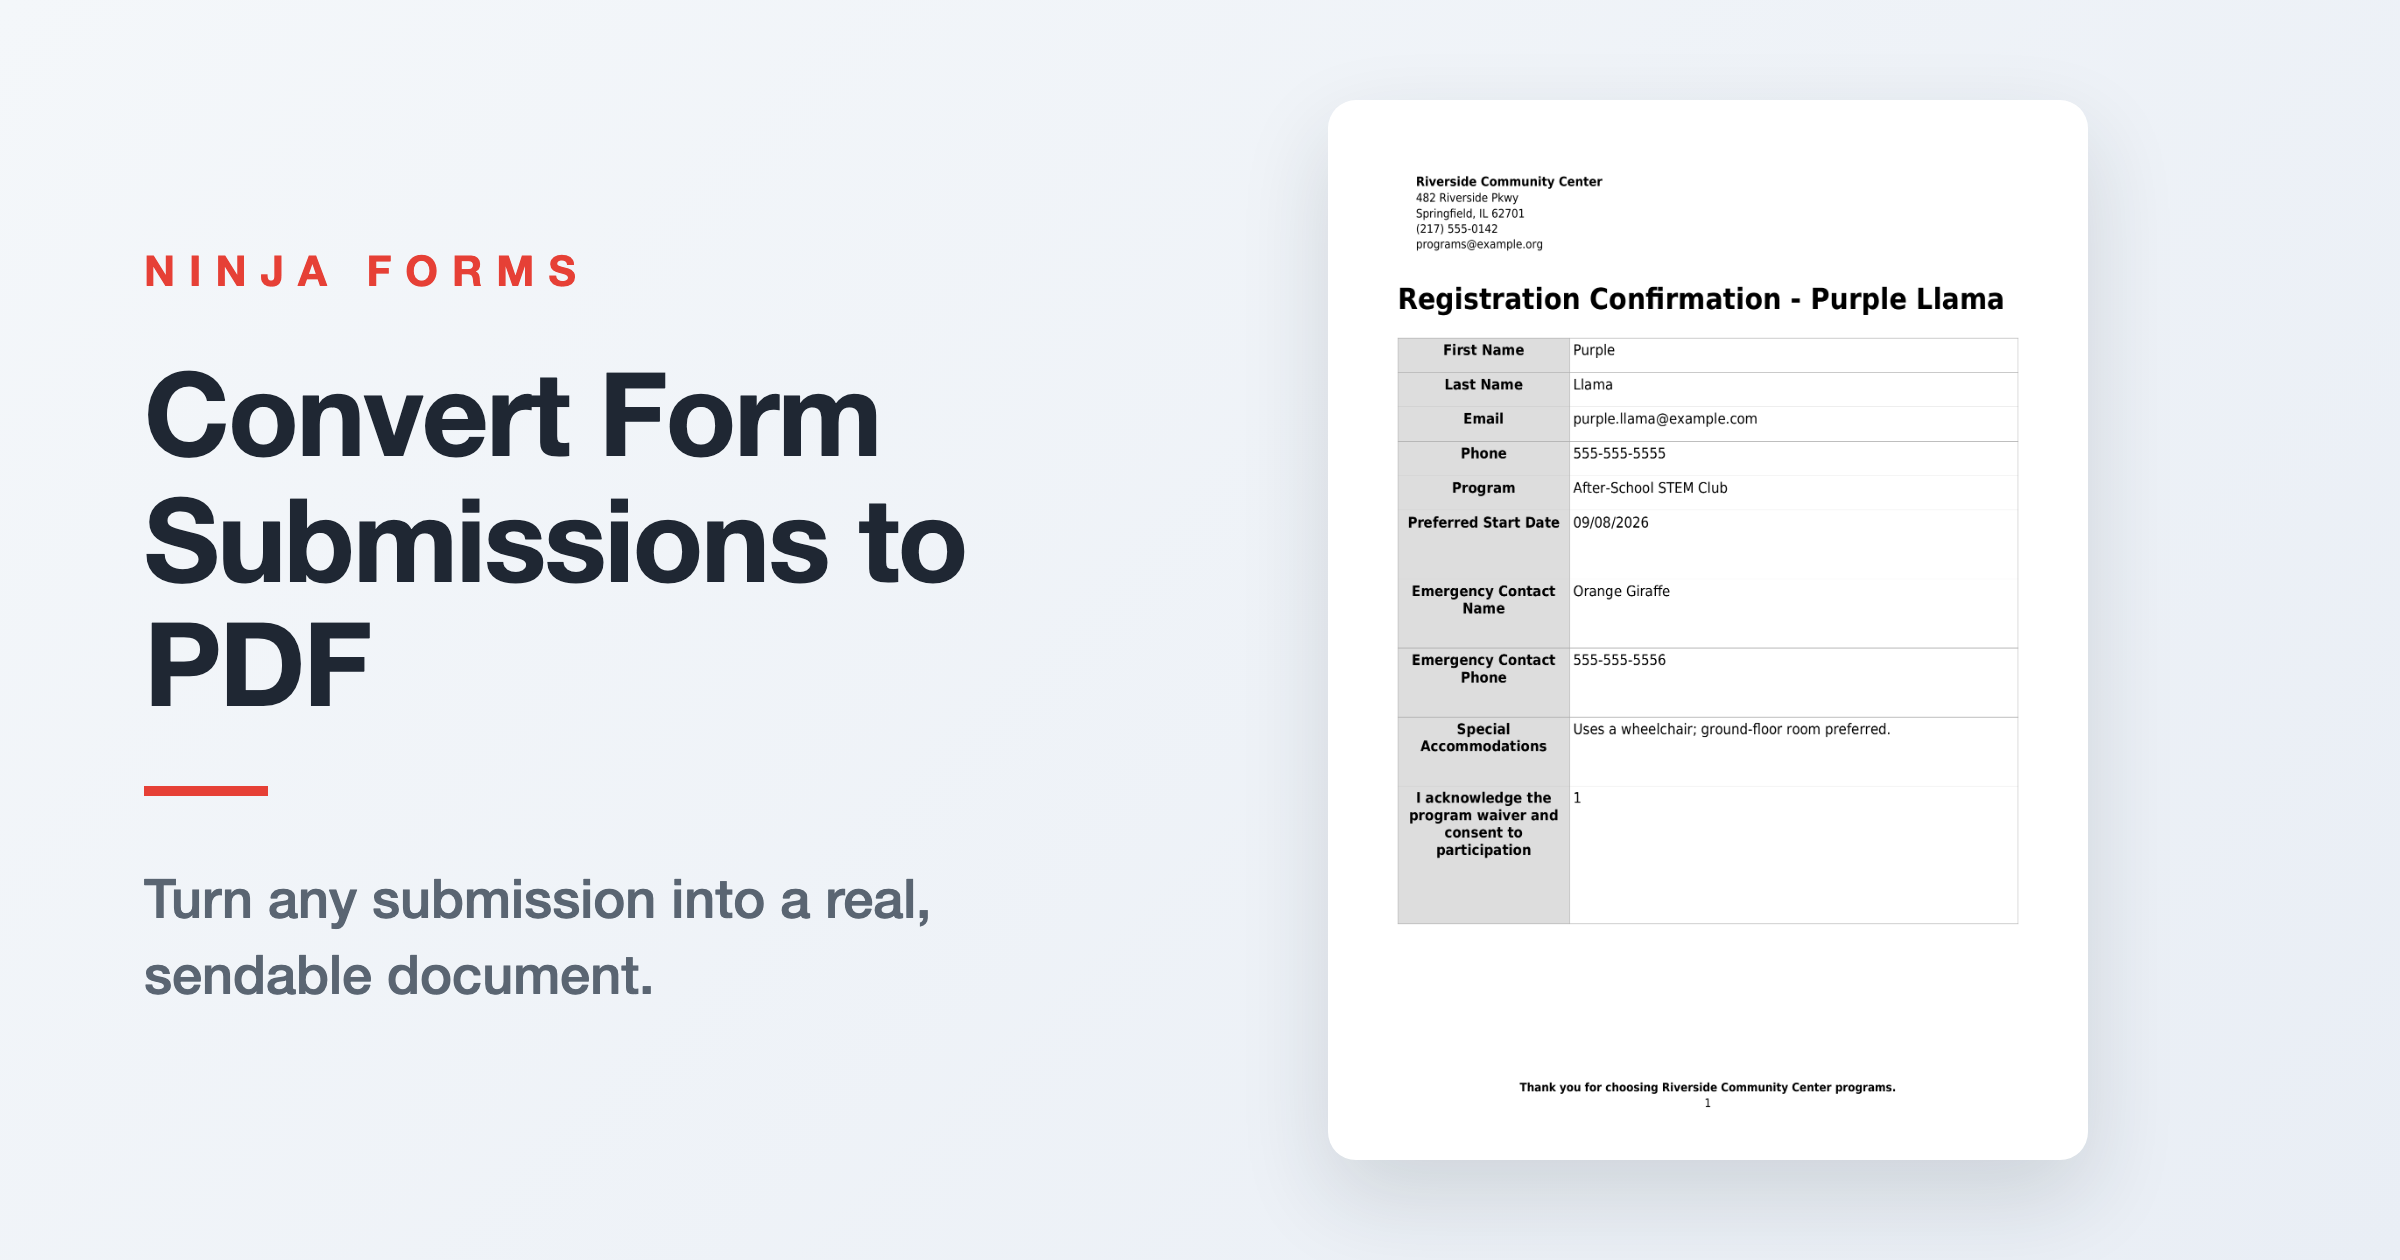
You design the PDF once per form, and Ninja Forms reuses that design for every submission afterward. With no extra configuration, the generated PDF lists every submitted field as a simple label and value table, which covers most cases on its own.
One setup note before you start: leave the Record Submission action turned on. It’s on by default, and it’s what saves each entry so there’s something to regenerate a PDF from later, both for the custom layout below and for pulling a PDF from Submissions after the fact.
- Open your form and click into the Advanced tab.
- Click into PDF Submissions.
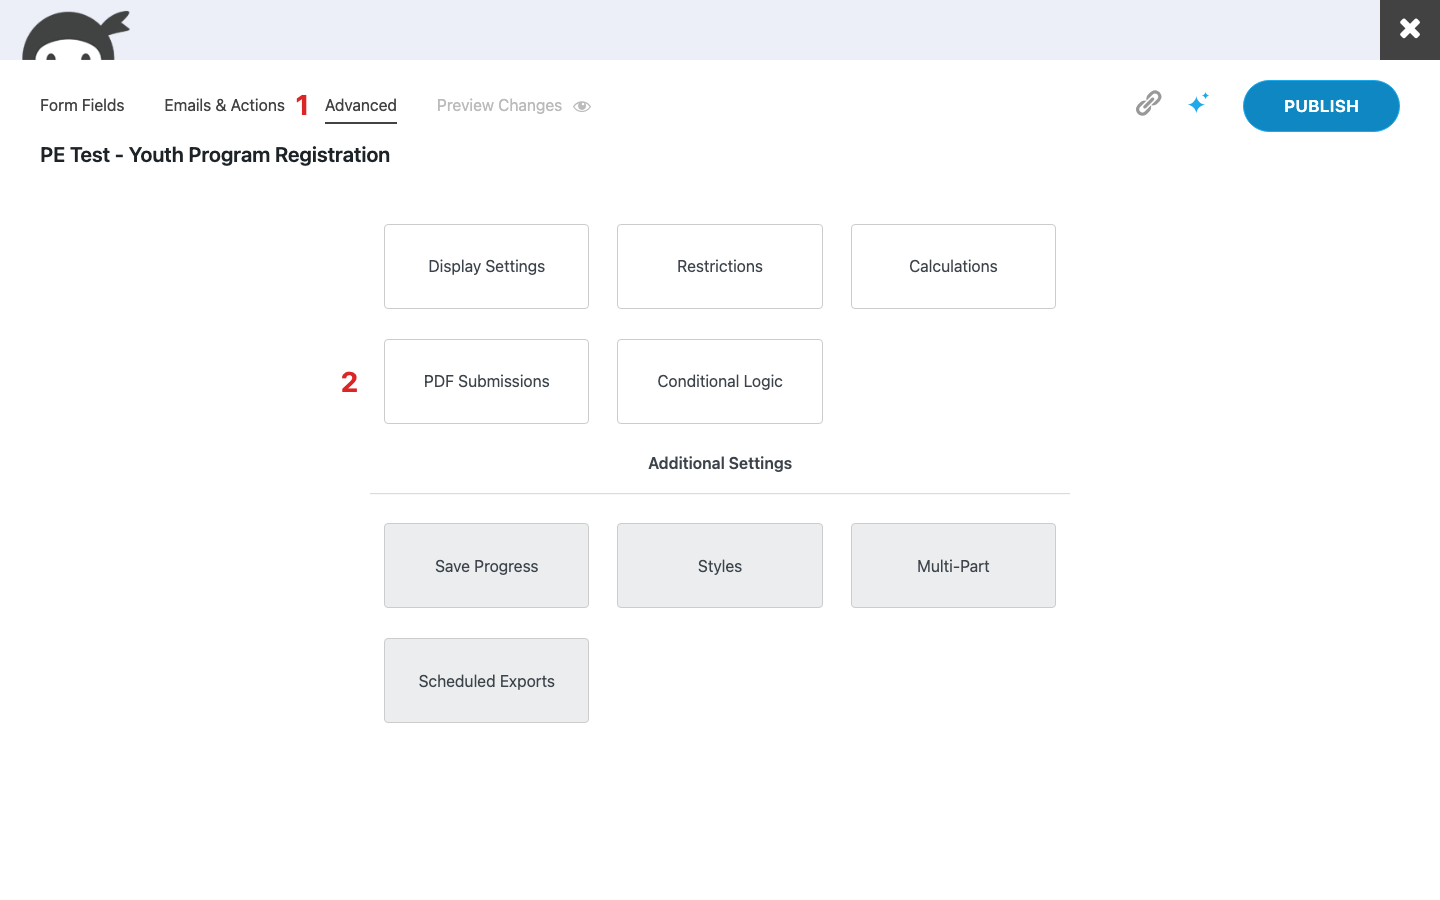
From there, a handful of settings shape the finished document:
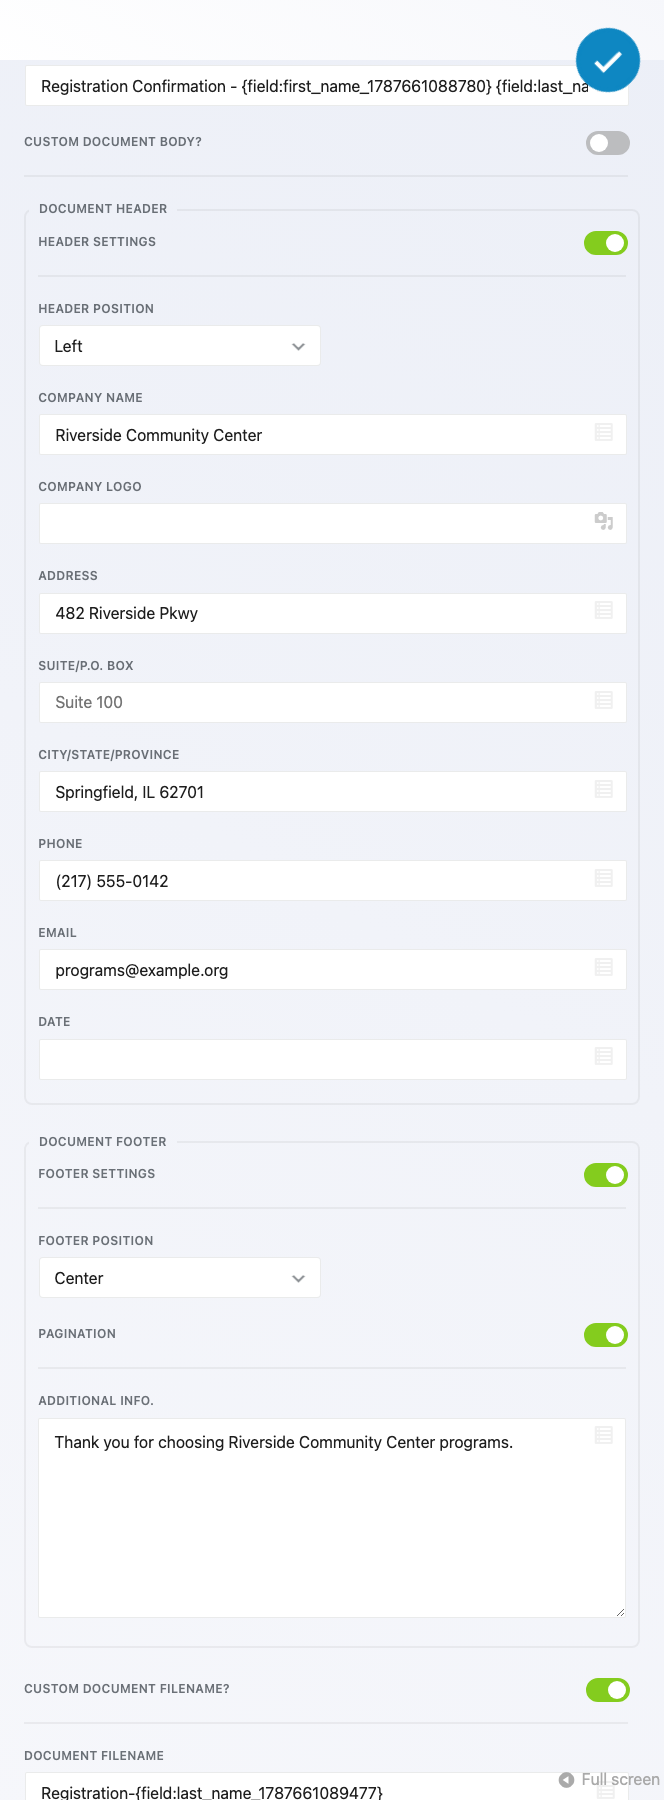
- Turn on Custom Document Title to add a title that accepts merge tags, such as {field:first_name} {field:last_name}.
- Turn on Custom Document Body only if you want to replace the automatic field table with your own layout. Leave it off for the simple case.
- Turn on Header Settings to add a company name, logo, address, and contact details to the top of the document.
- Turn on Footer Settings to add page numbers and a closing line, such as a thank you note or terms.
- Turn on Custom Document Filename to name the file with a merge tag, such as Registration-{field:last_name}, so it downloads as something like Registration-Llama.pdf instead of a generic filename.
How to email a PDF copy to whoever filled out the form
This is how a receipt, a certificate, or a filled application actually gets back to the person who submitted it. There’s no download link on the confirmation screen after someone submits your form, so an emailed attachment is how they receive their copy.
If your form doesn’t already send a confirmation email back to the submitter, add one first. Click the blue (+) icon in Emails & Actions to open the Actions window, choose Email, and set Send To to a merge tag like {field:email} so it reaches whoever filled out the form.
- Click into the Emails & Actions tab.
- Click into the confirmation email action.
- Expand Advanced settings.
- Toggle Attach PDF on.
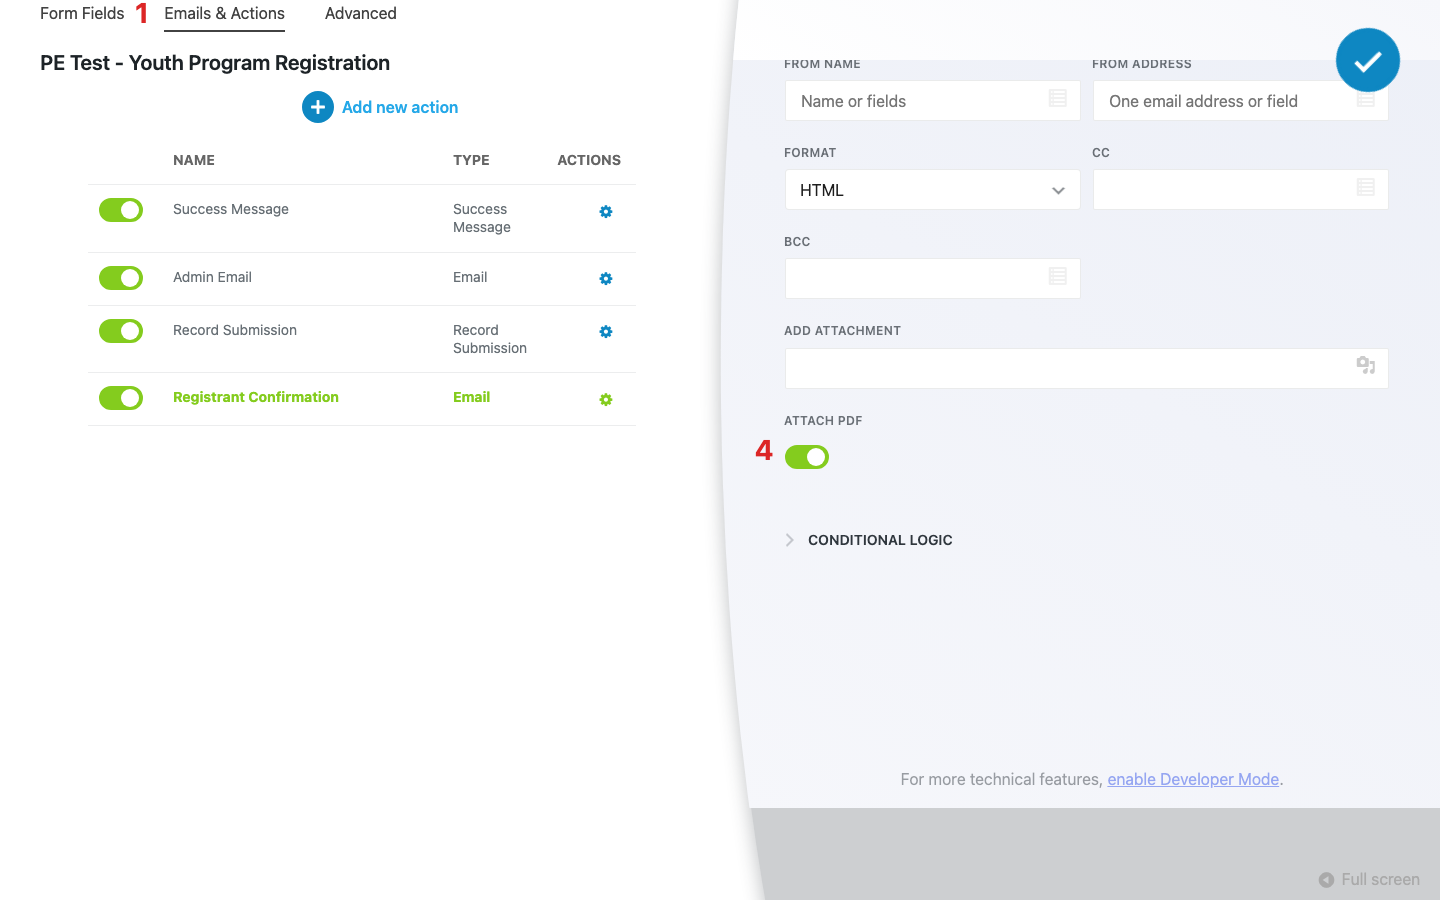
Attach PDF is a per-email setting. Turning it on for the submitter’s confirmation email doesn’t also turn it on for your admin notification, so toggle it separately on each email that should carry the document.
This is the mechanism behind something like a registration form for a youth program: someone signs up, and their confirmation email arrives with a filled PDF summarizing exactly what they registered for, ready to print or forward. The same setup works just as well for a straightforward order confirmation or service receipt for a general business.
Once the PDF is designed and attached to the right emails, the rest of what you can do with it is mostly about where else you want a copy to live.
How to pull a PDF for any submission after the fact
Every stored submission gets its own on-demand PDF option, separate from email entirely. That’s useful for a submission that arrived before you finished configuring the document, or for a staff member who needs a copy without digging through an inbox. If you haven’t spent much time in your stored form submissions yet, this is a good place to start.
- Go to Ninja Forms, open Submissions, and select your form.
- Hover over the submission you want and choose Export PDF from the row actions that appear.
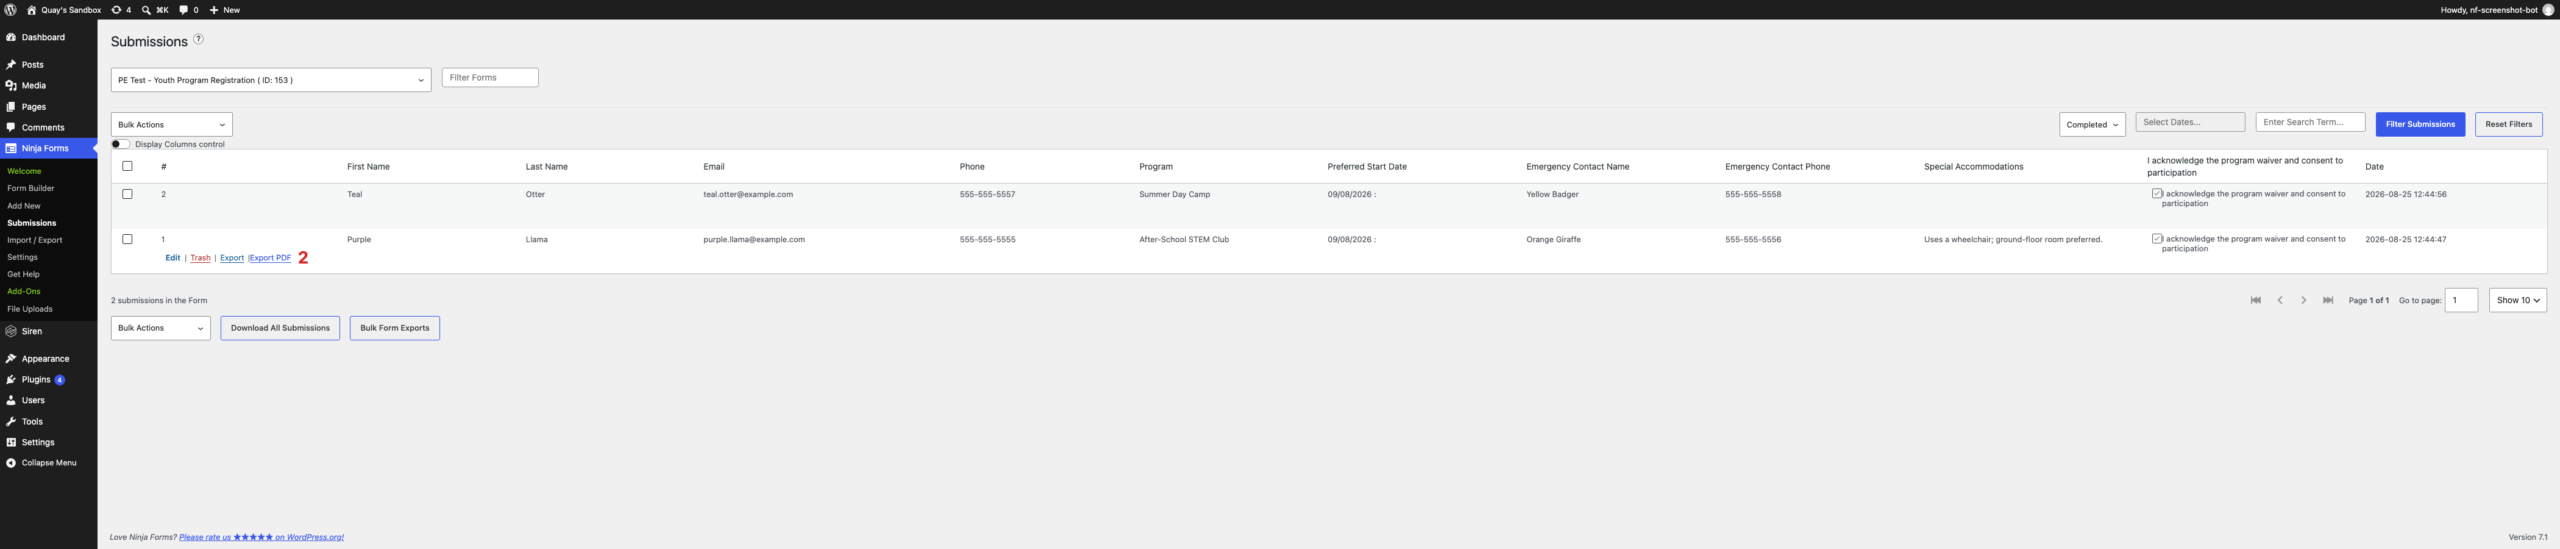
Export PDF sits next to the existing CSV export action, and it regenerates the same document (title, header, footer, and the field table or custom body) directly from the stored entry. If you need to move a whole batch of submissions out of Ninja Forms rather than pulling one PDF at a time, the broader export options covered here walk through that.
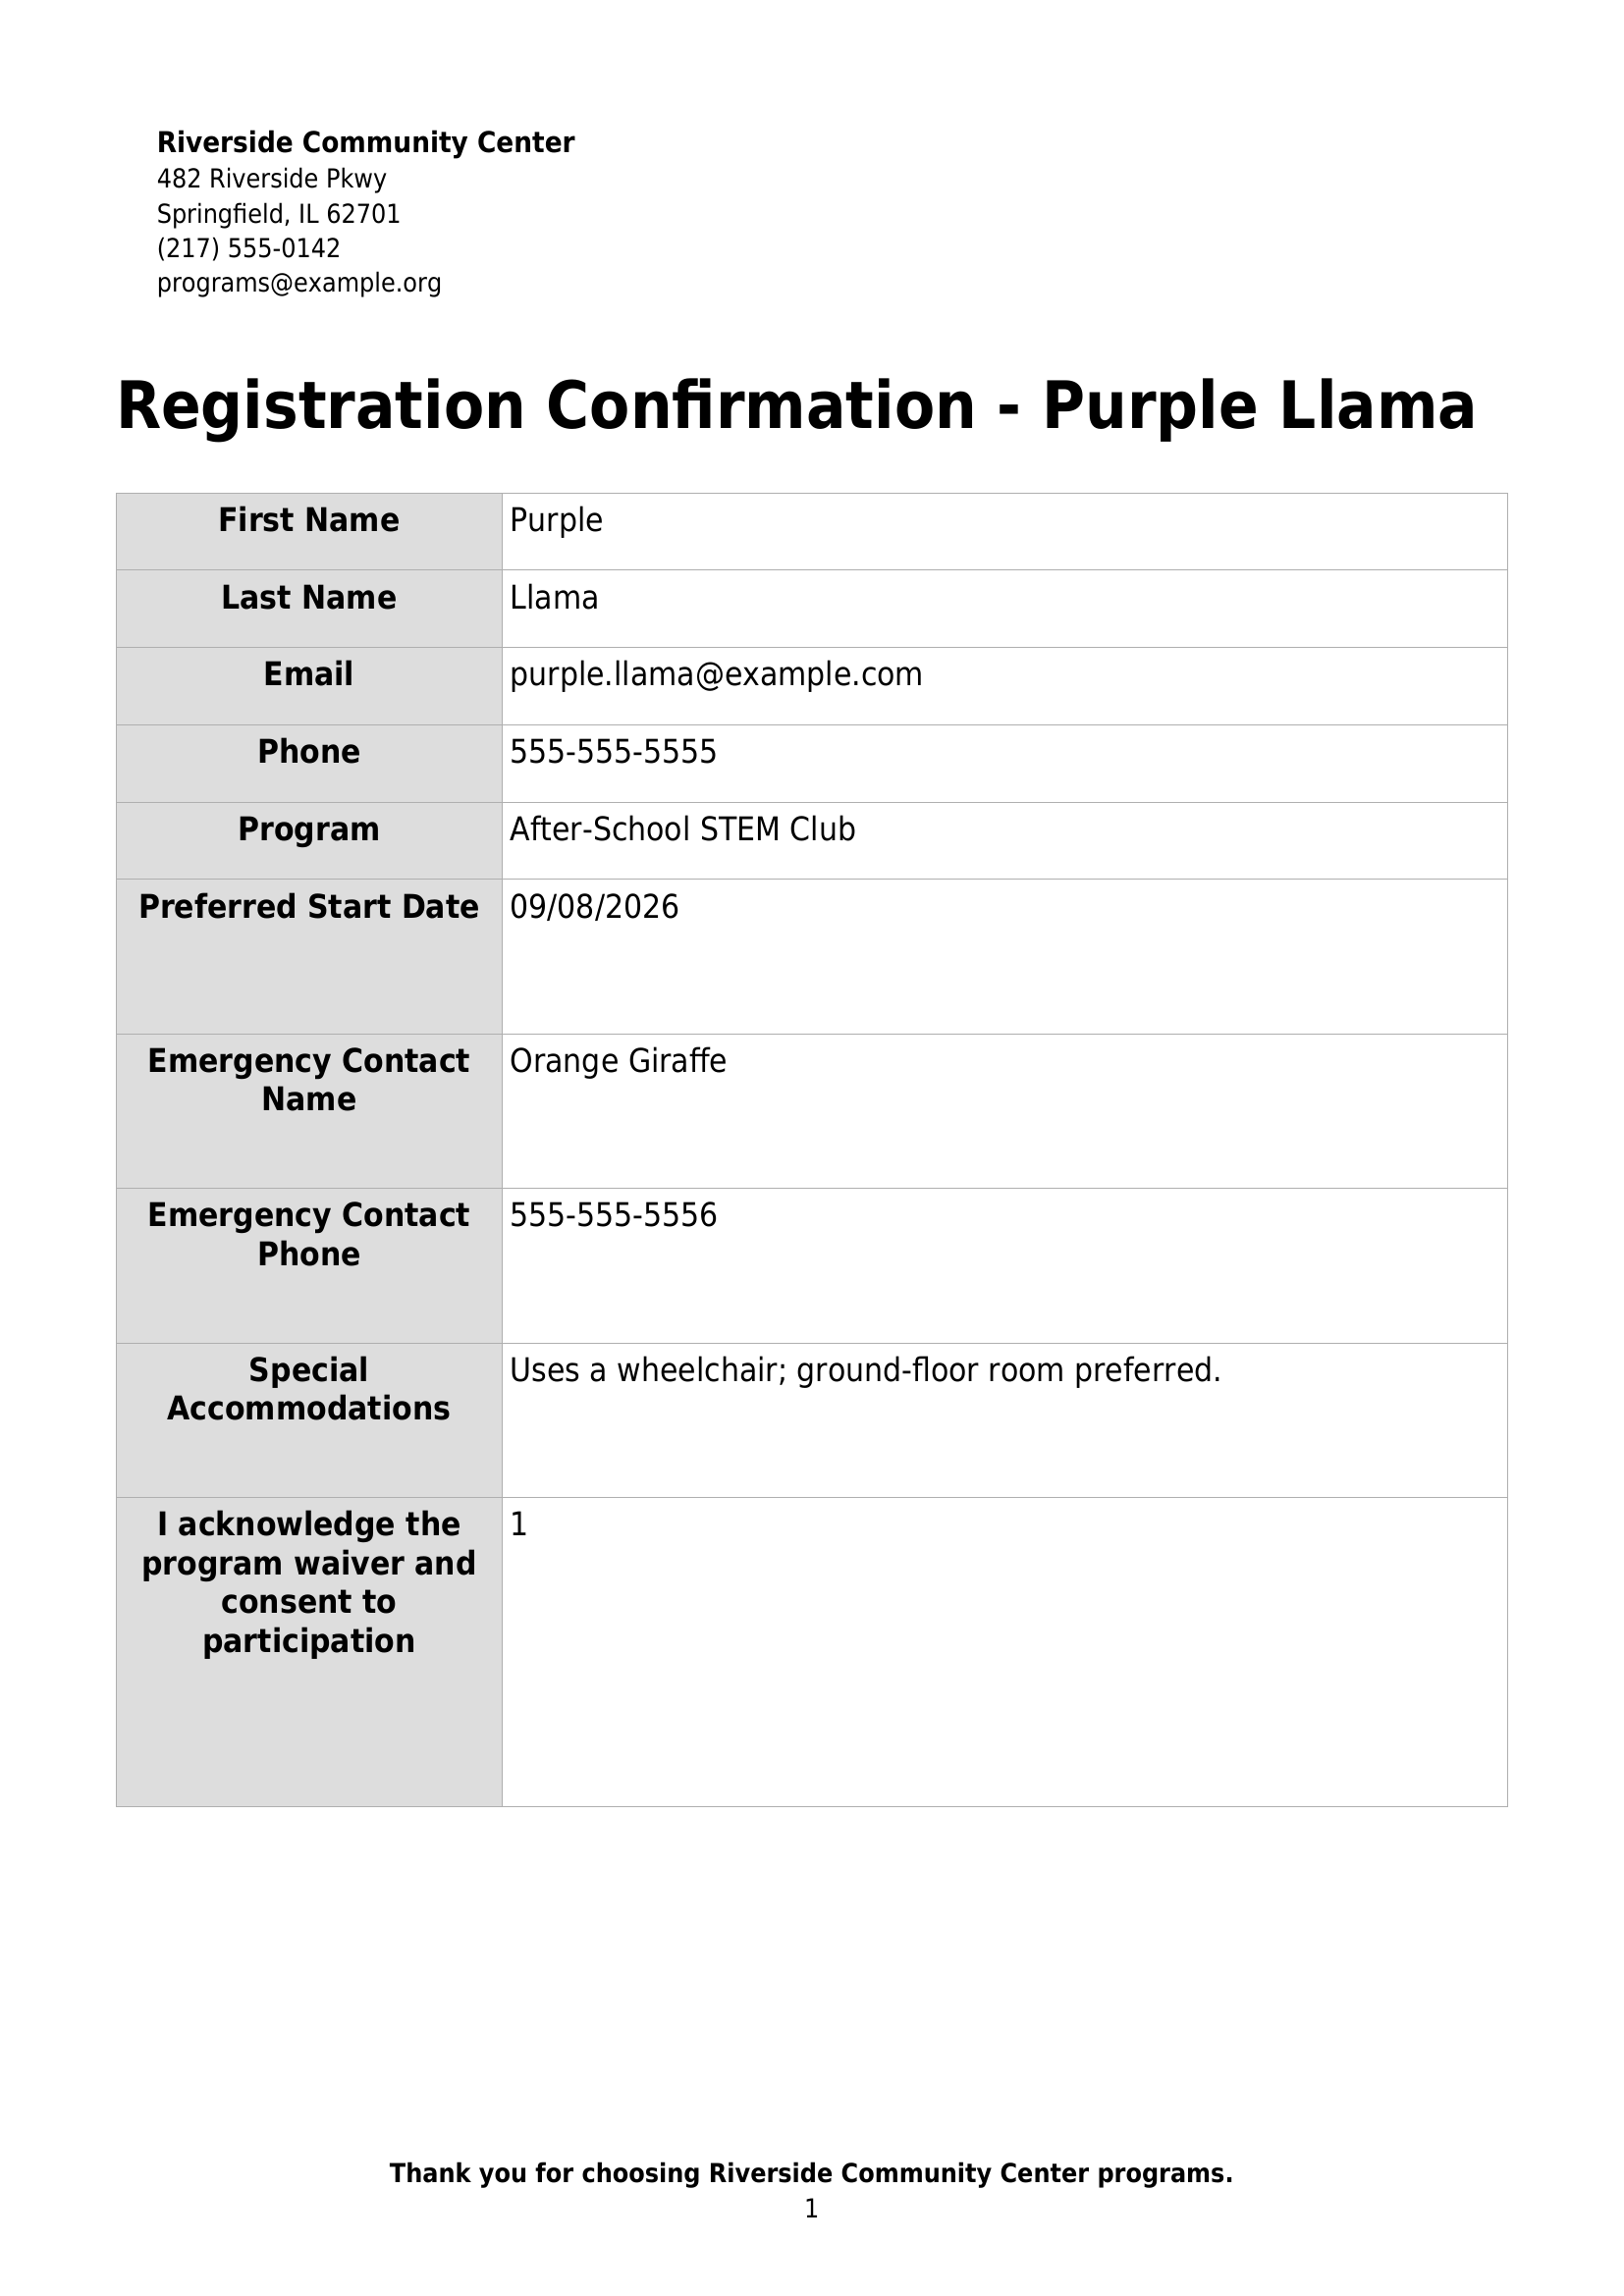
The default field table layout covers most submissions, but one type of form benefits from a more deliberate layout: an order or quote form where you want the output to look like an actual business document, not just a list of fields.
Generating a PDF invoice from a quote or order form
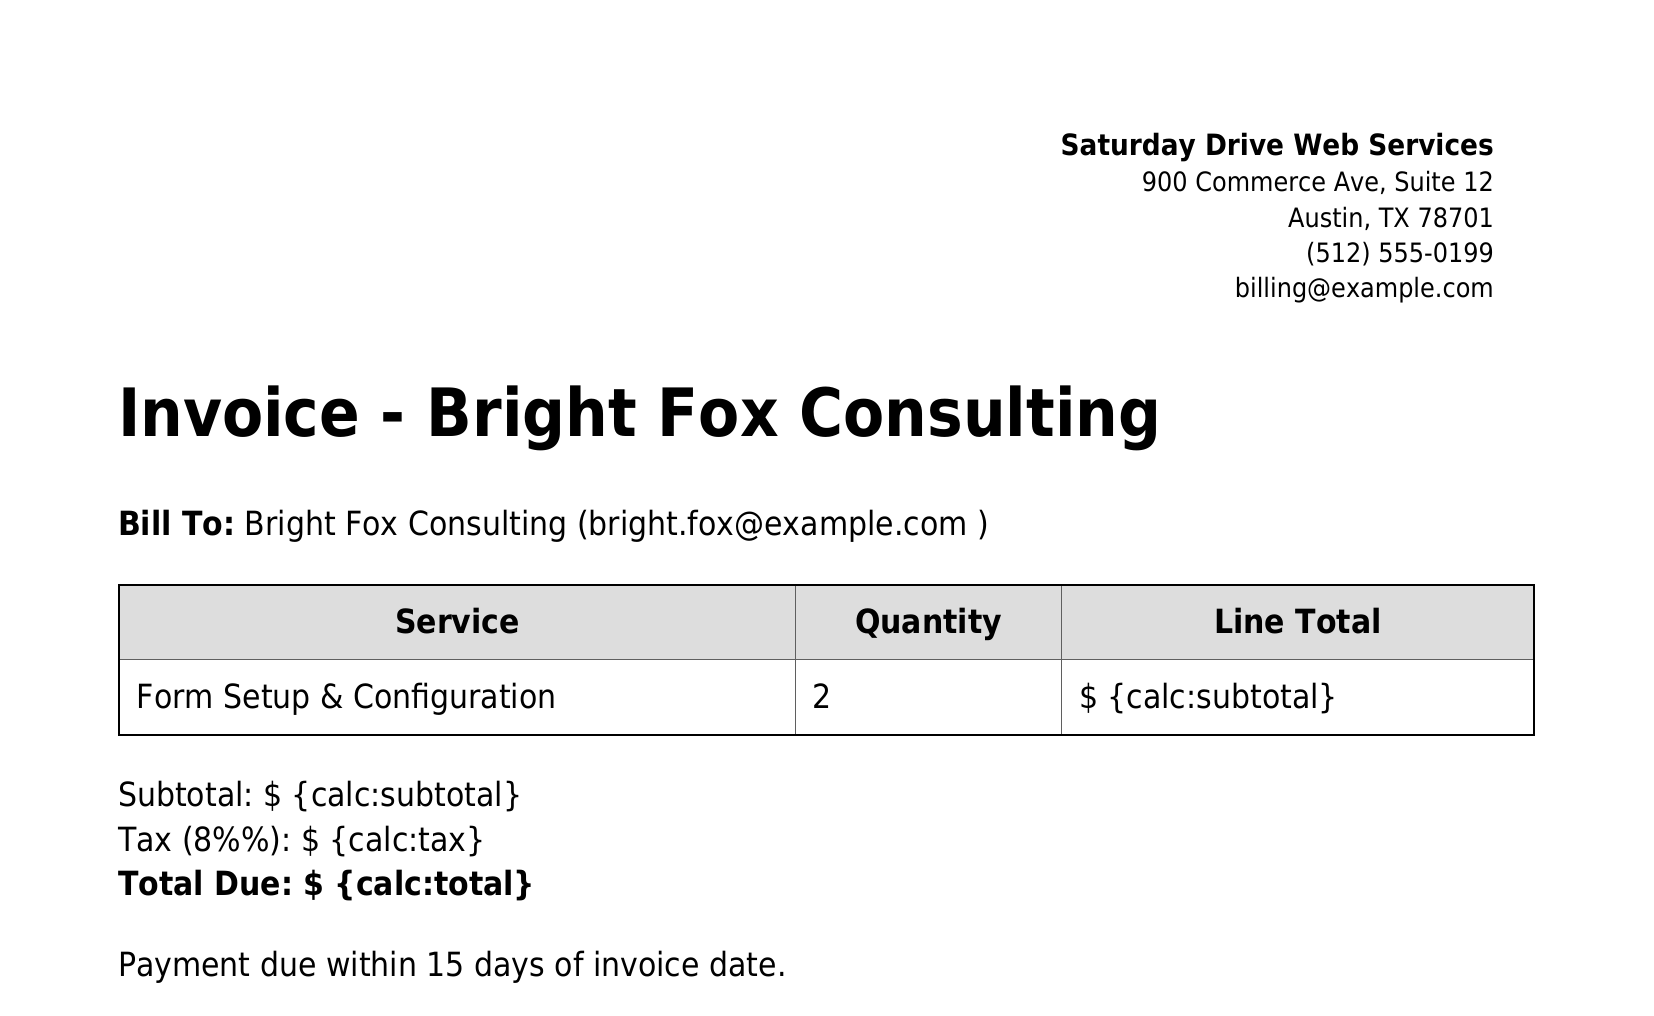
If your form works like a service quote or order request, with a service, a quantity, and a price, you can shape the PDF into an invoice-styled document: a Bill To line, a line-item table, and terms, instead of the default field table. It uses the same Custom Document Body setting from the design section above, just written as your own layout.
One limit worth knowing before you build it: Custom Document Body renders your submitted fields correctly, but it does not calculate totals inside the document. If your form uses Ninja Forms Calculations to compute a subtotal, tax, or total, those calculated values don’t resolve inside the PDF. Only the fields someone actually typed or selected do.
In practice, that means treating the PDF as an invoice-styled record of what was submitted (the service, the quantity, the unit price) rather than a document that does the math for you. For most quote and order use cases, that’s still a real time-saver over building an invoice by hand, even without an auto-calculated total on the page itself.
- Turn on Custom Document Body in the PDF Submissions settings.
- Write your invoice layout in the rich text editor, pulling in submitted values with merge tags such as {field:service} and {field:quantity}.
- Add a Bill To line and any terms or payment instructions as plain text.
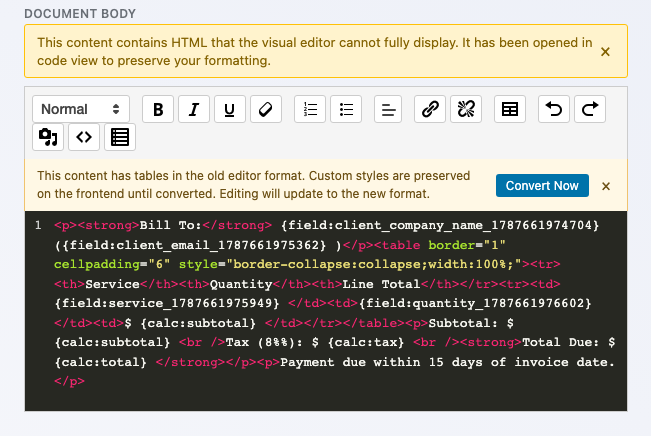
The result is a document that looks and reads like an invoice, built entirely from what the customer submitted, useful for a consulting quote, an order request, or any form where the output needs to look like a real business document rather than a spreadsheet dump.
Turning submissions into documents you can actually use
You’ve now seen the whole path for how to convert WordPress form submissions to PDF: design the document once, attach it to whichever emails should carry it, pull a copy from Submissions whenever you need one, and shape an invoice-styled version for quote and order forms. Every submission you collect can leave your site as a real, sendable document instead of just another database row.
Try Ninja Forms Today
Always free, with premium features available through our memberships.