Payments Built to Scale
Accept credit card payments from any of your WordPress forms. Pass customer information and invoices from any field securely into Elavon with each payment.
Risk-Free 14 Day Guarantee
You'll love it or we'll refund you fully. No questions asked.
If you use Elavon as your payment processor and need to collect payments through your WordPress site, the Ninja Forms Elavon add-on connects your forms directly to your Elavon merchant account. Payments process inline, inside the form itself, with no redirect to an external payment page.
With the Elavon add-on, you can:
Key Features
Inline Payments
Process credit card payments directly inside your WordPress form, no redirect required.
Flexible Pricing
Set a fixed amount, calculate totals from field selections, or use Calculation fields for dynamic pricing.
Field Mapping
Pass name, address, invoice numbers, and custom form data to Elavon alongside every payment.
Demo & Production Modes
Test safely in Demo mode before switching to Production. Credentials can differ between modes.
Any Device
Accept payments from desktop, tablet, and mobile via Elavon's payment infrastructure.
Direct Account Integration
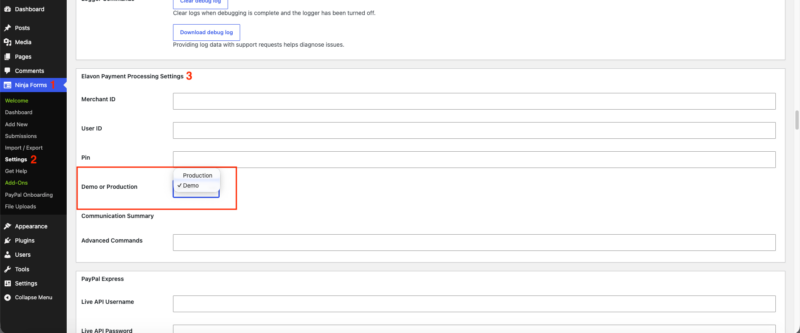
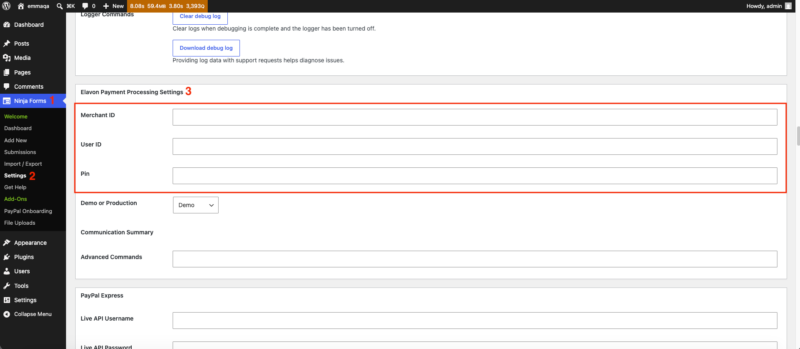
Connect your existing Elavon merchant account with your Merchant ID, User ID, and PIN.
Key Features of the Elavon Add-On for Ninja Forms
Inline credit card processing, no redirect
Customers enter their card details and submit payment without ever leaving your WordPress site. The Elavon add-on processes the transaction directly within the form, keeping the experience seamless and on-brand. There is no handoff to an external payment page, no interruption to the flow you have designed.

Flexible payment amounts
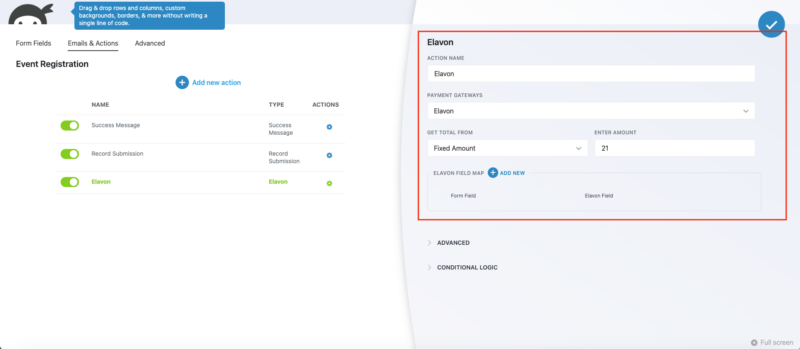
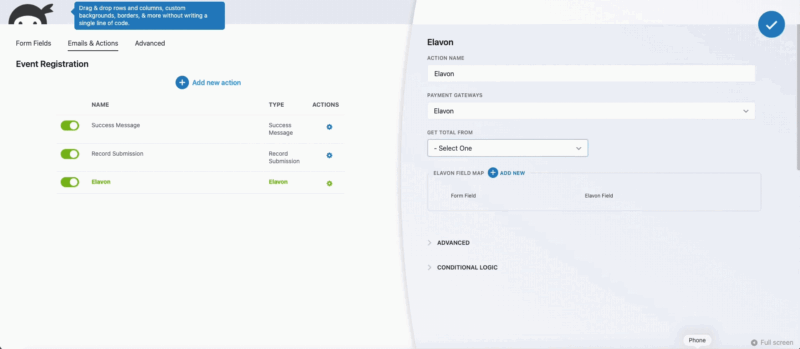
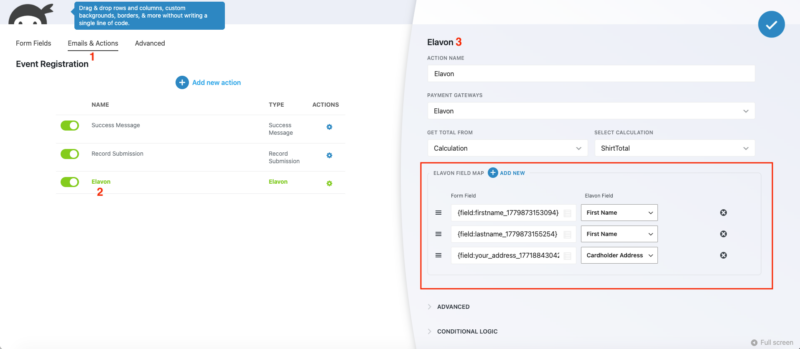
The add-on supports three ways to set the payment amount. Use a fixed price for single-rate registrations or service fees. Pull a total from form field values, such as checkbox selections, dropdown options, or quantity fields, so the charge updates as the user makes choices. Or connect a Ninja Forms Calculation field to handle more complex pricing logic, such as tiered pricing or bundled service rates. All three methods work within the same Collect Payment action.
Customer data field mapping
Pass form data to Elavon alongside the payment. The Elavon Field Map section lets you map any form field to a corresponding Elavon field. You can send name, billing address, invoice numbers, or any custom field value your Elavon account requires. Some accounts require specific fields such as invoice numbers for reconciliation; the field map covers those cases without any custom development.
Demo and production mode toggle
Before going live, switch to Demo mode to run test transactions against your Elavon account without processing real charges. When you are ready to go live, switch to Production mode. Note that your Elavon credentials may differ between modes, so verify that your saved Merchant ID, User ID, and PIN match the mode you are currently using.
Mobile and tablet payment support
Elavon’s payment infrastructure handles transactions from any device. Forms built with the Elavon add-on accept payments from desktop browsers, tablets, and mobile phones without any additional configuration. Your customers can submit a payment from wherever they are.
Direct Elavon account integration
The add-on connects directly to your existing Elavon merchant account using the Merchant ID, User ID, and PIN from your Elavon account credentials. There is no third-party intermediary. If you already process payments through Elavon, you are not starting over with a new processor. You are adding a WordPress form layer on top of the account you already have.
Connect your Elavon account to any form
Take credit card payments through your forms with the Elavon account you already have, with no switching processors and no offsite redirect. Add it to your cart and connect the account you already use.
Backed by priority email support and a 14-day money-back guarantee.
Setup Requirements
A few things to have in place before building your first Elavon payment form:
- An active Elavon merchant account: The add-on connects to an existing account. You will need your Merchant ID, User ID, and PIN from Elavon. Contact your Elavon representative if you do not have these.
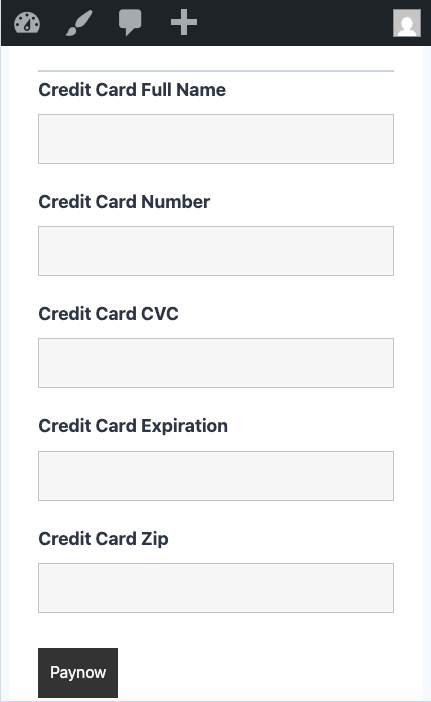
- Separate First Name and Last Name fields: Elavon’s API does not accept a combined “Full Name” field. Your form must use individual First Name and Last Name fields for the payment to process correctly. This is the most common setup mistake; plan your form fields accordingly before you build.
- A Credit Card field on your form: Add the Credit Card field type in the Ninja Forms builder. This generates all card entry fields automatically.
- Test in Demo mode first: Confirm your credentials and field mapping work correctly in Demo mode before switching to Production.
Elavon Payment Gateway for WordPress: Common Use Cases
- Service business invoicing: Collect payment for consulting, creative work, or professional services directly from a form submission. Map invoice numbers from your form to Elavon for clean reconciliation.
- Event registrations with variable pricing: Charge different amounts based on ticket type, session selection, or add-ons. Use Field Total to calculate the charge from the user’s selections automatically.
- Membership and subscription signups: Accept a fixed payment at the point of registration and capture the customer data your Elavon account needs alongside it.
- Retail and product orders without WooCommerce: Sell products or services through a Ninja Forms order form, with pricing logic handled by Calculation fields or checkbox-driven Field Totals. Start with a pre-built order form template or build your own.
- Nonprofit donations: Accept variable donation amounts by letting the user enter a number field that drives the payment total, or offer preset giving levels as selectable options.
- Internal payment collection: Process payments for internal use cases such as employee purchases, facility rentals, or departmental chargebacks through a straightforward form tied to your Elavon account.
Already on Elavon? Keep it.
If your business already runs on Elavon, you do not need a new processor to accept payments through WordPress: this connects the account you have to the forms you build. Add it to your cart and start taking payments on your forms.
Priority email support and a 14-day money-back guarantee included.
Frequently Asked Questions
-
Install the Ninja Forms Elavon add-on, enter your Elavon Merchant ID, User ID, and PIN in the settings, and add a Credit Card field and Collect Payment action to your form. Payments process inline on your site with no redirect to an external page.
-
Yes. The Elavon add-on connects Ninja Forms directly to your Elavon merchant account. You build the form in WordPress, configure the payment amount and field mapping, and Elavon handles the transaction processing through your existing account.
-
Yes. The add-on connects to an existing Elavon merchant account using credentials Elavon provides: your Merchant ID, User ID, and PIN. If you do not yet have an Elavon account, contact Elavon directly to set one up before installing the add-on.
-
Yes. Switch to Demo mode in the Elavon settings to run test transactions without processing real charges. When you are ready to go live, switch to Production mode. Note that your Demo and Production credentials may differ, so verify your saved settings match the current mode.
-
The most common cause is using a combined "Full Name" field instead of separate First Name and Last Name fields. Elavon's API requires them to be separate. Check that your form uses individual First Name and Last Name fields, and verify your credentials match the mode (Demo or Production) you have selected.
-
Three options: a fixed amount for consistent charges, a field total that calculates the charge from checkbox, dropdown, or quantity field values, and a calculated amount that reads from a Ninja Forms Calculation field. All three are configured within the Collect Payment action.
-
Yes. The Elavon Field Map section lets you map any form field to a corresponding Elavon field. You can send name, billing address, invoice numbers, or any custom data your Elavon account requires for reconciliation or reporting.
-
Licenses are subscription based and will auto-renew each year unless cancelled. If cancelled, you may still use your extensions but will no longer receive important updates or support once the license expires.