Connect Forms to Salesforce
Turn every form submission into a Salesforce record. Map fields to leads, contacts, opportunities, or any custom object, no code required.
Risk-Free 14 Day Guarantee
You'll love it or we'll refund you fully. No questions asked.
Getting WordPress form data into Salesforce shouldn’t require a developer, a middleware tool, or a manual export routine. The Ninja Forms Salesforce CRM add-on connects your forms directly to your Salesforce account so every submission lands where it belongs, automatically.
With the Salesforce CRM add-on, you can:
Key Features
Map Any Salesforce Object
Send form data to Leads, Contacts, Opportunities, Accounts, or any custom Object in your Salesforce account.
Visual Field Mapping
Click to match form fields to Salesforce fields inside the Ninja Forms builder. No code, no configuration files.
OAuth 2.0 Authorization
Connect securely via OAuth without storing your Salesforce username or password in WordPress.
Duplicate Detection
Check for existing records before creating new ones. Flags duplicates and creates a Salesforce task for review.
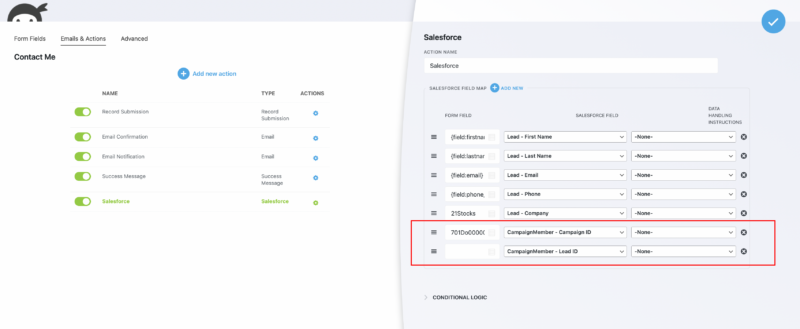
Campaign Linking
Associate submissions with a Salesforce Campaign for clean marketing attribution from the first touchpoint.
File Upload Support
Automatically send file upload links from Ninja Forms submissions straight to Salesforce.
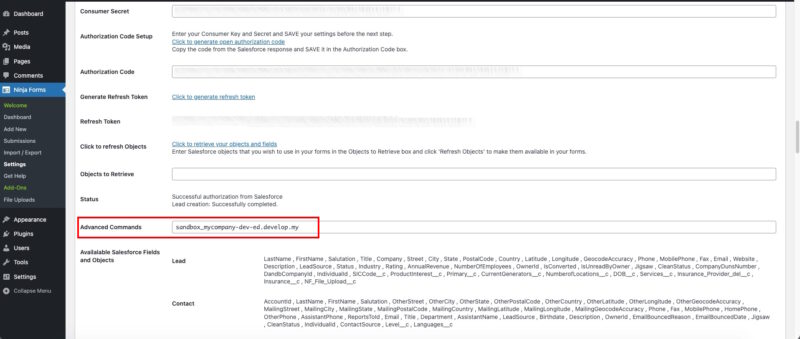
Sandbox & Test Support
Connect to a Salesforce sandbox environment to test your integration before it goes live.
And Much More…
Fixed value mapping, date formatting, programmatic field names, and advanced diagnostics for troubleshooting.
Key Features of Salesforce CRM
Map form fields to Salesforce Objects and fields
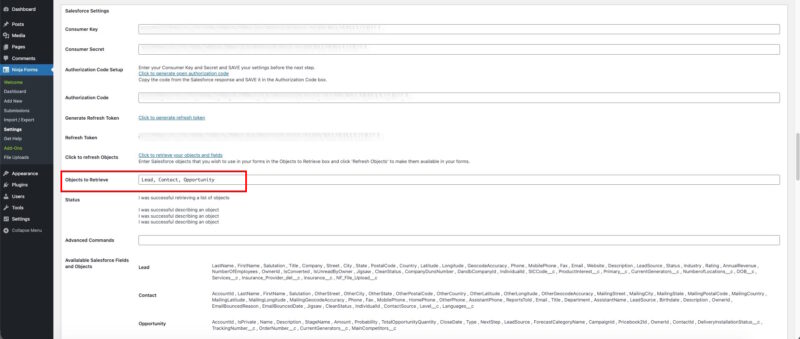
Your Salesforce account organizes data into Objects: Leads, Contacts, Opportunities, Accounts, and any custom Objects your organization has built. The Salesforce CRM add-on lets you select exactly which Objects and Fields to pull into Ninja Forms, then map your form fields to them one by one. You’re not locked into a generic lead form. If your workflow routes new inquiries to Opportunities instead of Leads, or if you maintain a custom Object for a specific department, you can map to it directly.
Only pull in the Objects you actually use. As your needs change, adding more is a matter of a few clicks in your settings, not a new development cycle.
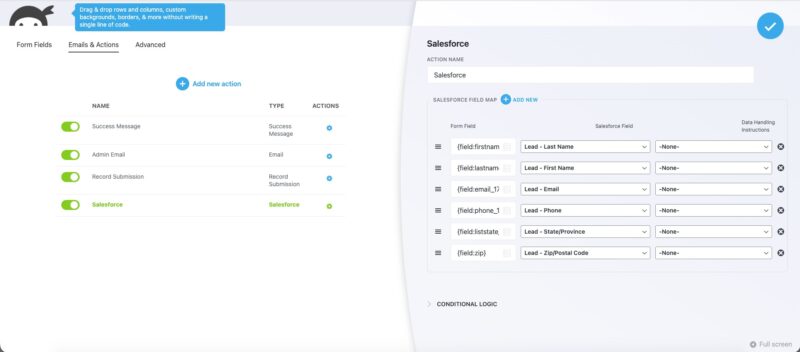
Visual field mapping inside the form builder
Once your Objects and Fields are loaded, mapping happens inside the Ninja Forms builder. Add the “Add to Salesforce” action to your form, open the field map, and click to match each form field to its Salesforce counterpart. The interface shows your form fields on one side and your Salesforce fields on the other. No code, no configuration files, no developer on standby.
You can also send fixed values alongside submitted data. For example, you might always want to stamp new Leads with a “Lead Source” of “Web Form” regardless of what the user fills in. Set that directly in the field map without touching your form or your Salesforce account settings.
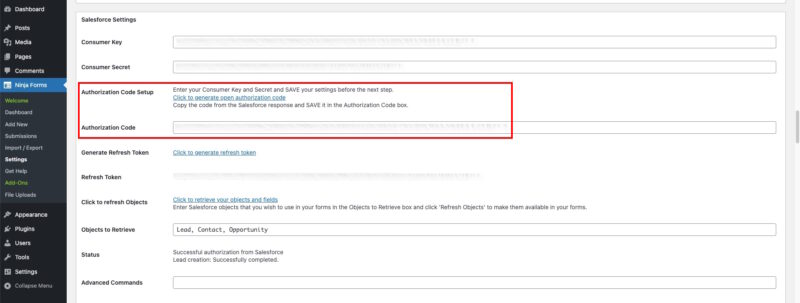
No-code setup with OAuth authorization
Connecting to Salesforce uses OAuth 2.0 via an External Client App you create in your Salesforce account. This means your Salesforce username and password are never stored in WordPress. You generate a Consumer Key and Consumer Secret in Salesforce, enter them in Ninja Forms settings, then authorize the connection with a single click. From there, Ninja Forms holds a refresh token and handles authentication automatically on every form submission.
The entire process from creating the External Client App to publishing your first mapped form can be completed without writing a single line of code. Step-by-step documentation covers each stage.
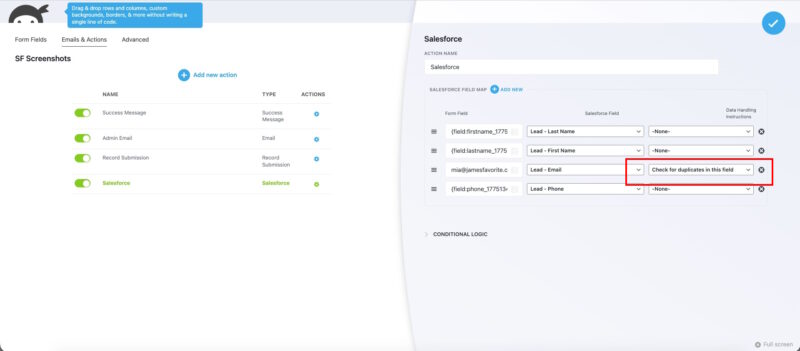
Duplicate record detection
When a form is submitted, the add-on can check your Salesforce account for an existing record that matches the data being sent. If a duplicate Lead or Contact is found, the add-on flags it and creates a Salesforce task for review rather than writing a second record and corrupting your CRM data.
Duplicate detection is configured per field in the field map. Enable it on the email field, the phone field, or whichever field your organization treats as the unique identifier for a record.
Salesforce Campaign linking
Associate form submissions with a Salesforce Campaign so every new Lead or Contact carries marketing attribution from the moment it enters your CRM. This is particularly useful for teams running paid campaigns, email sequences, or event registrations who need to track which marketing effort drove a conversion without manual tagging after the fact.
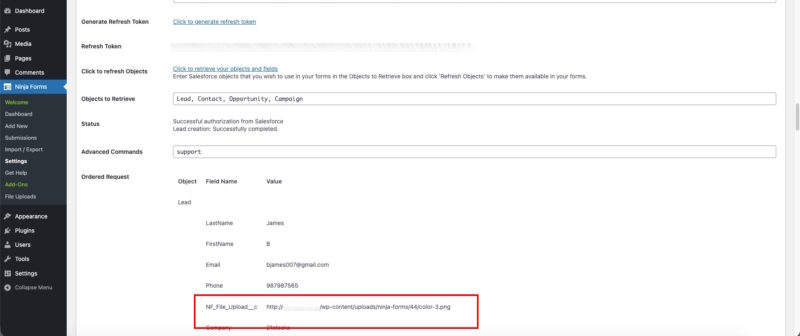
File upload support
Automatically send file upload links from Ninja Forms submissions straight to Salesforce. Works alongside the Ninja Forms File Uploads add-on. If your intake forms collect supporting documents, ID photos, or signed agreements, the direct file links are available in Salesforce with the rest of the submission data.
Sandbox and test environment support
Before you deploy a new form or change your field mapping, connect to a Salesforce sandbox environment to test your configuration without touching production data. Sandbox support is fully documented with step-by-step instructions for setting the correct OAuth endpoint, adjusting your External Client App callback URL, and authorizing the test connection. Switch between sandbox and production by updating a single setting, no separate plugin install required.
Every submission becomes a Salesforce record
Map form fields to leads, contacts, opportunities, or any custom object with no code, so each submission lands in the right place the moment it is sent. Add it to your cart and send submissions straight to Salesforce.
Backed by priority email support and a 14-day money-back guarantee.
Why This Beats Salesforce Web-to-Lead
Salesforce’s built-in Web-to-Lead generates a raw HTML form you paste onto your site. It works for the simplest case: one form, one Object, basic fields. But it comes with real constraints that affect most organizations using WordPress seriously.
- No conditional logic: Web-to-Lead sends the same fields to everyone. Ninja Forms lets you show or hide fields based on previous answers, and send only the relevant data to Salesforce.
- No file uploads: Web-to-Lead cannot attach documents to a Lead. The Salesforce CRM add-on can send direct file links to the record.
- Daily lead limits: Salesforce caps Web-to-Lead submissions at 500 per day. The add-on uses the API directly, so no cap applies.
- Single Object only: Web-to-Lead creates Leads. The add-on maps to any Object: Contacts, Opportunities, Accounts, or custom Objects.
- No duplicate detection: Web-to-Lead creates a new Lead every time. The add-on can check for existing records and create a review task instead of a duplicate.
- Raw HTML, no form builder: Web-to-Lead gives you markup to style yourself. Ninja Forms gives you a drag-and-drop builder, pre-built templates, multi-step forms, and every other form feature you already use.
Which Salesforce Editions Work With This Add-On
The Salesforce CRM add-on uses the Salesforce API, which requires API access to be enabled on your Salesforce account. API access is included by default on Enterprise, Unlimited, Developer, and Performance editions. If you are on a Professional or Essentials edition, check with your Salesforce account representative about enabling API access before purchasing this add-on.
Common Use Cases
- Capture leads directly into Salesforce without manual entry: Replace copy-paste from email or spreadsheet with automatic Lead creation on every form submission. Start with a pre-built lead generation form template or build your own.
- Create Salesforce Contacts from event registrations: Route event sign-up data to your Contacts Object rather than Leads, keeping your CRM organized by how the person relates to your organization.
- Route sales inquiries to Opportunities: Map a “Request a Quote” or “Talk to Sales” form directly to an Opportunity record so your sales team can work the deal from the moment it’s submitted.
- Track marketing attribution with Campaign linking: Tie every form submission to the Salesforce Campaign that drove it, giving your marketing team clean conversion data without post-submission tagging.
- Replace Web-to-Lead for high-volume sites: Bypass the 500-submission daily cap and gain conditional logic, file uploads, and multi-step form support that Web-to-Lead cannot provide.
- Collect documents alongside intake data: Use the File Uploads add-on together with Salesforce CRM to send signed agreements, ID photos, or supporting files directly to the related Salesforce record.
Stop re-keying leads into Salesforce by hand
A contact form or quote request comes in and the record is already in Salesforce, mapped to your pipeline and ready for follow-up before anyone opens a spreadsheet. Add it to your cart and close the gap between form and pipeline.
Priority email support and a 14-day money-back guarantee included.
Frequently Asked Questions
-
Install the Ninja Forms Salesforce CRM add-on, create an External Client App in your Salesforce account, and enter your Consumer Key and Consumer Secret in the Ninja Forms settings. Authorize the connection via OAuth, retrieve your Objects and Fields, then map your form fields to Salesforce inside the Ninja Forms builder. No code required at any step.
-
Ninja Forms has a dedicated Salesforce CRM add-on that connects directly to the Salesforce API. It supports visual field mapping, multiple Salesforce Objects (Leads, Contacts, Opportunities, Accounts, and custom Objects), duplicate detection, Campaign linking, and sandbox testing, all without writing code.
-
Yes. Add the "Add to Salesforce" action to any Ninja Forms form, select the Lead Object, and map your form fields to Salesforce Lead fields. Every submission creates a new Lead record automatically. You can also enable duplicate detection to avoid creating duplicate records when the same person submits more than once.
-
Ninja Forms Salesforce CRM add-on is a dedicated integration that supports multiple Salesforce Objects, visual no-code field mapping, OAuth 2.0 authorization, duplicate detection, and sandbox testing. It works with any form you build in Ninja Forms, including multi-step forms and forms that use conditional logic or file uploads.
-
Yes. The add-on supports any Salesforce Object your account has access to, including Contacts, Opportunities, Accounts, and custom Objects. Select which Objects to retrieve in the settings, then map your form fields to whichever Object your workflow requires.
-
No. Web-to-Lead is a native Salesforce feature that generates a basic HTML form. It is limited to the Lead Object, caps submissions at 500 per day, and does not support conditional logic, file uploads, or duplicate detection. The Ninja Forms Salesforce CRM add-on uses the Salesforce API directly, supports any Object, has no submission cap, and works with the full Ninja Forms feature set.
-
No. The entire setup uses OAuth 2.0 authorization and a click-to-map interface inside the Ninja Forms builder. You create an External Client App in Salesforce, enter your credentials in WordPress, authorize the connection, and map your fields. Step-by-step documentation covers each stage. No code, no plugins beyond the add-on, no developer required.
-
The add-on uses the Salesforce API, which requires API access. API access is included by default on Enterprise, Unlimited, Developer, and Performance editions. Professional and Essentials edition users should confirm API access with their Salesforce representative before purchasing.
-
Licenses are subscription based and will auto-renew each year unless cancelled. If cancelled, you may still use your extensions but will no longer receive important updates or support once the license expires.