More Opens, Clicks and Sales
Connect your forms to Mailchimp and drive revenue with every submission. Email & SMS marketing minus the learning curve.
Risk-Free 14 Day Guarantee
You'll love it or we'll refund you fully. No questions asked.
Your Mailchimp WordPress plugin should do two things well: connect without hassle and give you enough control to build the signup experience your audience actually deserves. The Ninja Forms Mailchimp add-on does both, turning any form on your WordPress site into a direct pipeline to your Mailchimp audiences.
With the Mailchimp add-on, you can:
Key Features
Connect Any Form to Mailchimp
Add a Mailchimp action to any WordPress form and send subscriber data to your Audience with every submission.
Map Fields & Merge Tags
Send exactly the right data to the right Audience fields using Mailchimp’s native merge tag system.
Add Tags Automatically
Assign one or more Mailchimp tags to new subscribers at the moment of form submission.
Interest Group Routing
Place subscribers into specific Mailchimp Interest Groups based on the form they completed.
Built-in Opt-in Field
A dedicated Mailchimp Opt-in field lets visitors choose to subscribe without any conditional logic setup.
Double Opt-in Support
Enable confirmation emails so every subscriber on your list actively chose to be there.
Key Features of the Mailchimp Add-On
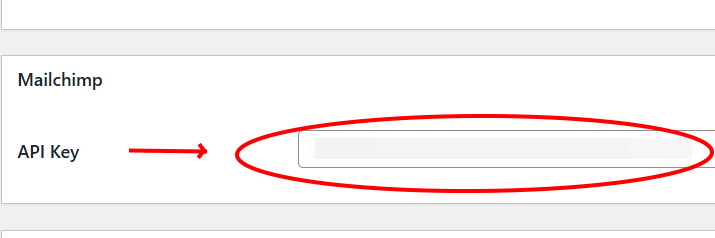
Simple API connection and fast setup
Getting started takes minutes. Paste your Mailchimp API key into Ninja Forms settings, choose your audience, and your WordPress form is connected. A pre-built Mailchimp Signup Form template is included so you can launch immediately without building from scratch.
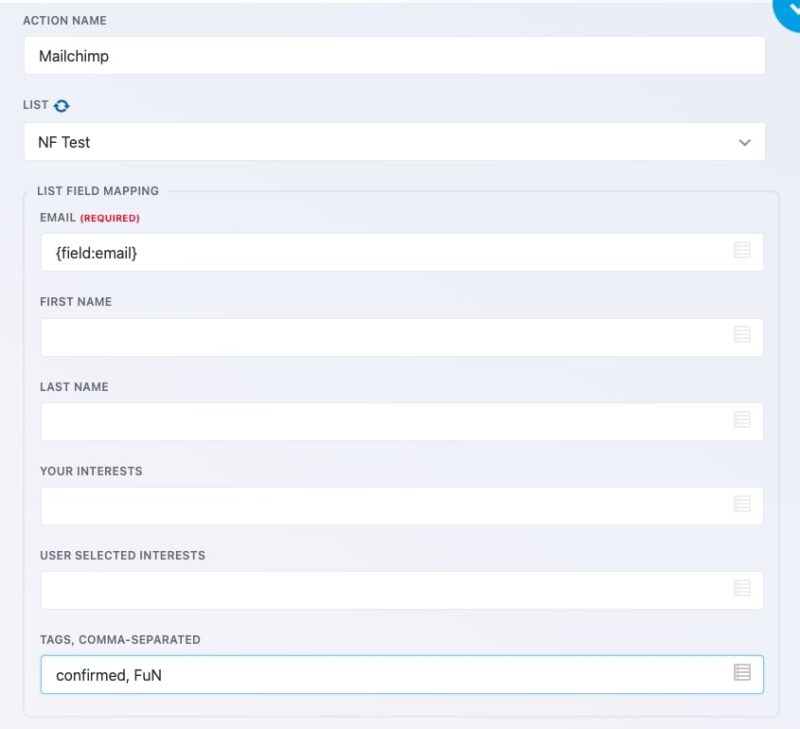
Audience field mapping with merge tags
Map any form field to the corresponding field in your Mailchimp audience using merge tags. Need to collect more than just a name and email? Create custom audience fields in Mailchimp and they will appear automatically in the mapping interface once you resync. Checkbox list, radio list, and select fields are also supported for more complex data collection.

Tags support
Assign one or more tags to every subscriber who submits your form. Tags are entered as a comma-separated list in the Mailchimp action settings and must match tags you have already created in your Mailchimp account. This makes it easy to segment new subscribers the moment they sign up, without any extra steps in Mailchimp.
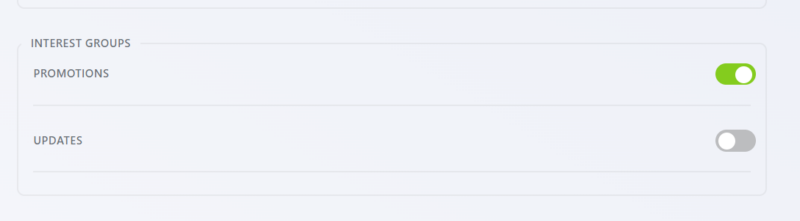
Interest groups
Route subscribers into specific Mailchimp Interest Groups based on the form they submitted. Groups you have created in your Mailchimp audience will appear in the action settings, ready to toggle on. For more advanced routing, you can add multiple Mailchimp actions to a single form and use the Conditional Logic add-on to assign subscribers to different groups based on what they selected.
Mailchimp Opt-in field
The dedicated Mailchimp Opt-in field gives subscribers a clear choice at the point of submission. When the field is checked, the Mailchimp action runs and the contact is added to your audience. When it is left unchecked, the action is skipped entirely. No conditional logic setup required.

Double opt-in
Protect your list quality and stay compliant with email marketing best practices by enabling double opt-in on any form. When this option is turned on in the Mailchimp action’s advanced settings, subscribers receive a confirmation email from Mailchimp before being added to your audience.
Every submission builds your list
Connect any form to Mailchimp and add subscribers automatically, mapped to the right audience and tagged the moment the form fires. Add it to your cart and grow your list with every submission.
Backed by priority email support and a 14-day money-back guarantee.
How the Mailchimp WordPress Plugin Integration Works
The add-on works as a form action inside Ninja Forms. Once you connect your Mailchimp API key, you can add a Mailchimp action to any form on your WordPress site, not just dedicated signup forms. Every time someone submits the form, their information flows directly to the audience you selected.
Field mapping happens through Mailchimp’s native merge tag system. Whatever fields you have defined in your Mailchimp audience will appear in the mapping interface. This means your WordPress forms can send names, email addresses, phone numbers, custom fields, and more, all going to exactly the right place in Mailchimp.
If your audience lists are not showing up after you add your API key, use the refresh icon next to the List label in the Mailchimp action settings to pull the latest data from your account.
Building a Mailchimp Signup Form in WordPress
The fastest path is the included Mailchimp Signup Form template. From your Ninja Forms dashboard, click Add New, select the Mailchimp Signup template, choose your audience, name the form, and click Create. Your form is ready to publish.
Prefer to add Mailchimp to a form you have already built? Go to the Emails and Actions tab in the form editor, click Add New Action, and select Mailchimp from the list. Map your fields, configure any tags or Interest Groups, and save. That form is now synced to your audience with every submission.
Common Use Cases
- Grow a newsletter audience from your WordPress site: Add a Mailchimp action to a simple contact or signup form and start building your list immediately. Start with a pre-built Mailchimp Signup Form template or build your own.
- Segment subscribers at the point of signup: Use Interest Groups and tags to organize new subscribers automatically, so your Mailchimp audiences stay clean without manual sorting.
- Add list opt-in to any existing form: Turn a contact form, event registration, or quote request into a list-building opportunity by adding the Mailchimp Opt-in field. Visitors choose to subscribe; you do not have to change the form’s primary purpose.
- Give subscribers control over what they receive: Map form fields to Interest Groups so subscribers can self-select the topics or lists they want to hear from, reducing unsubscribes.
- Maintain a clean, confirmed list: Enable double opt-in to ensure every address on your Mailchimp audience belongs to someone who actively confirmed their subscription.
- Collect richer subscriber data: Map custom audience fields to form fields to capture job titles, locations, preferences, or any other information your email campaigns need to be relevant.
One form, the right list, no manual import
Send each inquiry, sign-up, or download to exactly the audience it belongs in, tagged and double opt-in confirmed, without exporting and importing a thing. Add it to your cart and keep your list growing on its own.
Priority email support and a 14-day money-back guarantee included.
Frequently Asked Questions
-
Yes. You can add a Mailchimp action to any form built with Ninja Forms, not just dedicated signup forms. This makes it easy to add list-building to contact forms, event registrations, quote requests, or any other form on your site.
-
The Mailchimp Opt-in is a dedicated field type you add to your form. When a visitor checks it, the Mailchimp action runs and they are added to your Audience. When left unchecked, the action is skipped. It requires no conditional logic setup and is the simplest way to make list subscription optional.
-
Yes. You can enable double opt-in in the Advanced settings of the Mailchimp action. When enabled, Mailchimp sends a confirmation email to the subscriber before adding them to your Audience, helping you maintain a clean, engaged list.
-
Inside the Mailchimp action settings, use the merge tag dropdowns to match each form field to the corresponding Mailchimp Audience field. Custom Audience fields you have created in Mailchimp will appear after you resync the Audience list in the action settings.
-
Yes. Tags and Interest Groups you have created in your Mailchimp account will appear in the action settings. Enter tags as a comma-separated list. Toggle on the Interest Groups you want subscribers added to. Tags must match exactly, including capitalization, as they are case sensitive.
-
Click the refresh icon next to the List label in the Mailchimp action settings. This re-fetches your Audiences from the Mailchimp API. If lists still do not appear, confirm your API key is correct and that it has been saved in Ninja Forms settings.
-
Yes. The Mailchimp add-on is included with any Ninja Forms membership plan. It is also available as a standalone purchase if you only need this specific integration.
-
The most common cause is an unmapped required field. If a field is marked as required in your Mailchimp Audience, it must be mapped to a corresponding form field in Ninja Forms. Without that mapping, Mailchimp will reject the submission and the contact will not be added.
-
Licenses are subscription based and will auto-renew each year unless cancelled. If cancelled, you may still use your extensions but will no longer receive important updates or support once the license expires.